

This is a version of the Pop Up Book Fold card, with the addition of a window scene and I'm going to show you how I did it with the photo tutorial below. You can always click on the picture to see a larger version. For those who prefer a video tutorial instead, check out this one by Ann Melvin.


Products I Used:
Silent Night Forest *New
Wintery Village *New
Additional:
Gold foiled snowflake design paper, 12"
Light Pink cardstock, 12" (Bazzil)
Gold foiled cardstock (Recollections)
Pink glittered cardstock (Park Lane)
White glittered cardstock (Park Lane)
Snow-Tex
Design Steps:
Pink Cardstock: CUT at 6" x 12" and SCORE in middle at 6".
White/gold snowflake paper: CUT at 11-3/4" x 5-5/8" and SCORE in middle at 5-7/8".
I then measured in 3/4" on all 4 sides and placed a pencil mark, then I lightly drew lines between each intersecting point to make a large rectangle.
I then CUT on the longest lines and SCORED on the shortest lines.
On the short ends, I measured in 1" from the score line and SCORED between the cut lines.
Next, I measured along the longest edge and placed marks at 3-1/4" at top and at bottom. Then I turned my paper 180 degrees and did the same at the other end. Then I scored from the edge just down to the cut line on all 4 marks.
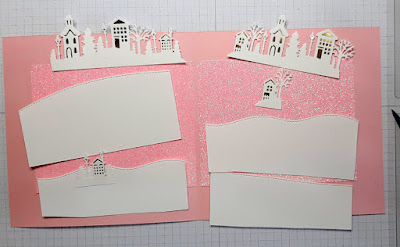
Now it's time to fold and burnish! Use the photo below for reference.
Top & Bottom: Outer score lines are valley folds, middle is a mountain fold.
Middle: Outer score lines are valley folds, next one in is a mountain fold, and the middle is a valley fold.

I then used the 2nd largest of the Pierced Circle Set and cut a circle from the middle of each "book" panel as shown.

From gold foil cardstock, I die cut 2 of the largest die from the Pierced Wide Circle Frame Set and added glue to the outer edge of the backside of gold circles and attached as shown. Set aside.

I cut 2 pieces of pink glittered cardstock at 4" x 5" and attached about 1/16" on each side of the score line, and so that there's equal amount on top and bottom as shown.

I then cut 2 of the Wintery Village die. Then I cut small pieces of gold and glued behind the building and lanterns.

I cut 4 hills for my scenes. Two of them are a li'l shorter and narrower than the back two, which are cut to 5" wide.

THE FUN PART (and slightly messy! Lol)
I added Snow-Tex to the roofs and trees of my villages.

I then built my scenes by gluing the larger hills to the pink c.s. and I added foam tape behind the front hills. I also added foam dots behind the li'l buildings in front

I cut 2 more short hills from the white glittered cardstock and attached behind my circle window panels.
Next, I folded my inner (white snowflake) piece and lined it up with the left side of cardstock so it doesn't stick out of the card. Then I put double sided tape JUST on the short edge and the 2 adjoining sections up to the first score line as shown. Then folded the right side of card over onto it.

I die cut 2 of the Silent Night Forest die and from one of them, I cut the li'l deer out and attached just behind the front hill.

Next, I created a belly band to help hold my card together as it's pretty thick! This is completely optional, especially if you're putting in an envelope.
BELLY BAND:
I cut a gold frame using the largest from the Nested Scalloped Rectangles then, I cut a window from the middle of it using my paper trimmer. I added 1/8" foam strips all along the backside to pop it up.
I wanted my scene on a li'l bit larger piece of cardstock than the inside of my frame, so I cut a piece on my trimmer and attached the Silent Night Forest (I did trim some off the left side so it would fit)

I attached the frame to top.

I CUT a strip of gold cardstock at 2-1/2" x 11"
I CUT a strip of white snowflake patterned paper to 2-1/4" x 10-1/2"
I attached the patterned paper on top of the gold and wrapped it around my closed card (not too tight!)
I then added tape to each end of the band and placed my Silent Night Forest piece on top.
Here are the Products I Used:


THANK YOU for taking time to visit today!
I hope I inspired you to get crafty with your favorite CotageCutz dies!
~Kristine
4 comments:
Wow Kristine- this is so beautiful- your Mom will love it- and you supplied a great tutorial- your work is always amazing
Love this card the color combo and design is beautiful!
Oh wow! This is gorgeous! Thank you for your tutorial. I would like to try my hand at making one :-)
What a pretty card! I love all the details and the how to!
Post a Comment