Sunday, September 30, 2018

Peace Wreath

Hi!

This is Anja again. I have a very simple card for you today. I'm still busy at work, coming home late and lacking time for crafting. Happily things slow down in October, so I'll have more free time.

Sometimes also a simple design can be useful, especially if we have to make a lot of cards and we don't have enough time. So this is quite a simple card to make.


For this project  used:
- Cottage Cutz dies (Grapevine Wreath w/ Bird, Love Peace & Joy),
- Distress Oxides (Antique Linen, Squeezed Lemonade, Faded Jeans, Black Soot),
- white card base (11x11 cm),
- white card stock for die cuts,
- water color paper for background (10x10 cm),
- water spritzer,
- heat gun.

First I made the background. I used Distress Oxides this time and blended the three colors together. I went from light to darker color around the edge of the paper.


The I spritzed some water on top and dried it with the heat gun.
I also used Distress Oxides around the edges of the card base. 


Then I die cut the wreath and the sentiment. I again used Distress Oxides around the edges.


When I had everything colored, I glued the elements on top of the card base.

And my card was finished.


Before I go I want to invite you also on The Scrapping Cottage website to check all the new goodies in the store. Can't wait to try it out.

Have a nice Sunday and see you again next week.

Anja Z.


Cottage Cutz products I used:


Saturday, September 29, 2018

A Spooky Wish Hello

Hello Scrapping Cottage friends! Thanks for taking the time to stop and visit with us today. It's Mary Marsh here bringing you the Saturday edition of the Blog. 

My card today is from the 2018 Halloween release and a sneak peek of the Autumn 2018 release.  There are 10 new designs in the Halloween release. You will find these in the online store at a 25% off sale.
I used the Halloween Ice Cream Cone  and the Fall Phrases dies for my sample today. This die is a sneak peek of the new Autumn release coming soon. So let's get started with some details on how I created this card.

Step 1: I looked through my paper collection for a Halloween themed design. I found this paper that has the title of "spooky night" and I liked the laboratory beakers and flasks on the paper. I thought it would work well with my Halloween themed card. 
I cut both sheets of the patterned paper at 4" x 5 1/4" and then cut on an angle. The panels are joined together with some matching ribbon.
Cajun Card Base: 4 1/2" x 5 3/4"
Orange layer panel: 4 1/4" x 5 1/2"
Patterned Paper: 4" x 5 1/4"
***After I started card assembly, I decided to add another color for my card base. I chose a cinnamon shade for the card base***
Step 2: I cut my ice cream cone in similar colors to the die packaging. The hello word is cut in the Cajun (cinnamon) cardstock. 
I used the Rectangle Set & the Pierced Rectangle dies as a backdrop for my ice cream cone. Stamped my spooky wishes sentiment on the white panel in black ink. 
The ice cream cone is secured with dimensional adhesive and the hello phrase with Ranger multi matte medium.
Step 3: To finish off my card, I scattered 3 black rhinestones. It balanced the image panel nicely.  Attached the panel to the card base with double sided tape. 

Well, that's it for me for this week. I hope I have given you an idea for a way to use these new dies. And, remember they are 25% off in the online store. See you next Saturday!

Dies  I used to create card:

http://www.scrappingcottage.com/cottagecutzrectanglesetbasics.aspx

http://www.scrappingcottage.com/cottagecutzpiercedrectanglesetbasics.aspx


Friday, September 28, 2018

Pumpkin Latte

Happy Friday!  It's Jeanne posting a card today using a super versatile die from the Christmas Part 2 collection.

Before I get to my card I'd like to encourage you to  check out the Christmas Part 3 and Halloween dies that are on sale right now on the website.  Look for samples from the design team coming soon.

Now on to today's card.  I used the Coffee and Cocoa Warm Wishes set.  With all the coffee sentiment stamp sets out there, this die set with it's variety of mugs and cups could be used for virtually any occasion.  Today I went with a fall theme - I love my pumpkin spice!
To make this a fall themed card all I needed to do was change my paper and colors to go along with my pumpkin spice sentiment.
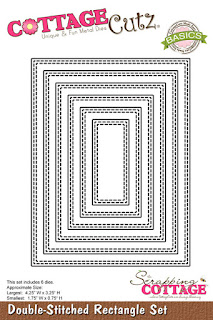
I used three dies (the second and third from largest and the second smallest) from the Double Stitched Rectangle set.
Then I cut the latte pieces from coordinating card stock.
And glued them together.
For the card base, I decided to use a green A2 base.  I don't normally use colored bases much but the color really worked well on this one.  I cut a rectangle from brown card stock 1/16" larger on each side than the leaf rectangle to give it some definition.
I cut a piece of ribbon 15" long and tied it around my leaf panel.
I then assembled the card and used foam dots to pop the latte cup off the orange panel.
This was a super easy card to make but really makes an impact.  Just by elongating one of the rectangles you could use several of the mugs instead of just one.  I LOVE this set!

Dies used:
http://www.scrappingcottage.com/cottagecutzcoffeeandcocoawarmwishes.aspx


http://www.scrappingcottage.com/cottagecutzdouble-stitchedrectanglesetbasics.aspx

Thanks for stopping by - have a relaxing and creative weekend!


Thursday, September 27, 2018

Forest Christmas

Good Morning Scrapping Cottage Friends!

It is Pam sharing with you today!

We are so happy that you stopped by to visit with us today!! I am showing you a die from the Part 2 Christmas release today.  In this release there are 29 different designs and everyone of them is unique and very detailed.

Very soon you will be seeing examples from our Christmas Part 3 and Halloween dies.  These dies are already in the store with a 25% discount!  There is also an exclusive die that can only be purchased through the online store.  So make sure you stop by the store to see our sweet Dakota the Huskey!!

Here is my card for today hope you like it!


Design Steps:
1.  Use an A2 white card base and a slightly smaller piece of red card stock.  Glue the red card stock 
to the base and set aside


2.  Cut a piece of white card stock 4 x 5 1/4 and stamp the background using a forest stamp with Versa Mark.  
 3.  Emboss with white diamond embossing powder set with a heat gun

 4.  Use blue inks and sponge over the embossing.  After completing the inking wipe it off with a paper towel

5.  Use the Merry Christmas w/ Deer Family die and cut out the deer in brown, the banner in red and the fawn and trees in white 
 6.  Ink shadows onto the large deer and color the fawn with a marker and add small white dots to fawn.  Color all of the hoofs black with marker
7.  Add shadow to the birch trees with grey ink
8.  Add the die cut pieces to the background


CottageCutz Products
Thanks so much for stopping by!  And make sure to take some time to be creative!!
Blessings

Pam


Wednesday, September 26, 2018

Group Post w/Christmas Designs

Hello Scrapping Cottage friends! Thanks for taking the time to stop and visit today. We are sampling DT cards from Part 2 of the 2018 Christmas release. There are 29 new designs in this release. 

And, speaking of new releases Christmas Part 3 has just been released along with some new Halloween dies. You will find these in the online store at a 25% off sale. There is also an exclusive die that can only be purchased through the online store. Check out the sweet Dakota the Husky die.

The DT will be showing samples soon with these new dies. Today, we have a group post showing samples from the recently released Christmas Part 2 dies. All the card samples today are ones that could easily be mass produced for Christmas card giving.

Card 1: This first sample is from Jeanne Knobbe. She used the Grapevine Wreath w/ Bird and the Love, Peace & Joy dies to create this soft and serene card. The wreath was colored with Copic markers except for the bird which was left in white. The bird and peace word are covered in two coats of wink of stella for a bit of shine. Notice that she continued the sparkle by layering the image panel with silver metallic cardstock.
Card 2:  Our next sample is from Anja Zurga. She used the Christmas Village 1 & Christmas Village 2 dies to create her beautiful night time scene. The background is sponged with distress oxide inks and then she splashed with a bit of water. She also sponged a little yellow ink to give the effect of a soft glow coming from the buildings.
Card 3: Our next sample is from Janja Albreht. She used the Winter Deer Oval + The Merry Christmas w/Deer Family dies to create her woodland scene. She used patterned paper with a subtle design that gives a beautiful whimsical look to this card. It reminds you of a misty moor. Her oval cut in the medium shade of brown draws your eye right to the deer image.
 Card 4:  Our last sample for today is from Anja Zurga. She used the Peeker Snowmen die to create a beautiful Christmas tag. By using black cardstock as a background it created a dramatic look for her sweet snowmen. The sentiment in white ink gives a chalkboard look to her tag. Wouldn't a tag like this look great on that special Christmas present. It's a gift in itself.
That's our samples for today. Hope the team has given you some new ideas for using these fabulous Christmas dies. 
 
Dies used to create samples:
http://www.scrappingcottage.com/cottagecutzgrapevinewreathwbirdelites.aspx
 
http://www.scrappingcottage.com/cottagecutzchristmasvillage1elites.aspx

http://www.scrappingcottage.com/cottagecutzchristmasvillage2elites.aspx
 
http://www.scrappingcottage.com/search.aspx?find=winter+deer+oval

http://www.scrappingcottage.com/search.aspx?find=Merry+Christmas+Deer
 
http://www.scrappingcottage.com/search.aspx?find=peeker+snowmen