Tuesday, August 31, 2021

Merry Christmas

Hello Scrapping Cottage friends! Thanks for taking the time to stop and visit with us today. It's Mary Marsh here bringing you the Tuesday edition of the Blog.

IT'S NEW RELEASE TIME! The Scrapping Cottage has just added a new brand to the company line. Lil' Bluebird Designs is being introduced with 16 new Photopolymer Clear Stamp Sets and 16 coordinating dies. There are stamps for so many of your card making occasions and then some. The coordinating dies just make it a perfect fit for your card making designs.

They are currently on a great bundle price at 40% off and the individual dies are 25% off.

And speaking of new releases, we have just introduced new CottageCutz Sentiments with Shadows. There are 12 phrases in this new release and you can pick the bundle up at a 51% savings or the individual dies at 25% off.
The shadow dies are so popular right now and they coordinate so well with the new Lil' Bluebird Stamps and dies.

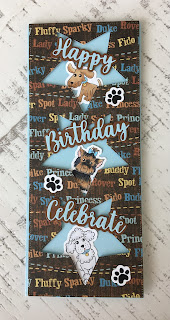
Today for your viewing pleasure I am featuring the new Forest Friends Stamp & Die set. When I saw the cute little deer image, the birch tree and the pine tree in this set, I thought it would make a cute Christmas card. So that's the direction I took. I like it when stamps and dies can be multi-seasonal. 

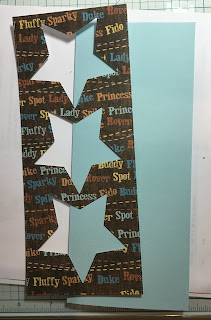
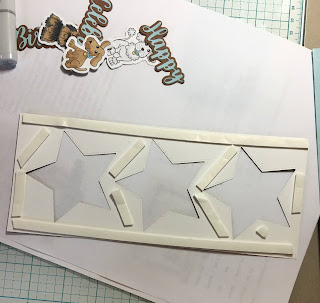
I stamped the images and colored with alcohol markers. For the birch trees I just added a little shading with a light gray Prismacolor pencil. The snowbanks are cut from the Hills slimline die. 

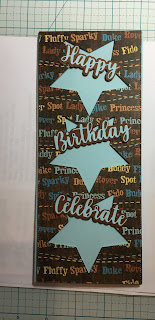
Used some snowy designer paper for my background. Stamped the merry christmas greeting and this card is finished. I hope I have given you another idea for a way to use these new Stamps & Dies. 

That's it for me for this post. See you again on Saturday!

Stamps & Dies I used to create card:


Sunday, August 29, 2021

We've Moved

It's Anja here. I have a simple card for you today. I used one of the new stamps sets and made a neighborhood.


For this card I used:

- Cottage Cutz dies (Home Sweet Home Stamp Set, Nested Rectangles Slimline),

- Distress Inks

- Faber Castell Polychromos Color Pencils,

- red card stock for background (22x9 cm),

- white card stock for die cuts and card base (22,5x9,5 cm),

- black pigment ink,

- acrylic block,

- post it stickers,

- scissors,

- paper glue. 


First I stamped the houses on white card stock. I used black pigment ink.

Next I colored the scene using color pencils.

Then I stamped another set of houses and other elements on the post it stickers. I cut it out with the scissors and used it as a mask. I used Distress Inks to color the grass and the sky. 

Next I removed the masks and cut the scene out. I used the largest die from the slimline set. I also cut the red card stock using a paper trimmer.

Last I stamped the sentiment and cut it. 

I glued all the background pieces to the card base and added the sentiment. And my card was done. 


And that's all from me for today. Before I go I want to invite you to The Scrapping Cottage online store to check the new Sentiments With Shadows release.
 
Have a nice week and see you again on Sunday.

Anja Z.


Cottage Cutz stamps and dies I used:


Saturday, August 28, 2021

Fun Birthday Wishes

Hello Scrapping Cottage friends! Thanks for taking the time to stop and visit with us today. It's Mary Marsh here bringing you the Saturday edition of the Blog.

IT'S NEW RELEASE TIME! The Scrapping Cottage has just added a new brand to the company line. Lil' Bluebird Designs is being introduced with 16 new Photopolymer Clear Stamp Sets and 16 coordinating dies. There are stamps for so many of your card making occasions and then some. The coordinating dies just make it a perfect fit for your card making designs.

They are currently on a great bundle price at 40% off and the individual dies are 25% off

And speaking of new releases, we have just introduced new CottageCutz Sentiments with Shadows. There are 12 phrases in this new release and you can pick the bundle up at a 51% savings or the individual dies at 25% off
The shadow dies are so popular right now and they coordinate so well with the new Lil' Bluebird Stamps and dies.

Today for your viewing pleasure I am featuring the new Happy Birthday Stamps & Dies + the Kitty Love Stamps and Dies. I used the sets to create a birthday card. I like to have birthday cards on hand to send out to my family and friends. I have a large extended family so I am always in need of cards. So let's get started with some details on how I created my card.

Design Steps:

Having a layout in mind at the card start is always a big boost for me. That way I can just choose the card colors, and I am good to go. I liked this week's sketch #868 from Splitcoaststampers. I thought it was a great layout to use several of the stamps. 
After many attempts to use designer paper for my image panel, I finally gave up and decided to keep the background white. It just seemed to busy with any of the patterns I tried to use in addition to the circles. 

Light Purple Card Base: 4 1/4" x 5 1/2"
White image panel: 4 1/8" x 5 3/8"
Light Purple Circles: 1 5/8" (I used the 4th largest Circle Set die) 

Next, I stamped, colored and die cut the birthday images. I used alcohol markers to color.
Photo of the alcohol marker colors I used for coloring. 
Now I am ready to start card assembly. I attached my images to the circles with dimensional adhesive. Then the circles are attached to the white image panel with double sided tape. 
The birthday swag banner & the happy birthday phrase are both attached with dimensional adhesive. 
I added some sequins to the card. I just didn't like the empty white space. I am not a clean and simple stamper (lol)!!! The image panel is attached to the card base with double sided tape to finish off my card.

Well, that's it for me for this week. I hope I have given you an idea for a fun way to use these new dies. I am really enjoying coloring the images. See you on Monday with another card sample.

Stamps & Dies I used to create card:


Friday, August 27, 2021

Hello My Finned Friend

Happy Friday!  It's Jeanne bringing you the Friday edition of the blog.  My card features one of the new stamps from Lil' Bluebird Designs and one of the new sentiment with shadows dies.  Right now both of these releases are on sale for a limited time!

I started by coloring the cat and fishbowl from the Kitty Love stamp set and cutting the Hello using the Hello with Shadow die.

I used mostly Spectrum Noir Tri-Blend markers with a few Copic markers.


Next I cut an A2 panel from patterned paper and a scalloped circle using the second largest of the dies and a stitched circle also using the second largest of the dies.

To get my ombre panels I first colored the whole circle using Distress Oxide ink and a blending brush.

I then used the Hills Slimline die to cut a curve about 1/3 of the way from the top.  Setting the top portion aside, I inked the rest of the circle.  Then I cut another curve, set the upper portion aside and inked the bottom portion. This gave me three gradated panels for my circle.


I turned them over and used double sided tape to hold them together.  This allowed me to flip them over  and glue them as one piece to the scalloped circle.


 I used a coordinating ribbon on the left side of the panel.

Using foam tape I popped up the circle over the ribbon.

I added my kitty, the sentiment and a few enamel dots to finish it off!  I hope you've enjoyed my card today.  Be sure to visit the online store to check out these and other stamps and dies from the new releases!

Products used:


Thanks for visiting today!  I hope you have a fun creative weekend!


Thursday, August 26, 2021

You Are Pawsome!

 Hello Scrapping Cottage Friends

It is Pam sharing with you today!

WE HAVE A NEW SENTIMENT PHRASES WITH SHADOWS RELEASE!!! You can pick up the entire bundle for an amazing 50% savings!! Or you can select individual dies at a 25% savings.  These dies have a wonderful font and look perfect with the Lil' Bluebird stamps!

I am using both the new release phrase dies and the Lil' Bluebird Puppy Love Stamp Set.


Designer Steps:


1.  Using the Happy Birthday w/Shadow and the Celebrate w/Shadow cut them out of blue and brown card stock as show above.  Glue the words to the shadows
2.  Using the Star Windows Slimline die cut out a piece of DP.  Also cut out a slimline card in blue card stock
3.  Stamp your images using the Puppy Love Stamp Set.  Use the colors above to color the stamped images
4.  Use the coordinating dies to cut out the puppy images.  I also cut out 3 paws that I colored in black
5.  Take the piece of DP that you cut out with the Star Slimline die and place dimension tape on the back and then pop it up onto the blue slimline base
6.  Also use some dimension tape on the back of the words and place them on the card as shown above
7.  Glue in the pups and add the paws and your card is complete

CottageCutz and Lil' Bluebird


Thanks so much for stopping by and make sure to check out the new Phrase with Shadow dies.  They are a must have and can be used so many times on your wonderful creations!

Blessing and Take Care
Pam