Monday, September 30, 2019

Rejoicing in Christ

Good Morning Scrapping Cottage Friends!

It is Pam on the blog with you today.

Each of the design team is creating a card to share on Mondays.  So please be looking for this extra treat and inspiration.  Today, I chose to use the die called Manger Scene. It is so simple to make multiple Christmas cards fairly quickly and I just love how it turned out!

You can see below that there are very few pieces and just a little layering!  I got this card done super fast and I will probably make at least 15 more!

Hope you enjoy this extra inspiration card.  I loved making it!

CottageCutz New Die

Don't forget to check out the new Christmas release.  There are 25 new designs to select from!  You are going to love it and the detail is unbelievable!

Blessings


Pam

Sunday, September 29, 2019

Christmas Scene

Hi!

It's Anja here. I got a full package of new Christmas dies and finally started creating with it. Today I have my first Christmas card for this season for you to see.


For this card I used:
- Cottage Cutz die (Santa Over Christmas Town, Circle Set),
- Distress Inks,
- white card base (15x15 cm),
- white card stock for die cuts,
- watercolor paper for background (14,5x14,5 cm),
- colored paper for die cuts (yellow, grey, green, black),
- perfect pearls,
- white pigment ink,
- colored sprays (shades of blue),
- masking tape,
- heat gun,
- scissors,
- artificial snow (dry),
- paper glue.

First I cut the houses out of white card stock. I glued piece of yellow and grey paper on the back.


Next I cut the trees from green card stock.


Then the Santa and his reindeer out of black card stock.


Then I cut the snowflakes and spritzed it with mix of water and perfect pearls powder to give it a bit of shine.


Then I started on he background. I used watercolor paper and spritzed it wit acrylic sprays. I dried the paper with the heat gun.


Next I used perfect pearls and dried it again.


When I had my background colored I trimmed it and cut a hole out for the moon. I colored around the hole with white ink. I also cut a piece of white paper for the ground. I used scissors for cutting this time.


Then I arranged the card together. I used glue for all the parts of the house and trees where there should be snow. On top of the glue I sprinkled artificial sow and let it dry.


And my card was done.


That's all from me for today.

Have a nice Sunday and see you again next week.

Anja Z.


Cottage Cutz die I used for this card:


Saturday, September 28, 2019

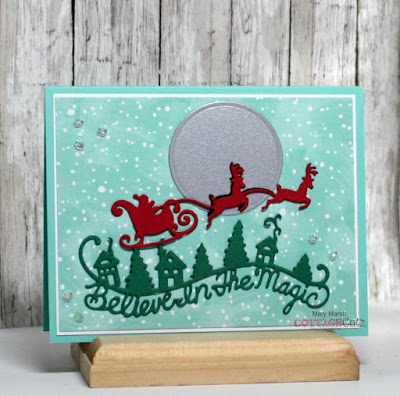
Believe in the Magic


Hello Scrapping Cottage friends! Thanks for taking the time to stop and visit with us today. It's Mary Marsh here bringing you the Saturday edition of the Blog. 

We have the new release of 25 Christmas dies in the online store and they are all available for shipping It's already the end of September and time to start thinking about Christmas cards. 

This release has something for everyone. So if you prefer a more religious tone to your cards- we have you covered. If you like a more whimsical design featuring Santa, reindeer, snowmen, penguins or penguins, you will find some really cute dies.

I actually do a combo of religious and whimsical for my Christmas cards. Today, for your viewing pleasure, I am going whimsical with the new Believe in the Magic die. So let's get started with some details on how I created my card.

Step 1: I wanted a card that was more on the clean & simple side and one that could easily be mass produced. I also just bought some new Christmas designer papers and was anxious to use them. I selected this pattern because of the snowy background and the softness of the colors. The coordinating colors are white and coastal cabana. 

card base: 5 3/4" x 4 1/2"
white layering panel: 5 1/2" x 4 1/4"
designer paper layer: 5 3/8" x 4 1/8"

Next, I cut the images in real red and shaded spruce cardstocks. For the moon, I used the 5th largest die from the circle set (2") and cut in a metallic silver cardstock. 
Step 2: I am ready to start card assembly. The layers are attached with double sided tape.
And, the die cut images with Ranger multi medium matte. This one dries clear which is why I like to use it. I wanted to create a partial reindeer shadow in the moon so I cut just one reindeer in black cardstock and did a slight offset.  
To finish off my card, I attached the image panels to the card base and added a few sequins for added interest. 

I hope I have given you an idea for a way to use this die and make a quick card for Christmas. That's it for me for today - see you next Saturday! 

dies I used to create card:


Friday, September 27, 2019

Birthday Melody

Happy Friday!  It's Jeanne today and I have a birthday card for you that is made with one of the new Christmas dies.  I have a real need for birthday cards with 20 people in my family (and that is only on my husband's side!)  Add to this my side of the family, then friends and well....you understand.  I make them whenever I can.
This card features the singing penguins from the Penguin Carolers die and uses a sketch from Splitcoaststampers.
I switched up the sketch a bit to accommodate my sentiment but it is very close.  I started the card by die cutting my penguins in black and white cardstock.  (Don't the little black penguin bases look like ghosts?  I'm thinking about how I could use these for Halloween!)
I colored the beaks and feet using a Copic marker and colored the eyes with a liner pen.  Then I assembled my penguins.
For the card itself I cut an A2 card base from Crushed Curry cardstock and two strips, one 2.875 x 5.25 inches and one .875 x 5.25 inches out of coordinating DSP.  I really like this paper as I felt the colors went perfectly with the colors of the penguins!
The ovals are cut from Whisper White using the second smallest of the Stitched Ovals dies.
I glued the panels and penguins to the card base; the smallest penguin is glued higher up in the oval so there is room for my sentiment strip.
My sentiment strip is .375 x 3.625 inches.  Originally I was going to use pink but decided on the green as a more neutral color.
To finish the card I popped the sentiment up using foam dots and added a few star sequins.  I love getting multiple uses out of my dies.  These cute little guys are perfect for Christmas or anytime of year!

Dies used:
http://www.scrappingcottage.com/cottagecutzpenguincarolers.aspx

http://www.scrappingcottage.com/cottagecutzstitchedovalsetbasics.aspx

Thanks for stopping by  today.  I hope you have a fun and creative weekend!

Thursday, September 26, 2019

Christmas Night

Hello Scrapping Cottage Friends!

It is Pam creating with you on the blog today.

I have another Christmas card today.  I am excited to get a head start on my cards this year.  And what a better way to do it then with this adorable new release.  The dies are just all so detailed and fantastic!  Today I am using the Santa Over Christmas Town die and I just love it!


Design Steps:

 1.  Cut all of the pieces using the Santa Over Christmas Town in white card stock
 2.  Line the back of the windows in a pale yellow card stock.  I just taped the piece behind the windows
 3.  Use a A2 white card base, cut a mint colored large rectangle frame using the Stitched Wide Rectangle Frame die, cut a piece of white for the snow 4 x 1 1/2 and a piece of DP with snowflakes
3 1/2 x 4 1/2
 4.  Attach the Snowflake DP to the center of the card base front and then add the frame using dimension tape
5.  Place the snow at the bottom of the frame and then arrange the trees and then the house.  Last place Santa and the snowflakes at the bottom of the frame


CottageCutz Products


I am so glad that you dropped by to take a peek!  Please check out the fabulous dies we have for Christmas.  It is an awesome collections!
Blessings
Pam