Friday, October 30, 2009


Firstly I would like to start off by wishing our Blog readers a ‘TERROR’IFIC AND ‘SPOOK’TACULAR HALLOWEEN.


Being Halloween today, I thought this was the perfect opportunity to use my CottageCutz Halloween dies again. I decided to do another Halloween layout this week, but I didn’t want to try cram everything into one page, so decided to spread it out over a 2 page layout.


For this layout I used the following COTTAGECUTZ DIES:-
COTTAGECUTZ Witch On Broom CC4x4-082-D,
COTTAGECUTZ Haunted House CC4x4-074-T,
COTTAGECUTZ Spider from Witch Hat CC3x3-017,
COTTAGECUTZ Skull MINI,


I also used the following QUICKUTZ DIES:-
QUICKUTZ Snake QK-E-0761,
(The Scrapping Cottage has a very limited number of these never released SNAKE QK-E-0761 & LIZARD QK-E-0760 dies for sale in their store for only $7.99 each OR $12.95 for BOTH, and that includes a free CottageCutz MINI die of your choice. Have a look at THE SCRAPPING COTTAGE for these great bargains - They would make a great addition to your Quickutz collection.)
QUICKUTZ City Skyline Border die CC-BDR-040,
QUICKUTZ Suburban Skyline Border die CC-BDR-038,
QUICKUTZ Fence Border die CC-BDR-041,
QUICKUTZ Bats REV-0241-D,
QUICKUTZ Sign RS-0265,
QUICKUTZ Broom RS-0578,
QUICKUTZ Trick-or-Treat pumpkin KS-0885,
QUICKUTZ Cauldron KS-0577,
QUICKUTZ Witch RS-0184,
QUICKUTZ Spider web C-0088-S-REV,
QUICKUTZ Haunted Mini Alphabet Set 4x8-HAUNTED-M,


Something to Crow About!

The Scrapping Cottage has given all
of us something to crow about! These
two country cuties are so adorable
to highlight pages, decorate cards,
add the finishing touch to gift bags,
and adorn whimsical, little tags!!!!


This fun little die is very detailed
and yet so easy to put together!


Go to the Scrapping Cottage the way
the Crow Flies and gaze at their fall and
Christmas collections of incredible dies!

Wednesday, October 28, 2009

Fun and Quick Photo Book

Normally I am a layout girl, but with Halloween fast approaching, I have been feeling very crafty. I think it must be all the super cute decorations I see as I am driving through my neighborhood. Or maybe it is the stack of adorable Cottage Cutz Halloween dies sitting on my scrapbook table to inspire me every time I sit down to work. Whatever it is, I wanted to create something a little different today.

I purchased some of those $1.00 plastic photograph albums in Walmart the other day to use for brag books. Well, of course the covers that come in those are weird and not very fun. So I pulled out the front piece of paper and covered it up and this was the result...

I used velvety brown paper to cut the piece of caramel for the top of my apple. Then I sprayed it with a mixture of perfect pearls (*tip coming soon!!*) to give it some sparkle like real caramel. Now you just slip the new and improved into the plastic sleeve and voila - quick and easy upgrade to an otherwise boring photo holder. I scanned my new cover so that you could see the caramel apple detail better.

Cottage Cutz dies just make everything better!! Get your orders in now for your Christmas Cottage Cutz dies and be sure to include the Limited Edition Gingerbread House and Christmas Shoppe in your basket! You don't want to miss out on these for sure!

Watch for it Wednesdays!! #32

I actually had a different technique all worked up to share today for my Watch for it Wednesday post, but I decided it was really better suited for a November project so you'll have to wait a few weeks for that one :)

The tip I would like to share today is one that I used just this week and LOVED it! I really like to use buttons on my scrapbooking projects, but I hate having to stop working to thread my buttons each time. So one night this week I was sitting in bed listening to the TV and I decided to grab a handful of buttons and start threading them. Since it is Halloween, I grabbed buttons in Halloween colors and cut some black thread to use inside of them. This was a simple, mindless activity I could do at night when I am too tired to scrapbook but not ready to go to sleep yet.

Today, I was working on a Halloween mini album and I pulled out my little stash of pre-threaded buttons to use. I can't tell you how great it was to just be able to grab a button and glue it on without having to stop and thread it up each and every time wanted to add a button to a page. Plus, I wasn't tempted to just stick them on "naked" to save time because I had already done the work at a more convenient time.

Here is a picture of some of the buttons I pre-threaded to have on hand for my Halloween projects.

You could use this trick with Christmas-colored buttons, too. Just choose a neutral thread color or use a couple of different colors and you'll always have some buttons ready to go!

Tuesday, October 27, 2009

Trick or Treat!

I couldn't resist doing a layout this time since this Trick or Treat die is just perfect for those pictures of your kids ready to go Trick or Treating or just getting back from raking in all that candy. Since my kids are a bit old for Trick or Treating I decided to scrap a picture of my friends two daughters from last Halloween. This makes a great page title.

I cut it out in black and then the stars in purple and added some Stickles to match Amy's sparkly witch hair.

I also used the witch hat die again with the little spider that also has glittery eyes.


I'm sad that Halloween will be coming to a close this week, these dies have been so fun to work with, but never fear there's always a new CottageCutz release near.

Monday, October 26, 2009

Some more cute cards from a blog follower


Luanne R. from Escondido, CA sent us these cute Halloween cards she made from the Halloween CottageCutz dies. Thanks for sharing with us Luanne!

Sunday, October 25, 2009

Cutest Spooks in all the Land!!!
One of our wonderful and very talented
customers sent us this very cute card and
we just had to share it with all of you!


We were blessed enough to also receive this
adorable recipe card with such a friendly little
ghost and a very yummy recipe!

Thank-you Rita for your thoughtfulness and
for your incredible designs. We love your creativity
and how you use our CottageCutz!!

Saturday, October 24, 2009

Hurry!! Don't miss out!!

SPECIAL PRICING ENDS MONDAY!

New CottageCutz Holly Jolly Christmas Release


The response has been overwhelming and the inital pre-order quantities are almost sold out. Order now to have your holiday shapes in time for Christmas.

Pre-Order and Save During our Introductory Pricing Week ...
Special pricing ends Monday, October 26th


All CottageCutz Pre-orders Receive a Free CottageCutz Mini

Friday, October 23, 2009

Which witch is which??


I am so in love with these CottageCutz
because they allow me to make decorations
that I could never buy at a store!


I bought a little black table decoration
with shimmering ghosts all around! I
thought that this would be the perfect
place to launch a new witch!!


I say "new" witch because out of the two
incredible CottageCutz "witch" dies
has come a third enchantress! I combined
elements from each die to make a new
wicked witch of the west!


CottageCutz
Witch on Broom
Witch with Cauldron

Thursday, October 22, 2009

As the Crow Flies...


I love this Creepy Raven from the Halloween Cottage Cutz Release. He is the perfect addition to any Halloween project where you want to add a real spooky touch. Lots of Halloween papers are fun and whimsical and but there are plenty of other Halloween paper lines, where only the spooky will do. So it is nice to have diecuts that coordinate with both.

For this Halloween card, I decided to use some Bazzill Bling cardstock for the Raven's body. The extra bit of sheen and shine really adds to the spooky feel. I also used pop dots behind him to give some added interest to my main character. Otherwise, the tones of the papers are muted for a more eery feel.

It's not too late to order some of the "fangtastic" Halloween Cottage Cutz dies in time for all your Halloween projects and decorations! Visit the Scrapping Cottage today!

Wednesday, October 21, 2009

WATCH FOR IT WEDNESDAY #31

Detailing Diecuts
The CottageCutz broom die was used on this card and boy is it a great die to detail, and easy too! All of the markings you see come through when you cut out the die.


First I took my Copic Ciao markers and colored in the markings on the cut out pieces.

Then I took my Distress Ink and a dauber and shaded around the edges. I used the Scotch Mounting Tape to make this piece raised on the broom.


I glued the pieces together and wallah! You have detailed broom ready for your card, layout or other project. I couldn't resist using this cute little spider from the Witch Hat die...again!

Check back tomorrow for Ruth Ellen's project!


Tuesday, October 20, 2009

WE HAVE A WINNER!

We have reached 500 followers tonight on the blog. The Random Generator picked number.......

220!

Congratulations Theresa Pollack you are the winner of the $250.00 shopping spree!!!!


There are 2 more lucky winners of a free CottageCutz die up to a $19.95 value for leaving consistent comments on the blog.

The winners are:


bluepoohbear75

dragonlady


email Joanne at scrappingcottage@cox.net with your choice(s)

Spoooooky Trees

Shadows of a thousand years rise again unseen,

voices whisper in the trees,

"Tonight is Halloween!"

Dexter Kozen


To make this card I used my brayer and some ink on glossy cardstock to make a night glowing scene. Then I cut out the Cottage Cutz Spooky Tree three times and glued these to my glossy piece. I had to have this cute little CottageCutz ghost peeking out from this haunted forest.

Remember when you are using your diecuts that you can cut it out multiple times and create a scene rather than just using it once.

I was so impressed how this tree punched out. Each piece cut perfectly and I used my paper piercer to help punch out the curly parts of the tree from the cardstock.


Whether you're using these wonderful CottageCutz Halloween dies to make your Halloween projects or saving them for your layouts after the big day you're sure to love them!

Monday, October 19, 2009

Holly Jolly Cottage Cutz Release

The Christmas Cottage Cutz are now available for pre-order!!! I just don't know which ones to order first! But I definitely do not want to miss the limited edition Gingerbread House and Christmas Shoppe!! And of course, now is the best time to start ordering so you can take advantage of the special pre-order pricing!

Go check out all the new Christmas Dies at the
Scrapping Cottage!!

Sunday, October 18, 2009

Only 27 more followers!

This is getting exciting - only 27 more followers and we'll get to have our random drawing for our $250 shopping spree!!!

Win a $250 Shopping Spree at The Scrapping Cottage!

How would you like to win a $250 shopping spree at the Scrapping Cottage? That's right - the winner will get to choose $250 worth of products at The Scrapping Cottage!

Our goal is to reach 500 followers of the Cottage Blog and we need your help.

It's pretty simple. Here is what you need to do:

1) Become a follower of the CottageBLOG. (If you are already a follower you met the first step).

2) Post a link to this contest on your blog. If you don't have a blog you can start one at blogspot.com.

3. Leave a comment on your favorite CottageCutz die with a link to your blog using Mr. Linky so we may visit you.

We will use Random.org to select the winner as soon as we reach 500 followers.

Remember, Mr. Linky is there to help you!


ATTACHING THE FOAM TO YOUR COTTAGECUTZ DIES


Are you like me that sometimes has trouble separating the foam from the backing sheet??? Or are you new to using CottageCutz dies and are not to sure how and where you are meant to use the foam. Well then, this tip is especially for you.
I was just about to foam my COTTAGECUTZ HAUNTED HOUSE die, and thought I would share this tip with you.
Please excuse the dirty nails…. Its just ink – I promise!!!!


STEP 1- Firstly, put the CottageCutz die flat on the table – smooth side down with the picture facing up.

STEP 2- Take the foam that is supplied with the die and hold it so that the foam section is at the bottom and the backing sheet is on top.

STEP 3- Because I don’t have long enough nails to use, I use a pair of fine sharp point scissors to carefully wedge in between the Foam and the backing Sheet. It doesn’t have to go in far, just enough for you to be able to see the foam and backing sheet separate.

STEP 4- While my scissors are still in between the foam and the backing sheet, I very gently slide my scissor blade along until I have made enough of a split to hold just the backing sheet with my fingers and then pull it to separate if from the foam. You can know throw the backing sheet away.


STEP 5– I carefully line up the sticky foam with the picture side of the die and stick them together.


STEP 6- Use your fingers to carefully and firmly push the foam down onto the die and rub gently to make sure its attached properly . A good indication that it is attached properly is once you have rubbed the die, you seen the picture indentation show on the foam.

For those of you that are beginners in the die cutting world of COTTAGECUTZ DIES, I hope this helps. And for those of you that are well educated on the subject, I hope you enjoyed the trip down memory lane.

Click link below to see a short video on how to use CottageCutz products...
http://www.scrappingcottage.com/index.asp?PageAction=Custom&ID=20

Friday, October 16, 2009


Today I would like to share a layout I did of my daughter Emily dressed in a Witches Halloween Costume. I have to say that she did NOT like being dressed as a witch and cried the entire time because in her words “Emmy not a witch, Emmy mommy’s princess”.
Don’t look too closely at her face painting, as my face painting skills are Non Existent. It didn’t help that the Green Face paint turned blue when I put it on Emily’s face – Who knows!!!! I think I will just stick to doing my die cuts and leave the face painting to the kids as I’m sure they would have done a better job.


In this layout I have used the following Dies & Products-

COTTAGECUTZ WITCH LEGS CC3x3-018,
COTTAGECUTZ WITCH WITH CAULDRON CC4x4-079-D,
COTTAGECUTZ WITCH HAT (spider only) CC3x3-017,
COTTAGECUTZ CREEPY TREE CC4x4-080-D,
COTTAGECUTZ GHOST WITH LEGS CC3x3-015,
QUICKUTZ PUMPKIN KS-0969,
QUICKUTZ BATS REV-0241-D,
QUICKUTZ REVOLUTION 4x4 SPIDER WEB
QUICKUTZ HAUNTED MINI ALPHABET 4x8-HAUNTED-M
TIM HOLTZ DISTRESS INKS


We love it when you leave comments as your feedback is very important to us. It helps us know what you do and don’t like, and what you would like to see more of on the Cottage Blog. We are here to help you as much as we can so if you have any questions or suggestions we are happy to try and help you as much as we can.

Thursday, October 15, 2009

Pass the Cheer!!


My dear friend Ann, who is an amazing artist,
gave me the delightful idea of turning a
Starbuck's Christmas sleeve into a work of art!

These sleeves are already so adorable that
when you embellish them with a whimsical
CottageCutz die they become irrestistible!!


Next time you stop by your favorite Starbucks for
a Peppermint Mocha Twist or a Caramel Apple
Spice, grab a sleeve or two....

The Possibilities are Endless!!

If the broom fits - FLY IT!!!

No, you are not seeing things and I did not misspell the word "witch" for my page title. When my oldest daughter was 2, she called witches, "itches". It was really the cutest thing! So, when we found this fancy witch costume, we knew it would be absolutely perfect for her for Halloween. In an effort to not be too scary, we called her a Glitter Witch. The
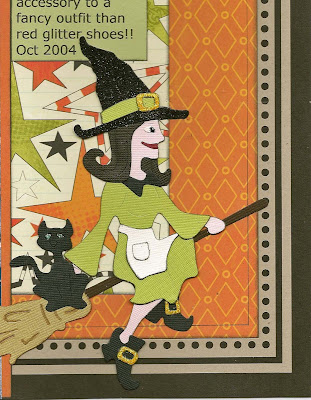
 Cottage Cutz Flying witch is the perfect addition to Halloween pages and projects where you don't want a scary witch! Actually, as I was putting her together, I kind of had the feeling she might be a little bit of a Diva witch with a little outfit tweaking!

Wednesday, October 14, 2009

Watch for it Wednesday #30!

Seeing WHITE!!!!!


I love so many things that are white......
Snowflakes Falling
Baby's Breath in a Bouquet
A Soft Fluffy Pillow
A Warm Cozy Sweater
Twinkling Stars in the Sky
White is a wonderful color and it can make
your paper crafting projects delightful!!!


White embellishes paper in a unique way that
no other color can! It can give a foggy, misty
look and it can make things look weathered.
It can also bring a dark background to life!!

To create this Halloween tag, I used a
variety of white products. The Spider Web
was drawn with Ranger's Inkssentials
White Opaque Pen....one of the best on
the market and available at The
Scrapping Cottage! The edges were
inked with a white ink pad. There are many
great brands and varieties available. I also
used some white chalk on the tag to add
some character and charm!
White is a fun,versatile color
that can bring those dark shades to life!

Tuesday, October 13, 2009

The Witch is in......

I'm loving these Cottage Cutz Halloween dies! I know I've said this before, but I really do love them more and more as I work with these. I love that you if you just want a little spider accent that you can get it off the Witch Hat die or if you just want witch shoes with out the legs you can still get them off the Witch Legs die.

I think as women, wives and mothers we feel like a witch now and then. After all what would our husbands, kids and bosses do without us nagging - I mean reminding them of what they're supposed to do? This card/sign tells it all with a little humor doesn't it?

These are the two dies I used as well as the Quickutz Haunted 4x8 Alphabet.

Rochelle is up tomorrow with Watch for it Wednesday!


Friday, October 09, 2009

Halloween Card


This week I have made a Halloween Card using the
COTTAGECUTZ WITCH WITH CAULDRON CC4x4-079-D,
COTTAGECUTZ CREEPY TREE CC4x4-080-D,
QUICKUTZ BATS REV-0241-D and the
QUICKUTZ FENCE 12” BORDER CC-BDR-041


I have made these COTTAGECUTZ dies up and love the sizes that they are once they are made up.
As you can see in the bottom photo, the made up die cuts are a lot larger then the picture on the front Of the packaging and are the perfect sizes for cards and scrapbooking pages.
Once made up the Witch measures aprox. 5 ½ inches x 3 ½ inches and the tree measures aprox. 5 inches x 4 ¾ inches.