Thursday, June 30, 2022

It is New Release Time!!!

 Hello Friends,

The new release is just plain adorable.  It is called Strawberries and Bees perfect for those fun summertime cards.  For a limited time the entire bundle is 50% off!!   We also have a 4th of July sale with savings up to 70% off!!  Both of these sales won't last long so now is the time to shop until you drop!!

Here is my card using the new release dies Bee Gnome and Bee Phrases.


Design Steps:

1.  Make a slimline base in white 3 1/2 x 8 1/2 cut a piece of yellow card stock 3 1/4 x 8 1/4, use the Honeycomb Background Slimline die and cut it out of white.  Glue the yellow to the base card and then glue the honeycomb on top of the yellow
2.  Using the Bee Phrase and the Bee Gnome dies cut out the following card stock colors: mustard, vellum, white, black, yellow and green
3.  Shade the mustard colored pieces with an orange ink and the face and hands with a pink
4.  Assemble the pieces with a fine tip, quick drying glue

5.  Glue your pieces to the card front as shown above and your card is complete

CottageCutz Products


Here is the new release so please check it out in our store today!!

We have more inspiration on our YouTube Channel check it out HERE
Thanks so much for stopping by!  And I will see you next Thursday.

Blessings and Take Care


Wednesday, June 29, 2022

New Release & Sale


Hello CottageCutz Fans. We have a new release in the online store. It's our Strawberries and Bees release with 16 designs.  You can pick up the entire bundle for 50% off and the individual dies are 30% off. 

The new dies are perfect for all your cardmaking needs. They would work for so many occasions. The DT will begin showing samples tomorrow. 

We are also having a big July 4th sale with savings of up to 70%. So shop early for the best picks.


Reminder: Our YouTube Channel has a new video from Marla Harris. There is a giveaway for being a subscriber, liking the video and leaving a comment. Click here


Tuesday, June 28, 2022

Welcome To Our Home Mini Décor Project

Hello Scrapping Cottage friends!  
Melinda here with you on this Terrific Tuesdie!  Today I am sharing a Patriotic Mini Home Décor project. It features some sweet little cupcakes from one of the dies from the New Sweet Treats Release! 
Here is my project.
I started with a cute little distressed home metal shaped silhouette. I found it at the dollar store.

I created the inner sentiment on my computer. I printed it off on some plain white cardstock. I printed it off on four different sizes as I wasn't sure which size would look the best.


Once I picked the size I felt would work, I used the third largest pierce circle die and cut it out.


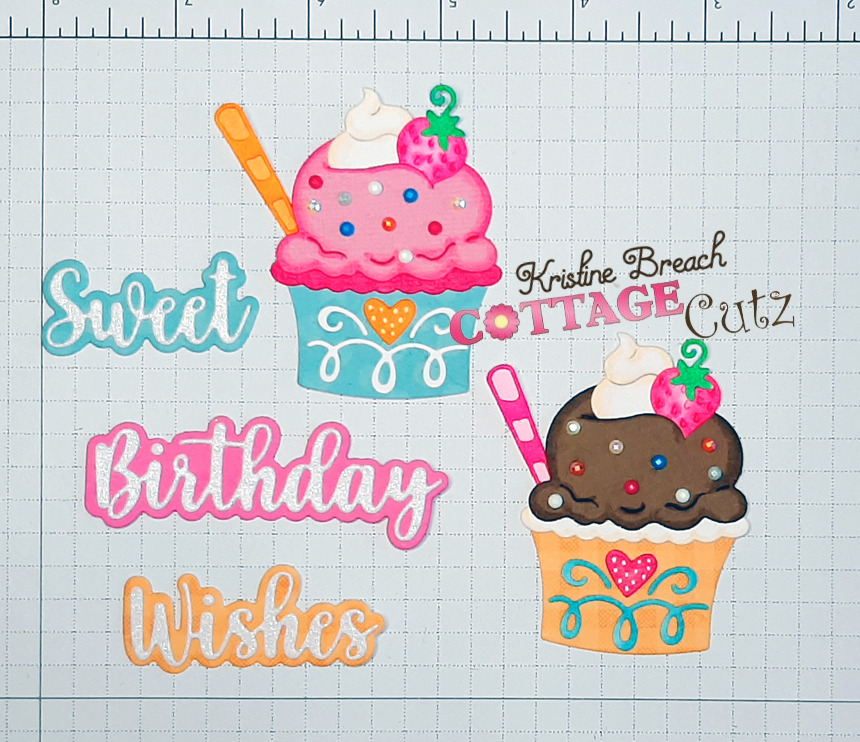
I then cut, colored and assembled some of the sweet little cupcakes from the Pedestal Stand W/ Cupcakes die. I cut all the pieces out in white cardstock. I only had to color in the red and blue pieces. Easy peasy!  I also added some clear stickles to the "stars" on the cupcakes and on some of the white frosting.  I used some red stickles on the berries to give them a little sparkle.

I used some foliage from the Christmas Floral and Lantern With Pine Boughs Dies. I cut them all out in white cardstock as well. I then colored in the little stems with the "holly" berries on them.

I also added a dot of some blue stickles to the centers of the stars on the image. The little bow I added on the chimney is also from the Lantern With Pine Boughs Die.

Here are a couple of closeup photos of the cute cupcakes and foliage. You can see them sitting on the cute base that is a part of the die as well.

I did mount the white pierced circle with the image onto the next size up pierced circle that I used to cut out some Kraft cardstock. I added some foam tape between them to give it all a little lift from the base.

Here it is on my dining room table. I decided I didn't quite like it here. Felt like it got lost in the shuffle....lol.

Here is where I decided to put it. on my table in my entrance. 

Here is the new sweet treats release.

Sweet Treats Release


The Dies I used to create this project:


I also used the Lantern With Pine Boughs Die which is a discontinued die. However both the Christmas Farmhouse Floral and Deer Floral Spray dies both have some great "Holly berry" type alternatives.

Make sure you head over to the CottageCutz YouTube channel and check out all of the amazing projects on there. Our video team is doing a wonderful job of filling the channel with all sorts of creative content! You don't want to miss it!


Well that about covers it for today! Until the next time, have a wonderfully craft-die day!
Melinda Beltran

Monday, June 27, 2022

Candy

Happy Monday everyone.  I am back sharing my Candy Cart card and its all about the hot pink. I wasnt sure how I wamted to make my cart so I diecut it out in a variety of colors. 

This has been my new thing use a nice color variation then I have wxtras to ise on multiple cards.
Finally I decided to go with hot pink, black and siler
mirror paper and I will say I am pleased.
I embossed a piece of 5x7 white cardstock using a wood baclground embossing folder
Then I added some lollipops and a few gifts I didn’t want to crowd my cart with too much stuff 
I hope everyone enjoy my card and thanks for stopping by! 


Sunday, June 26, 2022

Sweet Slimline Birthday

Hello and welcome back ~ it's Kris here on this sweet Sunday... or shall I say sundae? ☺  This week I'm sharing a yummy slimline birthday card using the Ice Cream Sundae die from the new Sweet Treats release, along with some other funtastic CottageCutz dies! 


Design Steps

I cut a piece of pink cardstock to 8-1/2" x 7" & scored at 3-1/2" along the 7" side.

Next, I die-cut a white frame (I used glittery white cardstock) from the Windows Slimline die.

And then I cut 3 pieces of coordinating patterned papers at 2-1/2" x 2-3/4".  


I glued the patterned papers to the back of window frames, and then glued the frame to card base.


Next, I cut all my pieces with the Ice Cream Sundae and sentiment dies and glued together.  
  • The cupcake liners were cut from patterned papers in the same paper pad as my 3 rectangle frame pieces so they coordinate.  I cut the rest of the die out of pink, brown and white cardstock. 
  •  I gave some shadows to the strawberry & chocolate ice cream and colored all other pieces with Copic markers.  
  • The top layers of the sentiments were cut from glittery white cardstock, like the frame.
  • I added some shaker elements to the ice cream for some sparkly "sprinkles"

And to finish the card, I attached all the die-cut elements to my card front using foam dots.  Easy peasy!


Thanks for taking a peek!  Hope your Sunday is extra sweet!

~Kristine


Here are the products I used: