Thursday, October 31, 2019

O Come Let Us Adore Him

Hello Scrapping Cottage Friends

It is Pam creating with you on the blog today!

Our Part 2 of the the Christmas release has 34 new designs everything from Moose to Mangers!  So please take a moment and check out the collections.  I am using the manger scene for today's card.  The name of the die is Nativity w/Donkey.

Design Steps:

 1.  Start by using the Nativity w/Donkey die and cut out the pieces using light yellow, tan, brown, flesh, and grey card stock
 2.  Shade the pieces with your favorite markers.  I used Copics
 3. Using the largest of the Stitched Wide Rectangle Frame set cut out a frame from tan card stock. Set aside and next cut out a piece of white card stock that will tuck just behind the frame.  Using your Distress inks sponge the bottom of the white card stock with yellow and the top with a navy blue
 4.  Use an A2 tan card base and take a distress edging tool to rough up the sides and bottom.  Next use a brown distress ink to ink all the edges of the card.  Also use the brown distress ink to ink the sides of the frame
5.  Glue the yellow and blue white piece to the center of the tan card base.  Then use dimension tape to attach the frame.  Add the nativity scene, your sentiment and star button to the card and it is finished

CottageCutz Products


Thanks so much for stopping by!  I hope you have time to create today!  We would love to see you in the store.   Shopping for dies to use for all those wonderful Christmas cards you create and everyone treasures!

Blessings
Pam

Wednesday, October 30, 2019

Have a Cup of Cheer

Hello!  This is Sukie and today I have a sweet card to share.  Warm drinks remind me of the holiday season which inspired me to create this card.
I used the Warm & Cozy Cocoa die set from the Christmas Part 2 die release to cut out all of the pieces for my card.  The circle is from the Double Stitched Circle Set and was inked to coordinate with the patterned paper.  The sentiment is from the Scrappy Moms (retired) Merry and Bright stamp set. 
The holiday drink paper is such a happy pattern and was the inspiration for my card.  I added some red and white striped paper along the edge for a festive look.  The circle was layered on top.
The cocoa mug was centered inside the circle and the cookies were added as a cluster next to the mug.
Next, I scattered the 3 snowflakes above the cookie mug creating a visual balance inside the circle.
I finished off my card by adding the sentiment flag above the circle with a small bow in Cherry Cupcake Trendy Twine.
Here are the dies used on my card available in the store:

Tuesday, October 29, 2019

Let's Go Sledding!

Hello Scrapping Cottage creative friends!
Janja is here with you with another happy holidays card.

In my opinion, I used one of the cutest dies from the Christmas Part 2 release. I wanted this motif to really stand out so I didn't over-decorate the card.


- blank card: 5.5 x 5.5" (14 x 14 cm), folded
- patterned paper: 5 x 5" (12,7 x 12,7 cm)
- white cardstock: 5.3 x 5.3" (13,5 x 13,5 cm)
- colored cardstock
- colored ink pads
- glue, double-sided adhesive tape, self-adhesive foam pads

Cut moose and gnomes out of colored cardstock. Color the edges with colored ink pads for more depth.


Cut off the patterned paper and cut out the white cardstock frame.


Sometimes I can not find the right paper in my drawers. So, I colored a white cardstock with dark brown and white. I got the aged pink color. 
When the color dries cut out a square in the middle. Keep it slightly smaller than the inside of the frame.


Attach the frame to the cardstock and trim the outer edges with your favorite paper cutter.


Cut a white strip and stamp a sentiment.


Complete the card.


Have a nice day. 
Janja


Monday, October 28, 2019

Happy Holidays

Hello Scrapping Cottage creative friends.
Janja is here to share happy holidays card with you.


- Cottage Cutz dies: Skiing Gnomes, Woodland Cabin (conifers)
- blank card: 5.3 x 5.3" (13,5 x 13,5 cm), folded
- patterned paper: 4.7 x 4.7" (12 x 12 cm)
- craft cardstock paper: 5 x 5" (12,7 x 12,7 cm)
- white cardstock: 4.7 x 1.7” (12 x 4,3 cm)
- colored cardstock
- colored pads
- glue, double-sided adhesive tape, self-adhesive pads

I cut both gnomes out of colored cardstock.


I glued white cardstock to the bottom of the patterned paper and attached conifers. I borrowed them from the woodland cabin die.

I first glued the prepared background to a craft brown cardstock with double sided adhesive tape and then to the front of the card.

Finally, I attached both gnomes with self-adhesive pads and stamped the happy holidays.


See you again tomorrow.
Have a nice day.
Janja


Sunday, October 27, 2019

Under The Mistletoe


Hi!

It's Anja here. I have another holiday card for you. This one is really simple and fast to make, so you can make a bunch of it.


For this card I used:
- Cottage Cutz dies (Holly Mistletoe, Happy Holidays Polar Bears, Oval Set),
- craft card base (10,5x15 cm),
- white card stock for die cuts and background (10x14,5 cm),
- acrylic sprays (shades of green, red),
- vellum,
- double sided adhesive tape,
- heat gun,
- adhesive foam pads,
- paper glue.

First I cut the greenery. I cut two sets and glued it together.


Next I colored it with acrylic sprays and dried it with the heat gun.


Then I trimmed the paper for the background. I cut an oval out of the white paper.


I used double sided adhesive tape to glue the vellum on the card base. For the white paper I used adhesive foam pads.


When the background was adhered I glued the greenery and the sentiment on top. And my card was done.


Thank you for stopping by. Have a nice Sunday and see you again next week.

Anja Z.


Cottage Cutz dies I used:


Saturday, October 26, 2019

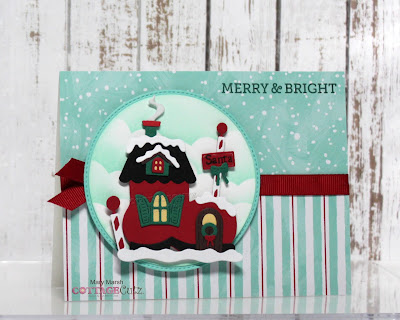
Santa's Workshop

Hello Scrapping Cottage friends! Thanks for taking the time to stop and visit with us today. It's Mary Marsh here bringing you the Saturday edition of the Blog. 

We have the new release of Christmas Part 2 in the online store and they are all in stock and available for delivery. There are 34 new designs in this release. 

This release has something for everyone. So if you prefer a more religious tone to your cards- we have you covered. If you like a more whimsical design featuring Santa, reindeer, gnomes, moose or even a hot chocolate theme you will find some really cute dies.

I actually do a combo of religious and whimsical for my Christmas cards. Today, for your viewing pleasure, I am going whimsical with the new Santa's Workshop die. So let's get started with some details on how I created this card.  

Step 1: I had somewhat of a layout in mind. So I selected my designer papers. I was looking for something bright and festive and I think I found it in these papers. I like the mix of dots and stripes.
White Card Base: 5 1/2" x 4 1/4"
Snowy Designer Paper: 5 1/2" x 2 1/8"
Striped Designer Paper: 5 1/2" x 2 1/8"
I cut Santa's Workshop with a combo of Christmas red and green cardstocks. I stuck pretty much to the packaging colors. I stamped the Santa sentiment on the light post.  Even though there are several pieces to this die, it came together quickly, And, if you were to cut the pieces in white then color it would even be faster.
Step 2: I am ready to start the card assembly. Since I was using ribbon and I didn't want it to show on the inside of the card, I cut another pieces of white cardstock 5 1/2" x 4 1/4". I taped the designer paper to this layer and then wrapped the ribbon. I then attached it to my white card base. It really doesn't add much weight so no issues on mailing.
I wanted the Santa Workshop image on a circle. I used the 2nd largest die from the Circle Set and 2nd largest Stitched Circle dies. I sponged some clouds using a cloud stencil on the white circle in cracked pistachio ink. This color coordinated with my coastal cabana cardstock and designer paper.
I attached the Santa Workshop image using dimensional adhesive.
I attached this image panel to the card base with dimensional adhesive. I cut 2 small tufts of red ribbon and added them to the side. Just for a little card interest.

I wanted a sentiment on the card and my original thought was to stamp on a flag banner. But it just didn't fit this card. So I stamped directly on the designer paper using a spruce ink.
Well that's it for me for this card post. I hope I have given you a bit of inspiration on a way to use this new die. See you next Saturday!

dies I used to create card: