
Here's the inside of my card...

And here's the front...

There are 21 dies in this release and they're currently on sale with a 50% discount on the entire bundle or 30% off individual dies for a limited time ~ so hurry over to the online store to make your selections!!
I used the Spooky Halloween Castle, the Spooky Kitties, Spooky Fence Mini, the Web and Graveyard for the inside of my card - and for the front, I also used Trick or Treat Phrase, and Spooky Truck (just the spider). As always, you can click on the pictures to see them larger. ☺
Design Steps:
I started with a piece of white cardstock cut at 5-1/8" x 3-7/8".
I made a circle stencil from a scrap piece of cardstock by die cutting the 4th largest of the Pierced Circle set from the middle of my paper and alternating the positive and negative die cuts to sponge Distress Oxide inks. I then misted with water and let dry. Then I spattered white paint mixed with a li'l water over the top and heat set it to dry.

I cut my card base from Granny Apple Green cardstock at 5-1/2" x 8-1/2," scored at 4-1/2"
I layered a piece of black cardstock, 5-1/4" x 4" to the inside upper half of my card, then attached my sponged piece on top.
I cut a piece of blue patterned paper at 5-1/4" x 3-1/4" and attached to the lower inside half of card. (see photo below for placement)
I computer-generated my sentiment onto white cardstock, then cut it to 4-3/4" x 2-3/4". I sponged the edges with Rich Razzleberry ink and centered it onto the blue patterned paper.
I then added my black silhouette tree and web to my inked layer before adding the mechanism as it will cover up part of the tree.

Now to make our POP UP feature!
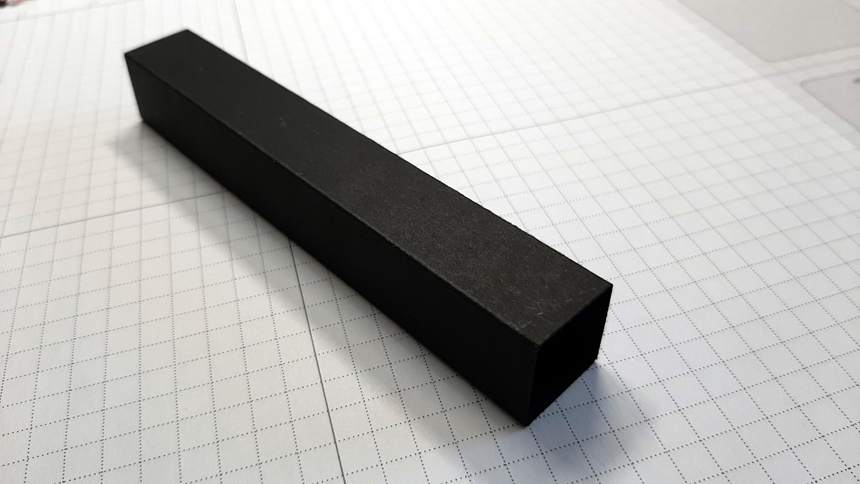
I cut a piece of black cardstock at 5-1/2" x 3-1/2" and then with the short edge along top of score board, I scored at 3/4", 1-1/2", 2-1/4", and 3". Then I added tape to the last 1/2" piece and attached the other end to it to make a long box!
To add it inside my card, I added tape to the bottom side of my box and laid it down so it's just up to the score line w/out going over it. (see photo below)
Then, I added tape to the adjacent side that will be attached to the "Back". Then I closed my card front down over it and pressed. Easy Peasy!!


And then I added all my elements as pictured ☺

For the front, I cut a piece of rainbow glittered cardstock at 5-1/4" x 4". Then added my die cuts and made them pop a li'l with a white gel pen... and DONE!! ☺
PRODUCTS I USED:


Check out the whole HALLOWEEN RELEASE HERE!
I hope I inspired you to get crafty with your favorite CotageCutz dies ~ Have a blessed week ☺
~Kristine
❄❄❄
We are happy to announce that CottageCutz dies will be available for purchase in a boutique in Southern California. If you're in the neighborhood please drop by!
Wild Skyes
42050 Main St.
Temecula CA 92590
❄❄❄

3 comments:
Wow Kris this is a fantastic scene you created- I love all the funfold techniques you bring to us- this one is amazing
Wonderful attention to detail! Love this incredible scene!
What a super fun and COLORFUL card! I love this fun fold!
Post a Comment