Hello CottageCutz friends! Thanks for taking the time to stop and visit with us today. It's Mary Marsh here bringing you the Saturday edition of the Blog.
It's new release time!!! We have new dies in the online store. Our Christmas Part 2 release with 36 new designs is available and ready for shipment. There are 3 different bundles you can pick up at 50% off retail. It's only for a limited time so don't delay. The individual dies are on sale for 30% off. You are going to love all the whimsical designs that are available in this release. There is something for everyone.
And we still have the Halloween release with 22 new designs. They are on a 30% off sale as well. So many fun and spooky designs that are perfect for your Halloween card-making.
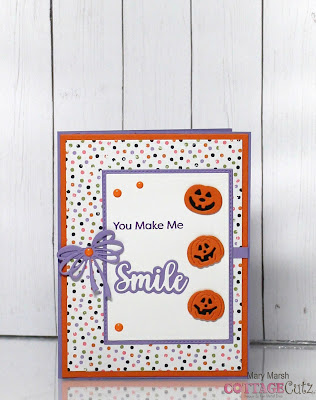
For today's card I am featuring the Spooky Kitties & Cute Witchy dies but just using the smiling pumpkins. I wanted to make a simpler card that would be easy to make multiples of and isn't scary. Maybe you want to send a card to school with your child with a treat attached. Or maybe you're a teacher and you want to give a card to your students. Or you send out cards to your family or neighbors. There are lots of possibilities here.
Design Steps:
I started by selecting my papers from a cute Halloween collection I had from last year. I thought the dotted designer paper would just add to the fun of the card. I paired it with the bright colors that are in the designer paper.
Light purple card base: 4 1/4" x 5 1/2"
Pumpkin layering panel: 4 1/8" x 5 3/8"
Designer paper panel: 4" x 5 1/4"
Image Panel: purple layer - Stitched Rectangle die (2nd largest - 2 7/8" x 3 7/8")
White Layer: 2nd largest Rectangle die (2 3/4" x 3 3/4")
I stamped my sentiment in a grape ink with the help of my MISTI. It did require a 2nd inking. The sentiment had some other words on it that I didn't want to use so I just masked them off and inked the part that I did want. Now that all my elements are prepared, I am ready to start card assembly. I attached the pumpkins to the image panel. I added my smile phrase using the Smile w/Shadow die. This panel was added to the card base with double sided tape. I wanted to add some ribbon to my card but since this is going out in the mail, I knew that would make it a bit bulky. So I added a 3/8" strip of purple cardstock across the panel and then cut the bow from the Halloween Wreath die. To finish off the card, I added a few pumpkin-colored enamel dots.
Well, that's it for me for this week. Make sure you visit again tomorrow; we are having Part 2 of the DT group post. The team has created some great samples.
Reminder: Our YouTube Channel has a new video featuring a princess card using the Halloween dies from Linh Van. There is a giveaway for being a subscriber, liking the video and leaving a comment. Click here.
Dies used to create card:


3 comments:
Your card did make me smile! Cute!
Aww, very sweet and I love the way you used that bow!!
What a happy card! Love it.
Post a Comment