Wednesday, July 20, 2011

Crazy Canuck Alert


Hi Everyone, Erika Taylor here today to share a little about me. First off, I'm super excited to be a part of the Scrapping Cottage design team and I'm so looking forward to working with the entire team, many I've had the pleasure of working with before.

A novel about me...got your morning coffee ready?

I'm a stay at home mom to two very special children. Our little boy is 6 and is filled with wonder, creativity and love. A true gift in every sense with a heart as big as Texas I'm certain. Then we have our little girl of just about 4, who adds to my happy days with her silly sense of humor, love for anything with wings or petals or sparkle and her soft tender soul. I've been married to the handsomest of men Mark, who is a Petroleum Engineer, for 6 years and we currently reside in Southern Alberta.

I've been crafting since I was little and I'm sure my first love was construction paper or Play-doh. About 3 years ago I started crafting cards and now I'm hook line and sinker for so many crafts. Paper crafts, mixed media, altered art and jewelry are the big ones. I love to layer and distress and a little blingage can be found on almost every project.

I'm fortunate to be on quite a few design teams. From Tattered Angels, Nikki Sivils, Basically Bare and Helmar. Now I'm adding a new adventure to the mix. I adore Tiramisu, Italian Sweet Cream and my moms lasagna. I'm a romantic through and through and love poetry and beautiful works of art. I'm most comfortable in a pair of jeans and a t-shirt, although I've got a shoe "thang".

I have always been drawn to mythical things. From King Arthur to Griffins. I collect fairies and my favorite insect is the butterfly. I'm a Twihard and am counting down days until the Breaking Dawn release. My favorite color is Pink and I adore a good Malbec or Merlot.

I can't wait to start sharing my Scrapping Cottage projects with all of you and I hope that you stop by my blog and take a look at what I create on a regular basis. So when you see my name here on the blog, just remember the crazy haired Canadian.

Until next time
Toodles
Erika Taylor


Sew Great!

Good morning!  Kay and I are doing a little switching up today, so while Kay is out of town, I have a card to share with you, and while I'm in Chicago at CHA on Friday, Kay will be here with something wonderful to share.  For this card, I used one of the new Cottage Cutz dies from The Scrapping Cottage, designed by My Little Shoebox.  These adorable dies are made to coordinate with the wonderful papers, stickers, and embellishments that are already favorites of so many.  Adding dies to this already amazing line is a SUH-WEET deal!!

I used the Sewing Machine and Dress Form 4x4 die, and  I cut everything except the dress form with white card stock and colored with my Copics.  For the dress form, I used patterned paper, and just shaded with Copics and highlighted with a white gel pen.  the sentiment is from a set of stickers that coordinated perfectly with this collection from My Little Shoebox.  I actually wrapped the spool of thread with embroidery floss, and threaded it around the machine.  I even added a little hand stitching for added texture and interest.  I really like the way this turned out, and it was "SEW" much fun!!!!  Does anyone else remember sewing machines that were colored similar?  I remember that we had a pink on in my Home Ec. Class.  It's so funny what we randomly remember.

Thanks for dropping by, have a blessed day, and happy crafting!!!


Monday, July 18, 2011

I Like Your Style

Hello friends!  I hope you are enjoying getting to know a little about the new design team members.  I know I am, and how wonderful to have 2 sisters on the same team.  I have 8 sisters and would be thrilled if I had a sister sharing the same passion with me.  Sisters share a special bond!


For today's card I used some of the My Little Shoebox dies, Sewing Notions, and Sewing Machine and Dress Form as well as some of the coordinating paper.  I cut all the die cuts with white cardstock and then colored with my copics, with the exception of the scissors.  I used a Creative Memories silver pen to color the scissor blades.  Thanks for having a look.

Sunday, July 17, 2011

Sew Glad to Meet You!

Hi, I'm Gini, and I am one of the newest members of the CottageCutz Design Team. I'm so thrilled to be a part of this very talented group of ladies. Before I show you my project for today, I thought you might like to know a little about me.

I have always loved everything vintage - and that has really influenced my work. Even as a little girl, I collected beaded purses and antique clothes, and had boxes of old photos and ephemera. And yeah, this was all by the time I was 9 years old. So I guess I was that quirky kid that everyone just kind of thought marched to her own drum. That early sense of style lead to someone who has a passion to create, who is confident in her own designs, but who also appreciates the historic influences of the past.


I have been crafting all of my life, in one form or another. I was a very successful bead artist (you can see my work on my blog - http://ginicagle.blogspot.com/2009/11/my-beadwork.html ). I had my work published in over a dozen books and magazines, and lectured and taught all over the country, but...my beaded pieces took 500-1000 hours to complete. About 10 years ago, I started scrapbooking, when my first nephew was born. I instantly fell in love with the immediacy of the medium (compared to the crazy hours I spent beading!) In the past year or two, I have really gotten serious with the craft and love finding new ways to take my pieces to the next level. It's really funny to look at any of my work, from beadwork to paper and to be able to see the same style emerge, regardless of the medium. I have always loved dimension, and color and layers.


Paper crafting is really a family thing for me. My sister and I l used to get together once a week to craft , but now she has moved right next door - so it's one big crafting party. We are so excited to be serving on this team together! And of course,my five year old nephew wants in on the action as well! My husband doesn't ever craft with me, but he is my biggest cheerleader, and is always supportive of what I do. We have been married for two years. We have a fairytale romance - we knew each other in high school and were friends, but went over 20 years without any contact, and reconnected on Facebook and quickly knew we were meant to be together. I work as a dental hygienist, so creating with paper is always a welcomed release!


The card that I am sharing with you today is a Z-fold card. I love how the new MLS dies coordinate so perfectly with the MLS papers - Sew Cute. I used the Sewing Notions die and the coordinating stamp set. The detail with these dies are so fun - I really love all of the dimension that they bring to my projects.

I am already working on my next projects to share with you, so until then...


Saturday, July 16, 2011

Ready for the Journey


Hi, My name is Lori and I am a happy fun loving Southern girl who lives in Western North Carolina.  I’m blessed to have two precious little boys who are the light of my life, fun as they are, they do exhaust me.   I’m truly in love with my family and God and feel so blessed everyday to have been given this great life.  I adore crafting and have always been involved in the arts in one form or another…I started with pottery in high school,  moved to metal in college and then switched to paper crafting 10 years ago when my first son was born.  I still love to incorporate metal and other mediums into my paper crafting every chance I can get.  One of the things I love the most about my life is where I live….right next door to my best friend, my sister Gini.  We share a passion for scrapping and look forward to tomorrow because you’ll get to meet her then, she’s the best.  We are so thrilled to be able to share this design team experience together…what a journey it will be.

Today I created this lovely little circle card using  Pink Peony Flower and Ornate Circle Frame dies and  The Made with Love stamp set.  I adore making handmade flowers and the Peony die was so much fun to work with. 

Remember to stay tuned tomorrow for Gini’s post…her project is adorable!!!! It’s a must see. 
Hugs,


Lori Williams Leng


Friday, July 15, 2011

You're Just Ducky!!

 Good day, and greetings from Green Bay, WI!  I'm here visiting with our friends at Peachy Keen Stamps, and enjoying the break from the HOT Missouri weather.  It's a cool and comfortable 72 degrees here in Green Bay, and boy, am I loving it!!!  I thought that since I'm making this post from Peachy Keen headquarters that it would be fitting to use one of the adorable Cottage Cutz dies designed by Kathy Jakopovich of Peachy Keen Stamps.  For this card, I used the Duck with Egg, and Duck Accessories dies.  I cut the pieces with white card stock, and colored them with my Copic markers.  All I needed to finish this card was some bling around the goggles and on the inner tube, some ribbon, and a few sparkles on the water.  Now I've got a cute little card ready to go for someone whom I think is "Just Ducky".  :-)
Wishing  you a beautiful day, a blessed weekend, and lots and lots of happy scrapping and stamping!  


Thursday, July 14, 2011

Hello from Sunny Singapore !

Hello,everyone from Sunny Singapore !!! 
Good to see you ( & how I wish I could too ! lol ) 
I'm excited to have my first post here as a new DT Member - 
For today , I'm giving a quick introduction of myself.


My name is Pearl , mommy to 2 wonderful kiddos - Deborah, 16 and John Ross ,13,
 living on the sunny little island of Singapore .
I first started scrapbooking after my wedding in 1993 , 
without using any acid free products .
There were very few acid free products available then here . 
Needless to say , that album is now yellow with age !
After the birth of my daughter in 1995, I started cardmaking via punchart and acquired the tools , punches and papers in the hopes that they would be useful for my kids at the right age. 
Well, I’m still the main user of all that product and tools today !

 From 2006, onwards ,there was such a shift in products available in the papercraft industry and I started using more scrapbooking products in my cardmaking. Magazines and on-line galleries were full of inspiration, so by October 2006 I started scrapbooking again and have never looked back since.
At this point in time, I consider myself very much a cardmaking scrapper. 
Cardmaking being my first love in papercrafting.

I'm so looking forward to sharing my Scrapping Cottage Cutz creations
 with you in the very near future. 
And I'm so thrilled to be designing alongside 
with this fabulously talented group of DT members. 
Thank you so much Scrapping Cottage for this awesome opportunity ! 


Wednesday, July 13, 2011

"Sew" Sweet & Masculine and Feminine

I have a super cute project from one of our new Design Team members who couldn't wait till her day to post to show her first project. Cheryl Walker got her new dies in the mail and went right to work and wanted to show this card - it's "sew" cute don't you think?? This is from the new
Thanks for sharing this with us today Cheryl!


I'm doing a little masculine and a little feminine today for my post. I used the lawn mower die from last years Summer release and the Grass Border die from the Flower Power release to make this card for my brother-in-law who has a birthday this week. I saw this cute little lawn mower pun on Split Coaster Stampers and just had to use it! (We're setting up a gallery on Split Coast Stampers so be sure to check it out.)

For my feminine card I used the same die (Flower w/stem) that Barry used yesterday to create his projects and I almost made mine a poppy as well, glad I chose to make mine pink to show you different ways to use the same die. I also used the Circle w/eyelets die for my sentiment and just trimmed off the top for a different look.
Hope you like these projects today and be sure to stay tuned for some sneak peeks of our upcoming release as well as the My Little Shoebox dies.
Have a great day!
Kay

Tuesday, July 12, 2011

Poppy Thank You

 This week I made a card and mini gift bag using the Cottage Cutz Flower with Stem die. That is a simple name for a flower. . but I just call it the Poppy die. The bag is 4" x 6" on the front and 1 3/4" deep. From a 6 1/4" x 11 1/2" piece of Lava Red card stock. The basic same layout as the card behind the flower except a stripe 2" wide, just so the red flower can be done on a red bag. The Lava Red card stock is really rather showy against the lime and cream stripe.
 The card is rather simple. I used a stripe card stock on the top 2/3rds and solid card stock on the bottom 1/3rd. I call this layout on the bottom of the card . . the Chopstick. . OK I know. . what the heck am I rambling on about chopsticks. There is a lot of times you end up using a printed card stock that you can not really match the solid color card stock to directly. In this case I wanted the stark red of the poppy to stand out from the lime, blue cream and brown in the stripes. I started with the bottom 1/3 in Divine Mocha Brown, than a 1/2" title strip in Parakeet Green. Than took three other colors . . Lava Red, Hillary Green and Truffle Brown to cut random chopstick shape strips of card stock. I than glued them down randomly. this allows you to include some of the colors from the flower into the card as a pattern. The silver metallic border and letters are from class a' peel stickers.
 The stem of the flower was done in Hillary Green card stock with YG23, TG67 and BG96 Copics, The Poppy was done in Lava Red card stock and R27 Copic. The center of the flower in Mocha, Truffle card stock with E77 Copic. The thing that is really hard to see here is there is also random black dots on the leaves, stem and flower made with a Prismacolor 03 pen. You can really be surprised by randon pin prick style dots on a project. It ads a nice highlight. The last highlights were made with a Sakura Sparkle Pen.
 Here is the same card, slight change in shape of the card. . done in a deep turquoise card stock on the flower. A more manly color makeup.
Here is the chopsticks for the brown, rust and turq card. The rust was the title bar and the chopsticks were done in greens and turq.

Thanks Barry

Monday, July 11, 2011

Swedish Style Bird

Hello Everyone!  Lots of new changes happening here at the Cottage!  How FUN!  Welcome to the new DT members.  Looking forward to getting to know you!

I was away for 2 weeks.  Had a wonderful time with family and friends!  I so enjoyed seeing my 8 sisters and having a slumber party with lots of yummy food, laughter, and sitting around a campfire.  I am trying to make this a yearly event!

I also got to meet Kathy Jakopovich, The Peachy Queen, and her family.  Angelica, her daughter, just introduced herself to the Scrapping Cottage Design Team.  I am thrilled she is joining us with her artistic talent and sweet personality.


Now on to my card for today.  I use the Bird with Flowers die from the Flower Power Release.  As I designed the card, it reminded me of the Swedish style of art with vivid colors.  I was thinking of the Dala.  I made the card first and then searched for a photo that I thought could have been the inspiration.  A little backward, I know, but art takes me on a journey.

I enjoyed making this card and I hope you like it!  Thanks so much for stopping by!
Hugs and smiles,
Janice


Sunday, July 10, 2011

That Pout!

Good Morning everyone! I am SO excited to be sharing my first Design Team project for Cottage Cutz and The Scrapping Cottage! I created a scrapbook layout for you today, but before we move onto the project, here's a little bit about me:

Hey guys! It's Angelica (pronounced Ahn-hel-ee-kah, you might laugh but you'd be surprised how many people think my name is Helga when they meet me!) - I live in Green Bay, WI along with my super stamping family!

My parents own Peachy Keen Stamps, Inc. and I am the Lead Illustrator/Co-owner of Market Street Stamps, LLC. I absolutely love paper crafting! You can find me blogging all my creations on Handmade by Angelica.

As a busy mom of two lovely little girls - Lucy (3) and Marlee (2), a wife, and a small business owner, my days are packed, but I always try and make room for something crafty or artful each day. Even if it's just doodling a page in my art journal.

I've had the pleasure of meeting Joanne and Greg (owners of the Scrapping Cottage) as well as some of my new fellow designers a few times, and I am beyond thrilled to be designing for a wonderful company with such amazing people behind it! The Cottage Cutz design team is a fabulously talented bunch, and I'm flattered to design along with them.

And now for the layout! 
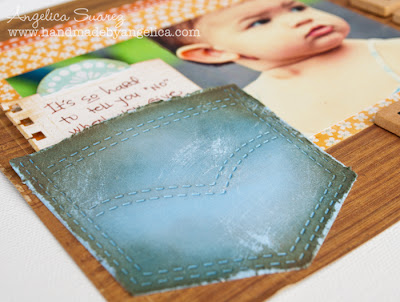
I don't scrapbook as much as I should. In fact, I can probably count on my two hands how many layouts I've actually completed. But, when I saw the Peeker Pocket I knew I had to fill it with some fun pull-out journaling. I tend to get overwhelmed when I start a 12x12 page, so I decided to use the pocket size as my guide and created an 8x8 page which ended up being a perfect proportion, don't you think? 

{click photo to enlarge}
I added this photo of Marlee (shot by my pal Scott Eastman) and used her sweet pout as the inspiration for my Scrabble tiled title. I used Crate Paper (Emma's Shoppe Collection) and My Mind's Eye (Stella & Rose - Mabel Collection) to create this orange and blue color scheme. I just love these colors together!


{click photo to enlarge}

For the pocket (Peeker Pocket from Cottage Cutz), I used a light blue shade of cardstock and started distressing around the edges. All of my jeans get worn OUT, and I wanted it to look like a good, lived-in jean pocket. So, I took a bit of "Weathered Wood" Distress Ink after it was all frayed along the edges and sponged it on. I then added in a bit of "Faded Jeans" and a touch of "Vintage Photo" Distress Inks for depth. After both inks were blended onto the pocket, I took a medium grit piece of sandpaper and scratched it up for even more of the worn-in look. 

To create this easy-peasy journaling tag, I cut my cardstock down to fit inside the pocket (about 3" x 3.75"). I stamped my Vintage Notepad background stamp (from Market St. Stamps) in "Antique Linen" Distress Ink and punched the side with a border punch to make it look like notebook paper.

I think I'm going to make a bunch of these during the girls' naps this week and keep them on hand for some of my future layouts - I love the large 4x4" size of the pocket - it's super versatile for embellishing and for adding in journaling! For complete details on what products I used, please visit me on my blog, I'll have them posted in just a bit!

Thanks to the Cottage Cutz crew for this fantastic opportunity!  And thank all of you so much for visiting The Scrapping Cottage and reading a bit about me! I'm so looking forward to sharing and getting to know everyone! 

Hugs,
Angelica

Saturday, July 09, 2011

The Scrapping Cottage Challenge #3

Good morning, and welcome to The Scrapping Cottage Blog.  It's the second Saturday, and that means it's time for a new challenge.  Before we get to that, though, we want to thank all of our wonderful entrants from last months challenge.  It's always so much fun to see what you're doing with your Cottage Cutz and Cottage Impressions, and your work was inspirational!!!   
Our random winner from the previous challenge is entry #7,    
Barbara Vinson!!!!!!!!!!!
Congratulations to you, Barbara.  Have fun shopping at The Scrapping Cottage!!!!!

Now, on to challenge #3.  I thought it might be a good idea to start thinking about Christmas.  After all, it is only 168 days till Christmas!!  LOL!!!   The theme for this month's challenge is Christmas in July.  There are no specific requirements, other than using Cottage Cutz, or Cottage Impressions, and that your  newly created card, layout, or altered item have a Christmas theme.   Here's my card, and for this one, I used both Cottage Cutz dies and Cottage Impressions stamps. 
One lucky winner from all the entries will be chosen at random to win a $25.00 gift certificate to spend as they choose at The Scrapping Cottage.  Woohoo!!  What could be better?  Getting ahead on Christmas projects AND a shopping spree!!  I can't wait to see what you've got up your crafty sleeves for Christmas!  Just use the Mr. Linky Widget below to link your work.  Happy stamping and crafting!!!


Friday, July 08, 2011

We have SIX new Design Team Members!!

Congratulations to our new DT members! They are:
Cheryl Walker
Gini Cagle
Lori Leng
Angelica Suarez
Pearl Liu
Erika Taylor
We are so excited to welcome these talented ladies to our design team here at the CottageBLOG and know you will love the unique styles each of them bring. We will be continuing our Second Saturday Challenges and adding some tutorial videos as well as some guest designers in the coming months.
Stay tuned for bios on each of these ladies in the weeks to come.

Exciting News!

Photobucket

The Scrapping Cottage is excited to announce that they have teamed up with My Little Shoebox!  CottageCutz dies are now available to coordinate with each of My Little Shoebox 6 new collections: Playtime, Pretty Little Things, Trick or Treat, Audrey,Enchanted Garden, Destination as well as their very popular Sew Cute Collection.  Please visit your local scrapbook store for MLS paper collections to coordinate with our CottageCutz dies.


You may check out these fabulous dies available for pre-order right now.  You're going to LOVE them!


To learn more about My Little Shoebox products click here.


Wednesday, July 06, 2011

Flower Power and some Polka Dots

A few weeks ago I went to my nephews wedding and their colors were red, white & black. It reminded me how much I like these colors together and so I was inspired to make my card with their wedding colors. This was so simple but elegant just the same. This same theme would look great with pink and black, brown and aqua, and the list goes on. I think this will be my next project to make up a bunch of these with different colors for my stash :)


I used the Daisies Layered Die and Leafy Foilage from the Flower Power release. I cut out the flower three times and layered the pieces together. For the center I stacked several of the center cutouts together to make it nice and thick and then cut out a white one for the top and applied Glossy accents to it. I shaped the petals a little to give it a dimensional look.
And there you have it!
Don't forget - you have until this Friday night to complete the Second Saturday Sketch challenge for your chance to win a $25 Gift certificate to the store.
Click here for details.

Tuesday, July 05, 2011

Simple Filigree Card

 This is a simple way to use the Cottage Cutz Floral Doily die to show a screen look to a card. (I have used yellow card stock to show the contrast, yellow was not used in the card) I cut a 3 1/4" circle in the front of my card and glued the Floral Doily over the hole. This created a window like.  . trellis on the front of the card. I than added the Cottage Cutz Flower Petals die flower over the lower corner (half on half off).
 The flower I cut from Basill Bling card stock and highlighted in two shades of pink Copic markers. The Stem was cut twice from the die, once in a lime green and the second from a leaf green. I cut the leaves off the second cut and added them behind the lime branch. This added a bit of base color contrast, than highlighted the whole branch in three shades of Copic greens. A mini bow was added to the stem. I thought the jewels added a bit of bling to the flower, because of the jewels in the stripes of the paper. If you go back to the first picture you will see the random stripes done with Stickles and the added jewels. (its hard to see, but there are 14 random stripes of various sizes with 6 jewels added) This is a great way to jazz up a simple stripe paper.
 This is a shot from the inside of the card.
What a great flower die. A lot of possibilities . .  This really is a simple card that you can get several done and add the matching envelopes, put in an organza bag and give as gifts.

Thanks Barry
This added little goodie is a gift tag, I DOUBLED the paper on the Floral Doily to add weight to the tag. Attached the same flower. Looped organza ribbon through the filigree and feed a bead onto the two stands of ribbon, tied a knot above the bead. The tag is ready to attach to any gift.