Showing posts with label Mary Marsh. Show all posts

Sunday, December 31, 2023

DT FAves From 2023

Hello CottageCutz friends! Thanks for taking the time to stop and visit with us today. It's Mary Marsh here bringing you the Sunday edition of the Blog.

We have an after Christmas sale going on right now at the online store with savings of up to 80%.  The sale runs through January 2 so stop over and visit to get some dies you may have on your wish list. 

This is the 2nd day of featuring DT favorite cards from 2023. So, let's get started to see what they have chosen. 

Design Team Faves:

Kristine created a beautiful sympathy card using dies from our Flowers & More release as another of her faves from 2023. There is a complete tutorial on this post
Kristine also selected this envelope box card as a fave using dies from the Easter release. The bold and bright colors made it so perfect for Springtime. See this post for a complete tutorial. 
Pam chose this tulip card as another of her faves from 2023. It's a perfect way to send a bouquet of beautiful paper flowers. See her tutorial here
Marla chose this beautiful Folk Art Rooster card as another of her faves from 2023. Distress inks and white gouache really captured the folk-art style in such a unique way. 
Melinda chose this shadow box home decor item as another of her faves from 2023. You can see more of how she created this on her Blog post here. 

I (Mary Marsh) chose this pop-up fun fold birthday card as another of my faves from 2023. You can see the complete tutorial on this post. There is also a video on the post that shows it opening and closing. 

card front
card inside

That's it for today's post. I hope you have enjoyed watching down memory lane with us for the past 2 days. 

Other News: This is my last post as a member of the CottageCutz Design Team. It's been nearly 8 years and I have thoroughly enjoyed my time designing for this incredible company. But in 2024 I will be getting more involved in the political realm in my community and that will take a good amount of my time. So, farewell my friends. It's been a wonderful ride!


Saturday, December 30, 2023

DT Faves from 2023

Hello CottageCutz friends! Thanks for taking the time to stop and visit with us today. It's Mary Marsh here bringing you the Saturday edition of the Blog.

We have an after Christmas sale going on right now at the online store with savings of up to 80%.  The sale runs through January 2 so stop over and visit to get some dies you may have on your wish list. 

For today and tomorrow we will be featuring some of the DT favorite cards from 2023. So let's get started to see what they have chosen. 

Design Team Faves:

Melinda made this Hot Coca Box in January. She presented a way to take Christmas dies and use them for the winter season. There are full details and more photos to show all sides of the box on this Blog post
Pam chose this slimline Valentine card using the Classic 50's dies. It's a great color palette and a super cute card for all ages from the boomers through the millennials. See her post here
Kris chose her vertical easel card using dies from the Christmas release and created a thank you card. This card was one of my faves as well because it ended up in my mailbox. I have it on display in my craft room. She has a complete tutorial on this Blog post.  


Marla chose this beautiful Fall themed card that she created in a 5 x 7 design. All her tips and tricks on how she created this card are on this YouTube post. 

I (Mary) chose this fun fold pop-up birthday card as one of my faves from 2023. All the details of how I created it are on this Blog post


Well, that's it for today's post. Stop by again tomorrow and see more of the Design Team faves. And as a reminder, all of these dies are on sale right now. 
 

Saturday, December 23, 2023

A Joyous Holiday


Hello CottageCutz friends! Thanks for taking the time to stop and visit with us today. It's Mary Marsh here bringing you the Saturday edition of the Blog.

We have 2 new releases in the online store. The Christmas 2023 release is available and currently at 30% off individual dies. The Black Friday In The Garden release is also available at 30% off individual dies.

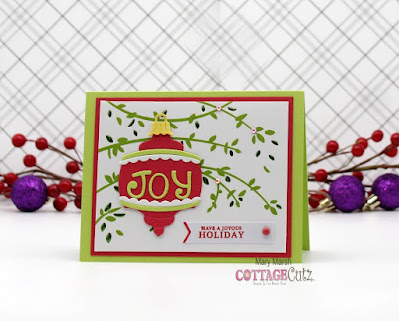
For today's card, I am featuring the new Old-Fashioned Ornament 1 die and created my last Christmas card of the 2023 season. It is another quick card because I was under a time crunch (LOL)!

Design Steps:

I started my card with the colors from this week's color challenge #979 on Splitcoaststampers. We are to use sweet sorbet, lemon-lime twist, daffodil delight and petal pink for our color combo.  
sweet sorbet, daffodil delight, lemon-lime twist, petal pink

The background foil paper was something I had in my stash and the color was a perfect match. I stamped a sentiment in sweet sorbet ink on a flag and added some bright pink jewels since I don't have the petal pink color. I also added a sweet sorbet enamel dot to the flag.  
The A2 card base is lemon-lime twist.
Card base: 4 1/4" ' x 5 1/2"
Designer paper Layer: 3 3/4" x 4 3/4"


I cut my ornament in the challenge colors. I think it turned out so pretty. 
Attached the image to the designer paper layer with double sided tape. I also add a layer of sweet sorbet cardstock to the panel. 
Sweet Sorbet Layering Panel: 5" x 4"

To complete my card, I attached the image panel to the card base.
 
Well, that's it for me for this post. Merry Christmas everyone. See you next Saturday. 

Reminder: Marla has a new video up on the CottageCutz YouTube channel and there is a giveaway. Click here.


Sunday, December 17, 2023

Christmas Greetings

Hello CottageCutz friends! Thanks for taking the time to stop and visit with us today. It's Mary Marsh here bringing you the Sunday edition of the Blog.

We have 2 new releases in the online store. The Christmas 2023 release is available and currently at 30% off individual dies. The Black Friday In The Garden release is also available at 30% off individual dies.

For today's card, I am featuring the new Vintage Horse & Sleigh die. If you are in need of some quick and easy Christmas cards, then this post is definitely for you. I am still creating Christmas cards so I am right there with you. 

Design Steps:

I started my card with the designer paper. I just bought this "One Horse Open Sleigh paper pack from Stampin' Up because of the background scenery.  For this pattern I thought of the Vintage Horse & Sleigh die and my card was born. You could use any designer paper from your stash that has a scene on it. 
I cut the designer paper to a 5 1/2" square. I didn't want to cut too much of this beautiful scene away. 
 
Designer Paper: 5 1/2" square
Boho Blue Base: 5 3/4" square

 Since I don't have 12" paper in this shade of blue, I used 8 1/2" x 11" paper and a hinge technique to make the base larger. You can check out this post to see exactly how I did this.
Next, I cut the sleigh image in a dark blue cardstock and my greeting from white glitter paper which picks up the lights on the trees and house. The Christmas Greetings phrase is from the 2018 collection and is still available in our online store. 
Now I am ready to start card assembly. Attached the designer paper with double sided tape. 

The sentiment and sleigh are attached with clear drying glue and this card is done. I said it was quick and easy.
That's it for me for this post. See you next Saturday. 


Saturday, December 09, 2023

Holiday French Horn


Hello CottageCutz friends! Thanks for taking the time to stop and visit with us today. It's Mary Marsh here bringing you the Saturday edition of the Blog.

We have 2 new releases in the online store. The Christmas 2023 release is available and currently at 30% off individual dies. The Black Friday In The Garden release is also available at 30% off individual dies. 

For today's card, I am featuring the new Holiday French Horn die. I don't know about you but I am still making my Christmas cards. I have about 10 more to make and then I need to get them addressed and mailed. It's crunch time for me. 

So, let's get started with some details of how I created this card. 

Design Steps:

I started my cad this week with the colors from the Splitcoaststampers color challenge #977. We were to use berry burst, old olive and crumb cake (Kraft) for our color trio. Optional was to add gold. 
berry burst, old olive, crumb cake


I decided to use berry burst cardstock for the card base. I just bought this gold vellum  designer paper that had all Christmas words in gold. I layered it with a brushed gold cardstock. For some reason my camera picked up a yellow tone.
Berry Burst Card Base: 4 1/2" x 5 3/4"
Gold Layering Panel: 4 1/4" x 5 1/2"
Gold Vellum: 4 1/8" x 5 3/8"
I cut the horn in gold mirror cardstock, and the berries & bow in berry burst cardstock and the greenery in old olive cardstock. I attached these layers with double sided tape and clear drying glue.
To finish off my card, I attached the image panel to the card base and scattered a few crumb cake enamel dots to get that color on my card. I decided not to add a sentiment to the card front. I thought the Christmas words were sufficient. 
That's it for me for this post. See you next Saturday!


Thursday, November 30, 2023

Garden Bicycle

Hello CottageCutz friends! Thanks for taking the time to stop and visit with us today. It's Mary Marsh here bringing you the Thursday edition of the Blog.

It's new release time!!! We have our annual Black Friday release available now in the online store. There are 19 different designs, and they can be used for all seasons. The dies are broken into 2 different bundles with bundle pricing under $78. Bundle pricing is only available through Friday, December 1. Or you can pick up the individual dies for 30% off.

We also have our Christmas 2023 release in the online store that has 40 designs. It's an old-fashioned Christmas theme. You can pick up the individual dies at 30% off for a limited time.

For today's card, I am featuring the new Garden Bicycle die. I made this card for a friend who moved to the Pittsburgh area this summer.  

It's been an adjustment for her, but she has been slowly finding her way around and starting to feel like she belongs. She is an avid bike rider and spent a lot of time on our dedicated trails that meander through wooded areas as well as along our rivers. So, I thought she would like this special card. 

Design Steps:

I started my card with a sketch that I had saved on one of my Pinterest boards. It's an older one but I thought it would work well to showcase the garden bicycle and the addition of the ribbon and the punched daisy edge makes it a bit more feminine. 
I cut my bicycle in colors that coordinated with my designer paper and that look like her bike. Just to make it a bit more special. 
  
For my background papers I used 2 different patterns of designer papers. The pink dotted paper (1 7/8" x 5 1/4") is from the Stampin' Up "pop of pink specialty paper" and it's layered on melon mambo cardstock (2" x 5 3/8"), the flowered paper (2 1/8" x 5 1/4") is from the "cheerful treat" collection" and it's layered on lucky limeade cardstock (2 1/4" x 5 3/8").  
Next, I added a bow with a lucky limeade brad center and a daisy edge cut from a Martha Stewart punch.
I stamped my sentiment in gray ink on a white rectangle panel. I used the 3rd largest die (2 1/2" x 3 1/2") from the Pierced Rectangle Set
I layered the sentiment panel on a melon mambo panel. I used the 2nd largest die from the Rectangle Set (2 5/8" x 3 5/8"). Attached my bicycle with clear drying glue.
To finish off my card, I attached the image panel with dimensional adhesive and added a few melon mambo enamel dots. 
That's it for me for this week. See you again next Saturday. 

Reminder: Marla has a new video and a giveaway on the CottageCutz YouTube channel. Click here.