Friday, July 31, 2009

WE HAVE A WINNER!

We would like to thank all those that participated in the CottageCutz contest.
Our winner is Rita Neubert!
She made this cute recipe with the CottageCutz Tropical frame die. As you can see
it is so versatile, you can make your frame any size you want.
Congrats Rita!
email thescrappingcottage@cox.net. with your choice of a free die $19.95 or under.
Thanks for playing!

Be sure to stay tuned for our next contest - it's a BIGGIE! Details coming soon.


The Endless Summer....
in search of the perfect wave

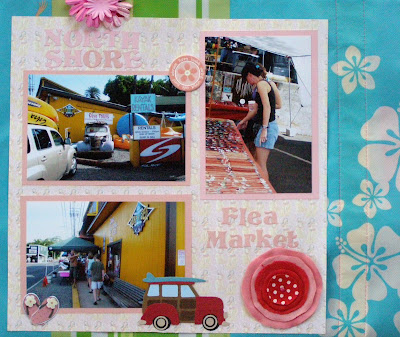
My good friend Ann went to Hawaii last year and
while she was searching for the "Perfect Wave"
she and her family stopped off at the North Beach
Flea Market. Oh....the treasures they found!!!
Not only did she find some amazing treasures at
the flea market in Hawaii, when she got back to
California she found the best treasures of all at
The Scrapping Cottage.
The Scrapping Cottage's
CottageCutz
are a
"wave above the rest"!!!

Thursday, July 30, 2009

Simplicity with the Silhouette


Do you ever have those days where you want to scrapbook, but at the same time, you don't have all day to spend trying to finish a page? Sometimes it can be just as much fun creating a simpler layout as it can be pulling out all of your embellies. When you are in this sort of scrapping mood, your silhouette is your best friend! It is so easy to create some simple embellishments using your silhouette.

One day I was in my scrapbook room with my camera out and my youngest came in and saw me and proudly exclaimed, "Mommy, take my picture." And of course I was happy to oblige. When I sat down to scrap this picture, I knew I wanted to keep things very simple and leave all the focus on the picture. I didn't even need to include journaling because my title says it all. I created the dainty swirled brackets using my silhouette. These brackets are a good example of how you can achieve small intricate cuts with your silhouette. I also used the Dragonfly 4x8 alphabet for my title because I like how the swirls on the letters match the swirly brackets I used.

Wednesday, July 29, 2009

Watch For It Wednesdays #20

All right, it's midnight and you are happily crafting away when you discover you are out of pop dots and/or chipboard. The project you are working on really needs some extra depth and dimension. What do you do? Give up and go to bed OR come up with a solution. If you are working with diecuts, I have the perfect remedy for the problem. :) Instead of cutting out one of your design, try cutting out five or six (depending on the weight of the cardstock). As you can see in the above picture, I cut out six of the new July Sizzix release die called Frame, Hanging w/Scallop.

All you do is simply glue the six diecuts together. This raises the diecut to a wonderful level and
gives your project great dimension. It makes the diecut stand out plus it looks pretty from all angles. :)

Give this tip a try sometime. I think you will be very pleasantly surprised with the results.
(Plus you don't HAVE to be out of pop dots and/OR chipboard to try it.) (Wink, wink.) Be sure to check out all the great products at Scrapping Cottage.


Tuesday, July 28, 2009

Oh Nuts!

Ok, anyone ever forget to send someone a birthday card? You can admit it, I actually have someone specific I need to send this card to......
This CottageCutz Squirrel makes the perfect belated birthday card or would be so cute on a childs layout and even those camping and scout pages. He's easy to put together and to ink around the edges like I did because the detail lines are actually cut so you can bend him a bit to get the ink on the inside edges.
The 4x4 Squirrel is just one of many CottageCutz designs available from the Scrapping Cottage.
These dies cut just like the Quickutz dies and can be stored the same way as well.

Don't forget to get your CottageCutz entry in by tomorrow midnight for a chance to win a CottageCutz die of your choice up to a $19.95 value.

Monday, July 27, 2009

Who's In The Mood For Cake? :)

How about some polka-dot cake? Today's card is a quick one using the Sizzix Birthday Cake #2.
Try cutting this die with pastel polka dot papers (I used Bo-Bunny papers. The rubber stamps are by Hampton Art). It almost looks good enough to eat. :) The next time you need a fast birthday card, remember two things -- Sizzix Birthday Cake die and polka dot paper. :) Be sure to check out all the great products at Scrapping Cottage.

Sunday, July 26, 2009

Cottage Cutz Sneak Peak

Today is the last day to take advantage of our special introductory pricing for the August Cottage Cutz Release. While you are shopping, be sure to look at the sneak peak of the Spooky Cottage Cutz release! Won't it be wonderful to have Halloween dies early enough for making cards and invitations for all your Halloween celebrations!

Saturday, July 25, 2009

Are you ready for another Scrapping Cottage Contest???

Well here you go! Your challenge is to create a layout, card or altered project using only the CottageCutz dies. You can use other products on your project but you cannot use any other brand of dies. You may enter as many times as you would like and the winner will receive a CottageCutz die of their choice up to a $19.95 value.
Contest entries must be emailed to scrappingcottage@cox.net with July CottageCutz Contest in the subject line by Wednesday, July 29th at midnight PDT. Entries will be judged by the blog team and the winner will be announced no later than Friday, July 31, 2009.
Have fun and we are excited to see your creations!

Friday, July 24, 2009

Hot Summer Days!
What is refreshing on a
hot
summer
day?

A cool, refreshing drink.
A splash in the surf.
A pleasant, tropical breeze.


The Scrapping Cottage
has the answer to all of your summer questions...

CottageCutz!

Thursday, July 23, 2009

Some Silhouette Fun


What is not to love about the new Silhouette features. I love being able to Weld words together for my page titles. It just gives such an extra special touch to your pages. Of course, one of the other great features of the Silhouette is that it will cut any True Type font already on your computer. I used my silhouette to cut the words and the monorail shape. If you are still on the fence about an electronic cutter, you will love it!

Wednesday, July 22, 2009

WATCH FOR IT WEDNESDAY #19

Today's Watch for it Wednesday tip is pretty simple but very useful.
Have you ever gone to punch a hole in your layout and the punch just doesn't reach?
This happens to me all the time.
For example: I want to put some sparkly brads above my journaling, but the punch I have doesn't reach where I need my holes. I just grab a push pin and something to put underneath (fingers not recommended) that I can punch into.
Then simply make a hole for small brads or a several holes for a larger brad.


Then I can put my brads on my layout anywhere I want them.


Tuesday, July 21, 2009

A Special Thank You Card

Today I chose to work with the CottageCutz Ice Cream Cart. This die comes with two 4x4 dies and makes this darling, detailed Ice Cream Cart (which is on sale right now for $24.95). I cut this out of pink and white cardstock and then used my Copic Ciao markers for the rest of the colors.
Since the patterned paper can be distracting I used mounting tape to pop up the cart a bit off my paper . I also used the Sizzix Textured Impressions kit to give the Thank You theme to my overall card as well as stamped the little banner on my ice cream cart with a thank you stamp.

Monday, July 20, 2009

Quick Notecard Set

One of my favorite July Sizzix releases was the Fleur de lis. :) I knew I "needed" it the instant I saw it. :) Today's inspiration for you is a set of notecards I did that are fast and easy. All you need is cardstock in pretty colors along with black, the Sizzix Bigz Fleur de lis die, the Sizzix clear
stamp set called Flourishes and Swirls and a black ink pad. The next time you need a fast card
or gift, try your hand at these. :) Be sure to check out all the great July Sizzix releases at Scrapping Cottage.


Friday, July 17, 2009

Crazy Days of Summer!
The Scrapping Cottage has done it again.....
another amazing die to help us show off our
summmer style!
This fabulous
CottageCutz
"Ice Cream Treats"
die is delicious!!
Find the perfect paper....
Find the PERFECT die.....
Run it through your
QuicKutz Revolution,
Sizzix Big Shot,
BigKick,
CuttleBug,
SpellBinder Wizard
or your
Accucut Zip'eMate
and
Walla....sweetness!

Thursday, July 16, 2009

Christmas in July :)

I thought I would do something completely different for my post today. How about a little Christmas in July?! I created this little mini album to use as a fun Christmas Planner. I also included a few pictures on a couple of pages for some shopping inspiration.


Of course I can't make anything without adding some Quickutz. The Rev clipboard makes the perfect place for a list so I definitely wanted to include it in my planner. I used the QK metal sheets to make the top of the clipboard.
As soon as I saw the Lamp Post from the June release, the first thing I wanted to do with it was decorate it for Christmas. I used some QK rub-ons to make the string of lights on the lamp post, but you could also use the light string from the 2008 QK Holiday Gift Set.

Tuesday, July 14, 2009

You Scream, I Scream, We all Scream for Ice Cream!

What would summer be without hearing the ice cream truck jingling down your street?
With this cute Ice Cream Treats CottageCutz die the ideas are endless. In the card above I used American Crafts paper to create my card and matched the colors in the paper for my ice cream treats. I popped them off the card just a bit with some mounting tape. This card is a matchbook fold and allows a place for a gift card inside. What a fun way to give a birthday treat to someone special with an ice cream gift card tucked inside.

This die is so versatile, you can make an ice cream sandwich, a popsicle, bomb pop and a fudgesicle in any color you'd like.

This simple postcard would be great as an invite for an ice cream party. Just print off your information on the computer and adhere that to the back of the this card for a quick and easy invite. Don't let your summer go by without some yummy Ice Cream Treats!

Monday, July 13, 2009

CottageCutz Tree w/Hearts & Leaves

When I saw the Cottage Cutz Tree w/Hearts & Leaves die, it was love at first sight. :) I had visions of doing cute Valentine's Day cards with it. But you know me, I alway think ahead as to what else can I do with a die to get my money's worth. So scroll down to see what I came up with. :)

I found a quote that made this die a good one for anniversary cards. All the leaves and hearts look SO pretty on this one when you see it "in person." :) What else could I use it for?

How about for Halloween? Cut the tree out of black paper and it takes on a "spooky" feel. I
glued eyeballs on it to make it even "scarier." :) The eyeballs are what I called "googlely eyes"
and can be found in craft stores with several to a package. How about one more sample with this die? :)


It can be used for winter or Christmas themes too. By cutting the tree from white paper, it looks "cold." :) I used some snowflake eyelets and then put crystal rhinestones in the centers of the
eyelets to make a "snow tree." You could also cut the tree from red paper, put it on a blue background and put white star brads on it for a patriotic theme. Or how about cutting it from green paper and putting shamrock brads on it for a very different St. Patrick's Day card or layout? Of course it would be pretty to cut it from brown paper for an autumn theme. I would leave it bare except for maybe one leaf brad laying at the base of the tree. That would be sharp! :) Maybe you could come up with even more ideas (and if you do, share them in the comments section with us). :) Be sure to check out all the great CottageCutz dies at Scrapping
Cottage.


Friday, July 10, 2009

Fun summer days are ours to remember!

I created this sweet little tag for a layout I am working
on. I had the incredible privilege of using my fun and
unique CottageCutz to get the look I really wanted!!
The CottageCutz Picnic Table and the Pitcher and
Lemon Tree are only two of the adorable dies that
are available at the ScrappingCottage! There are so
many other fantastic dies to choose from and right now
many of the dies are Buy 3, Get 1 Free!! Stop by and
pick up a few of these adorable dies today.....
the possibilites are endless!

Thursday, July 09, 2009

Star Spangled Layout

What July layout would be complete without some stars on it?? And the Quickutz Nesting Stars are perfect to add stars large and small to your projects. I have also incorporated stamped stars, rub-ons, and even a little brad with a star to complete my star theme in this layout.

Another thing I really like about this layout is that I combined pictures from different events in July to give an overall review of our July Summer fun. That is very "out of the box" for me, but it is really a great way to capture a lot of memories all together on one layout. It is also a good way to use up extra pictures (which if you are like me, you have tons of extra pictures!!)

I used Vixen for my July title and the P is from Diesel Classic. Other Quickutz dies I used include the 2x2 photo corner (on sale right now for only $2.95!!) and the 2x2 tab die (also on sale for $2.95!!). If you haven't taken advantage of the incredible deals going on in the store right now for Quickutz dies, you are really missing out!! Click here and you can see the huge selection of dies that are on sale right now!!

Wednesday, July 08, 2009

Watch for it Wednesdays!! #18

For today's Watch For It Wednesday, I would like to show you a tip for using your Quickutz 12" borders. Now each border has a nice finished edge on either end, right, which looks great when you are using the entire length of the border. But what if you only want to use a portion of the border, but you still want a nice finished edge? This tip will show you how to put that finished edge on each end of your cut.

First, cut your paper slightly longer than your desired finished length. Place that piece on top of your border and roll it through your Revolution like normal to get your first cut.

Now, you need to decide how many scallops you want to have on your finished border. Once you determine where you last scallop will be, you'll want to place your cut piece back onto the die matching your marked spot with the end of the border die. You'll need to flip your cut piece over to do this.If you look closely here, you can see the edge of the die around the pink paper and you can see how I have lined up the scallop with the end of the die.
When you have your cut piece placed onto the die, the already rounded end will just rest on the remainder of the die. It won't touch any of the cutting surface, so you don't have to worry about it being re-cut.
Now that you have the first border cut lined up onto the border die again, simply roll it through your Revolution like you normally would to get your second cut which will finish off the second edge.This technique is great for smaller pages, cards, or even larger layouts where you just don't need to entire length of the border. You can use this technique on any of the other 12" borders that have a repetitive pattern like this scalloped border die. Click here to see the card I posted earlier where I used this technique to cut the scalloped piece of cardstock.