Hello CottageCutz friends! Thanks for taking the time to stop and visit with us today. It's Mary Marsh here bringing you the Saturday edition of the Blog.
IT'S NEW RELEASE TIME! Our annual Black Friday release is in the store. It's the Campin' Out release with 14 ever so cute designs. It's perfect for year-round card making. And the Christmas release Part 1 and Part 2 is also available. There is still time to get Christmas dies ordered and delivered for Christmas card making.
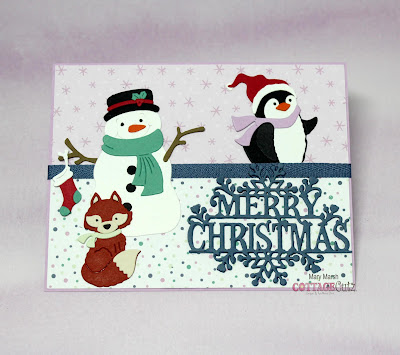
Today, for your viewing pleasure I have a Christmas card in non-traditional colors using the Snowman w/ Woodsy Friends, Ice Skating Buddies and Merry Christmas w/Snowflakes dies. They are all from the Christmas Part 1 release. So, let's get started with some details on how I created my card.
Design Steps:
I started my card this week by first selecting my designer paper. Since this is a whimsical style card, I wanted designer paper to reflect that style. I found a pattern that I thought would work well. And, it had non-traditional colors, so I liked that as well.
Misty Moonlight (Blue) card base: 5 3/4" x 4 1/2"
Fresh Freesia Layer: 5 5/8" x 4 3/8"
Designer paper Layers each: 5 3/8" x 2 1/4"
Next, I cut the images and used the colors that were in the designer paper for their accessories with the addition of red for the Penguin hat & Snowman hat trim and the Christmas stocking.
I wanted a Christmas greeting and decided to use the Merry Christmas w/Snowflakes dies. I cut it in the misty moonlight cardstock. I cut it 2x to give it more emphasis on my card.
Now that all my elements are prepared, I am ready to start card assembly. I attached the designer paper to the fresh freesia panel with double sided tape. To join the 2 panels, I used some misty moonlight ribbon.
The images are next, and I attached those with double sided tape. The Merry Christmas greeting is secured with Art Glitter glue. This adhesive dries clear so it's my new fave.
To finish off the card, I added the image panel to the card base with double sided tape. I also scattered a few white enamel dots just for added interest.
That's my card for this week. I hope I have given you a fun and different way to use the new dies. See you next Saturday!
That's my card for this week. I hope I have given you a fun and different way to use the new dies. See you next Saturday!


2 comments:
Lovely card Mary, such a classy theme
Such a cute card love all the fun characters!
Post a Comment