Hello Scrapping Cottage friends! Thanks for taking the time to stop and visit with us today. It's Mary Marsh here bringing you the Saturday edition of the Blog. Happy 4th of July to all our American friends. Hope you are getting to enjoy the day and celebrating the founding of our great nation.
We have a brand new release of dies in the online store. This one is all about the sea with Pirates and undersea creatures. There are 14 new whimsical designs and each one is cuter than the next. These cards would be ideal for so many occasions. The entire bundle is currently 60% off and you can pick it up for less than $100. Each individual die is also 25% off.
For my card today, I am featuring the new Treasure Chest Island and I created a card of encouragement for a friend who is always doing something special for me. I thought I would make her a card and let her know how special she is to me. So let's get started with some details on how I created my card.
Design Steps:
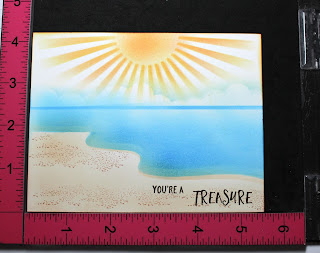
Since I was using the Treasure Chest Island die I wanted to do some ink blending to create an ocean scene. I use jumbo daubers for my ink blending technique. I started off with the sandy shore. I cut 2 templates and used crumb cake and old paper distress inks for the sand.
Image Panel: 4 1/4" x 5 1/2"
Next I sponged in the water using salty ocean distress ink. I laid my 2nd template over the sand and began sponging the blue ink. I used the other end of my template and sponged more salty ocean ink to create the horizon line. I wanted it just a bit darker than the water.
I used a sun ray stencil and sponged the sun with wild honey and abandoned coral inks. I took a cloud stencil and lightly stenciled in some clouds using tumbled glass distress ink.
I stamped a few sand granules on the sandy shore just to add a bit of texture. My stamp had lots more than just the sand so I taped off what I didn't want. Then, with the help of my stamp-a-ma-jig I was able to stamp the sand where I wanted it.
I decided to stamp my sentiment directly on the sandy shore. I used a medium brown ink and my MISTI for placement. I did stamp the sentiment 3 times to get the color intensity I wanted.
Now that my background is completed I am ready to cut the die images. I used different colors of cardstock to cut the palm tree, treasure chest, oyster and the mound of sand. I attached it to the background using dimensional adhesive.
I used a royal blue cardstock for the layering panel and attached this with double sided tape to my image panel. Then attached to the yellow card base. To finish off the card I added 3 enamel dots to highlight the sentiment.
Well, that's it for me for this week. I will see you next Saturday! There is a 4th of July sale in progress at our online store with savings up to 60%. Check it out here for some great deals.
die I used to create card:


3 comments:
Mary this scene is fabulous! Looks like it took some work but was well worth the effort. It is perfect for your palm tree and treasure!
Gorgeous card! I love the beautiful background that you created, it looks amazing against the die cuts!
Fantastic background you created for the treasure! Love it!
Post a Comment