Saturday, April 22, 2023

Set of Two Floral Cards

Hello crafty friends,
Melinda here with you and today I am sharing a set of quick and easy cards to help you build your stash. Take a peek!

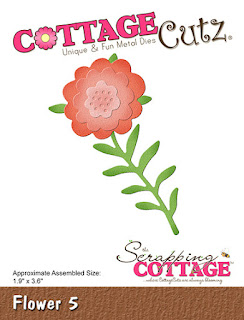
My two cards are both A2 cards with a pretty floral theme. The center piece for this set is the Flower 5 die from the recent Cottage Cutz Flowers and more release.


Here's a closer look at the first card with a single flower in the center.

After cutting out my card base, I cut out a couple of mats. I ran them through some embossing folders I had in my stash. 


For the larger one, I spritzed some Shimmerz Vibez spray to give it some fun color and bring out the wood grain texture.

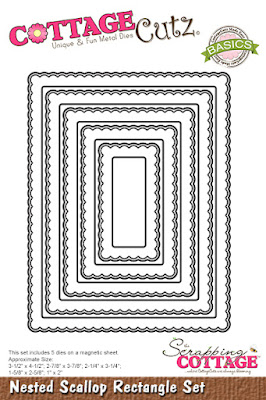
I cut out my flower 5 die in white cardstock and then used my markers to color in the leaves and the flower heads. I used some of my Nuvo Dew Drops for the center of the flowers and also as a decorative touch on the top right corner. I used some White Shimmerz Vibez spray on the kraft embossed mat. It gives it a subtle added touch without being too overpowering. I then mounted all of that onto a scallop stitched rectangle die mat and then wrapped that with some twine. I did use some foam tape on the back to give it just a little lift.

Here's a closer look at the second card. I used the same elements as the other card. I traded the colors of the mats and also used one size bigger scallop stitched mat. I used two of the Flower 5 dies on this one.


Here's a look at the same word embossed mat. I inked this with some of my navy ink.

For the larger mat on this card, I used kraft cardstock and then sponged some of my white ink onto the mat to bring out the texture.

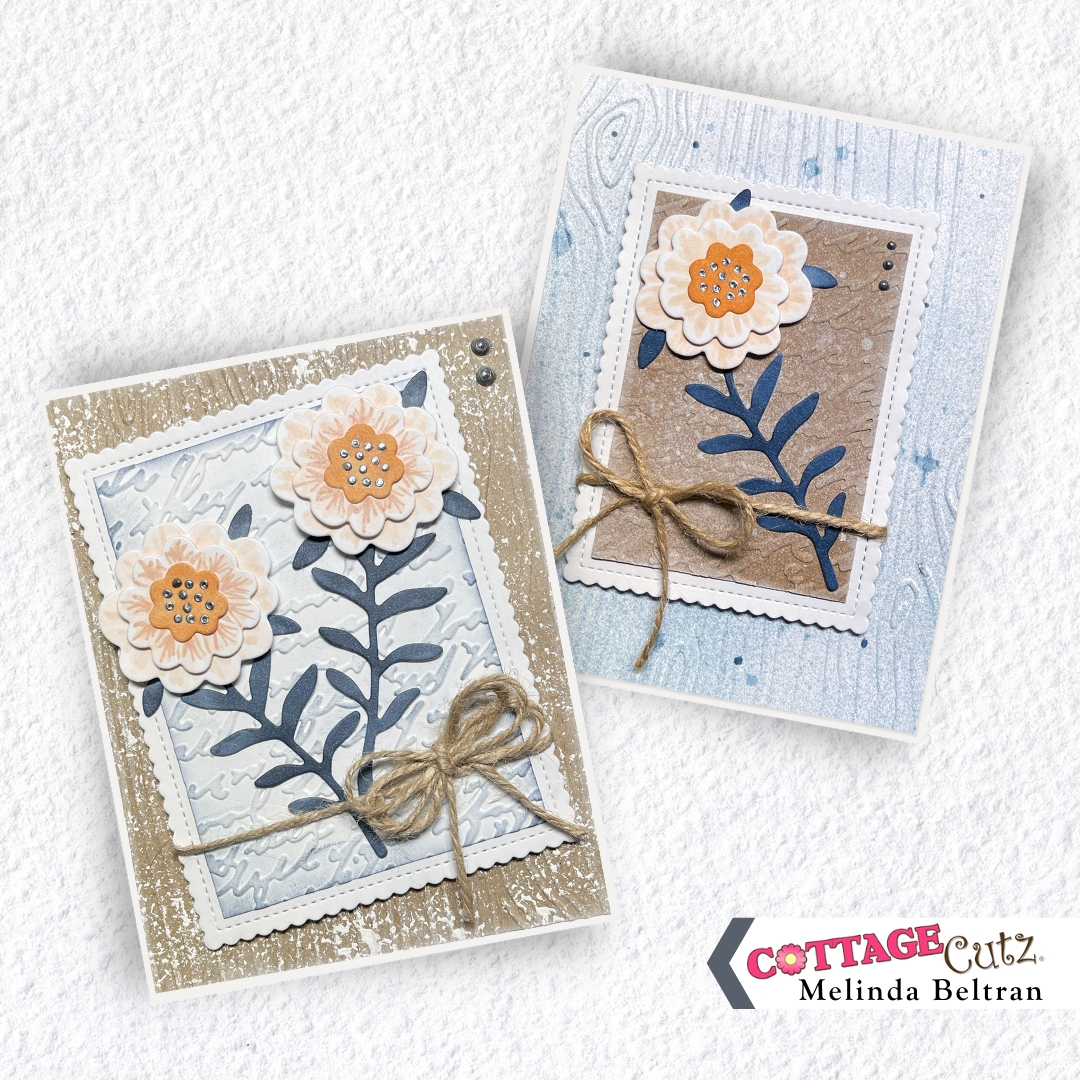
Here is one last look at both cards. A great tip to build your stash is to make sets of cards just like this. You don't have to put a sentiment on them until you know what the occasion is for. These are perfect for everything from Hello, thinking of you, to condolences, and anything in between!

Don't forget to check out the Cottage Cutz YouTube channel! Plus you want to check back here daily to see what the other amazing designers create. Until the next time, have a wonderfully crafty day! 

Dies Used To Create This Project


Friday, April 21, 2023

Spring Frog Tunnel Card


Hi everyone! Linh here and I have a new video up on the Cottage Cutz YouTube channelToday I'm sharing a fun tunnel card that features two different scenes staring our Spring Frog!  I love all the scene building elements of these die sets. They are so fun and filled with not just nature elements but also fun critters and of course the most adorable frog ever!


Thursday, April 20, 2023

Thank You Tulips

 Hello Friends,

It is Pam creating with you today!   

The flowers in this Easter collection are so versatile and gorgeous.  They would be perfect for a mother's day card, thank you, sympathy or just about anything! I am using the Spring Tulips for my Thank You card.


  Design Steps:

1.  Use a cream A2 size base, cut a piece of cream 4 x 5 1/4 you can use a cover plate or embosing folder for the background.  Use the Spring Tulips die and cut the tulips and leaves out of white card stock
2.  Use 2 shades of orange and yellow to ink up the tulips.  Use two shades of green to ink up the leaves and stems.  Assemble the flowers with a fine tip glue
3.  Use the Slimline Picket Fence die and cut it out of white.  Then glue it to the textured piece of cream.  Next use the Spring Grass die and cut it out of white twice.  Ink the grass with the same inks as the leaves.  Glue down the grass and then add the flowers
4.  Use the Expressions Thanks and cut it twice out of white and then ink with orange.  Glue the thanks to the upper right side of the card as shown and your card is complete

CottageCutz Products


We have more inspiration on our YouTube Channel check it out HERE

Thanks so much for stopping by!  And I will see you next Thursday.

Blessings and Take Care


Wednesday, April 19, 2023

Spring Themed Thinking of You Note Card


Hello, my crafty friends.  I hope you are beginning to see signs of spring and are getting outside more.  One of my favorite things about this time of year is listening to the birds sing again.  The melodic sound always brings me joy.  Especially, when I sit outside to enjoy my morning coffee.  Obviously, they were the inspiration for my card today.

I used two dies from the Easter release to create a cheery spring card.  I loved the size of the "Spring Bird w/ Vine" yet I wanted to add a couple flowers for that spring feel, so I used the flowers from the "Spring Potted Flowers w/ Bird."  I hope you'll join me over on the CottageCutz YouTube Channel to see how the card come together and to enter for a chance to win one of these two dies.  Until next time.... Marla


Tuesday, April 18, 2023

Hoppy Birthday Card


Hey Krafty Friends, Jen from Katahdin Krafts, back on the blog today with this fun "Hoppy Birthday" card.  I used the "Spring Frog w/ Mushroom" and "Pond w/ Cattails & Lily Pad" dies, from the Easter release to create this adorable frog pond scene. 


With my cloud stencil and oxide inks, I created a whimsical sky for my background.  Next, I cut the dies out on Copic marker friendly cardstock, and colored all the pieces.   Finishing off my card, I stamped "Hoppy Birthday" for my sentiment.  I love how these dies work so well together!  


I love that Spring is finally in the air!  Even way up here in northern Maine, we can finally see grass!  I can't wait to hear the peepers!  They are sweet music to my ears.  Comment below and share if you know what peepers are?!  

Thanks for stopping in and I will see you soon with another fun inspiration.  Take care and happy krafting!


Monday, April 17, 2023

Froggy Birthday

Hey there CottageCutz friends!  

Kris here again to share with you some crafty inspiration! For today's card I used the new Spring Frog w/ Mushroom and the Pond w/ Cattails and Lily Pad from the Easter/Spring Release.  


Design Steps:


I used some papers by Doodlebug Design and since I hate to waste pretty papers, I cut my red down to a 5-1/2" square, then I cut the inside out since it will be covered up anyways, and now I have a cute ladybug paper (backside of the red) to use on another project ☺

I cut some green and teal patterned papers to 5-1/4" wide and layered them onto card front (as shown in my completed card photo).

I used a sunrays stencil to apply green distress oxide inks to a white circle I had die cut using the Pierced Circles Set, then layered that onto 2 larger nested circles in shades of green.

I then die cut all my decorative elements from white cardstock and colored with Copics, and the sentiments I cut from blue and red cardstock + white glittered cardstock.  Easy peasy!


I hope you enjoyed my project today!  ✿ Kris


Sunday, April 16, 2023

Lattice Card with 3D Vellum Butterfly


Happy Sunday friends ღ

Kris here to share with you some crafty inspiration! I had some fun with vellum and metallic foil cardstock with the brand new Spring Butterflies from the new Easter/Spring Release.  

I decided to revisit a very old fun fold (I made some of these about 15+ years ago) but haven't made them in such a long time... it's called the Lattice Fold. 

Design Steps:

1.  I started with a double sided 12" piece of patterned cardstock and cut it to 5-1/2" x 8-1/2" - and scored the long edge at 4-1/4"

2.  I created a lattice template by cutting a piece of  65 lb. paper at 2-1/2" x 5-1/2"

3.  With paper placed vertically in front of me, I measured and made tick marks at 1/2" and 7/8" (from the left edge of paper) and drew straight lines to connect them as shown below.


4.  Along the very left edge of template, I made tick marks at 1/2".... 7/8".... 1-1/4".... 1-5/8".... 2".... 2-3/8".... 2-3/4".... 3-1/8".... 3-1/2".... 3-7/8".... 4-1/4".... 4-5/8"

5.  Along the 1/2" and 7/8" lines, I made tick marks at 1-1/4".... 2".... 2-3/4".... 3-1/2".... 4-1/4".... 5"


6.  I then used my ruler to draw diagonal lines to connect the tick marks as shown below.  Start at the top and connect the top tick mark on the left with the top mark on the 7/8" line.  Then 2nd line will connect to the 2nd tick mark on the left with the 1st mark in the 1/2" line and so on (see photo below)


7.  Fold your card base in half and align your template with the left folded edge of card.  Use clips to keep template in place and CUT only the diagonal lines.


8.  Remove the template and open your base.  Carefully cut off the bottom mountain (or upside-down "V") as shown below.


9.  Skip the next mountain, and bend the next one down and fold tip under the mountain that it overlaps as shown.  Continue moving up, and skipping every other mountain.


10.  Next I took that mountain I cut off in the beginning and added it to the TOP to complete that unfinished lattice area, only gluing the top of the "V" on each side.


11.  Next. I cut a piece of coordinating cardstock (green) that is 4-3/16" x 5-1/2" and taped it to the inside right of card.  It's best to apply your tape/glue to the (inside) card base instead of the insert.

*IMPORTANT - do not just adhere tape or glue to your green piece as you normally would, or you'll have adhesive showing thru the lattice on the front of your card and possibly stick to your envelope.


12.  Next I applied some glue to the parts of the lattice that are near the edge of the green cardstock.


13.  I stamped a sentiment onto lavender cardstock and die cut it with the largest of the Nested Scallop Rectangles set, then attached it to a darker purple cardstock that I had cut at 3-1/8" x 4-1/8" and adhered to card front as shown.

14.  I die cut the Spring Butterflies 3x --- once from vellum and twice from pink foiled cardstock, but one of those I ran it thru the machine with less pressure so that it would keep the inner parts in tact.  


15.  I glued all of the pink full butterfly with all the tiny pieces directly to my card front as shown below.

16.  The next pink butterfly, I punched out all the tiny pieces, and only applied glue to the body and adhered to body already there.  Then I slightly bend the wings upwards for more dimension.


17.  The vellum butterfly, I punched out all the tiny bits and applied glue to just the body, then bent the wings upwards even more than the pink one, for a very 3D effect.  The glue I use is Dries Clear by Art Glitter Glue so it won't show under the vellum. 


Thanks so much for popping by today!  
Have a BLESSED Sunday y'all! ♥Kris

PRODUCTS: