Saturday, April 18, 2020

Garden Wheelbarrow (new die)

Hello Scrapping Cottage friends! Thanks for taking the time to stop and visit with us today. It's Mary Marsh here bringing you the Saturday edition of the Blog. Hope you are doing ok in the midst of the pandemic. It's a great time to make some cards. I find it so relaxing being able to create and have my mind off all that's going on. 

We have a brand new release of dies in the online store. This one is garden themed and has 19 new designs. For a limited time, each individual die is 25% off or you can get the entire bundle for only $99. That's 69% off the retail price of each die. These new dies are perfect for birthdays, Mother's Day, Father's Day or even a thinking of you card for the person who loves to garden.

For my card today, I am featuring the new Garden Wheelbarrow  and the Garden Phrases dies. So let's get started with some details on how I created my card.

Design Steps:

This was a work in progress for me this week. I had a basic idea of what I wanted to do, but I would have to lay it all out to see how it would look. I started by cutting the wheelbarrow and flowers. I used various colors of cardstock for the die elements. You could also use white cardstock and color with your choice of medium. Either way will produce a beautiful image.
Next, I cut a phrase from the Garden Phrases die. I couldn't decide which one to use but eventually settled on the Live life in full bloom phrase. But any of the three would have worked for my card. I am going to use this as a birthday card with the birthday sentiment on the inside.
I wanted the wheelbarrow and phrase to have a fence as the backdrop. I first used an embossing folder but I didn't like that look. So I pulled out this stamp and used it to stamp my fence background. I used a light gray cardstock (smoky slate) and the matching ink. 

I didn't like the look of the fence without a bottom border of grass. So I cut a grass layer using the Spring Grass die.  It gave a more finished look to my fence.
Now that everything is cut, I can start the card assembly. I attached the wheelbarrow first using dimensional adhesive. I lifted it off the fence background slightly.
Next up, I attached the phrase using Ranger multi matte adhesive. I cut it 2x to give the phrase a bit more dimension. That's just my preference, because it looked ok with just a single cut.
To finish off my card, I attached the image panel to the red (lovely lipstick) card base. I also scattered a few lovely lipstick enamel dots.

Well that's it for me for this post. Our DT will be posting additional samples next week with these new beautiful dies. I will see you next Saturday.

dies I used to create card:


Friday, April 17, 2020

Spring Chicken

Happy Friday!  I hope everyone is well.  It's Jeanne today with a birthday card for all the "spring chickens" in your life.  This card uses the Rooster & Chick and Spring Lamb & Chick dies from the Spring collection.
I used the layout from this week's sketch challenge at Splitcoaststampers.  I rotated the sketch and made it square.
https://www.splitcoaststampers.com/forums/card-sketches-f41/sketch-challenge-786-%7B01-29-2020%7D-t632177.html
I first cut all the pieces for the rooster, chick and sun from various colors of scrap cardstock.  I debated about whether to go bright or more realistic for the rooster.  Once I had picked out my background paper I decided on the bright colors. (Ultimately I decided not to use the sun, but I saved it for later.)
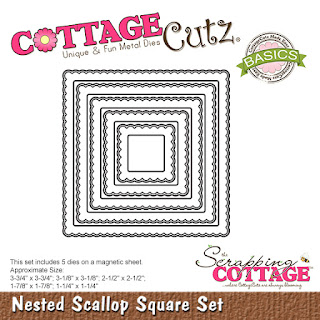
I used the second largest of the Nested Scalloped Squares and the third largest of the Stitched Squares to cut the center panels.  Then I cut a 5 inch square from solid yellow and a 4 3/4 inch square from patterned paper.  I picked these papers as I thought they had a "country" feel that went with the rooster.  I stamped my sentiment in the corner of the white square.
Next I used coordinating ribbon for the diagonal stripes.  I glued this to the yellow panel and then that to a top fold 5 inch square card.
In order to raise the square panel above the ribbon I placed foam tape on the back.  I left the corner that would go over the ribbon blank, so the square would lay flat over the ribbon.
After I placed the square and the rooster, I thought it still needed a little something.  And that something was flowers!  The flowers from the Spring Lamb & Chick coordinate perfectly with this paper!
I used the peacock blue and magenta that are in the paper for the flowers.
I love this little rooster!  I have a whole set of "punny" chicken sentiments, so I know this die will be getting a lot more use!

Dies used:
http://www.scrappingcottage.com/cottagecutzroosterandchick.aspx
http://www.scrappingcottage.com/cottagecutzspringlambandchick.aspx
http://www.scrappingcottage.com/cottagecutznestedscallopsquareset.aspx
http://www.scrappingcottage.com/cottagecutzstitchedsquaresetbasics.aspx

Thanks for stopping by today.  Be sure to visit the online store where we have a new Gardening release.  There is a great value bundle and all the individual dies are on sale for a limited time!


Thursday, April 16, 2020

Miss Ewe

Hello Scrapping Cottage Friends!

It is Pam creating with you on the blog today!

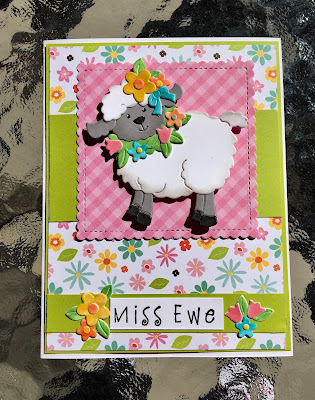
I don't know about you but I am really ready to see some of my friends and family.  Since I can't physically see them I am making a batch of cards to send out.  This little lamb was the perfect card for my sweet sisters!
Design Steps:


 1.  Cut out the lamb using the Spring Lamb & Chick die.  I cut them out in grey and white card stock


 2.  Using different colors of inks shade and color the pieces of the lamb before assembly.  I used a fine tip glue to attach all of the pieces

 3.  Use a white A2 card base, 4 x 5 1/4 piece of green DP, 3 3/4 x 5 piece of flowered DP, 1/2 x 3 3/4 piece of green DP and a 2 x 3 3/4 piece of green DP.  I also cut a pink checked DP square using the second from the largest Nested Stitched Scalloped Square die

4.  Glue the large green piece to the card base then add the flower DP and finally add the strips of green as shown

 5.  Next glue flat the pink checked square

6.  Finally add the lamb using pop dots add the sentiments.  I thought the sentiment needed some flowers around it so a cut out a few and added them around the sentiment

Cottage Cutz Products

I hope that you are making tons of fun cards during this difficult time.  I know being creative really helps me keep my spirits up!
Blessings
Pam

Wednesday, April 15, 2020

It's your Birthday - Paint the Town!

Hello!  This is Sukie and today I have a bright and cheery card to share for my design team post.  I used one of the intricate dies from the Spring die release.
I cut out the largest butterfly from the Springtime Butterflies die set and opted to leave all of the negative space pieces intact.  The butterfly was inked up with some Oxide Inks.  The doily is from the Nested Stitched Doily Set.
I used a rainbow of Oxide Inks to create the background for my card. Once the ink was dry, I splattered it with some water.
I waited for the water to dry and then splattered the card panel with some white paint.  Next, I embossed it with a butterfly embossing folder.
The doily was adhered in the center of my card base breaking up the rainbow background.  The white doily also helps to bring out the paint splatters.
The butterfly was nestled inside the doily.  A heat embossed sentiment on some vellum was the finishing touch on my card.
Here are the dies used on my card, available in the store:

Tuesday, April 14, 2020

Small Cards for Different Occasions

Hi Janja here. Welcome to the blog today.
I hope you all had a wonderful and healthy Easter holidays.

I made four small cards for different occasions. It's always good to have some of these cards in stock.


- CottageCutz dies: Orchids, Thanks Phrase, Potted Cactus, Valentine Phrase & More, Oh No Kitty, Bear Patient, Sending Hugs Bear, Stitched Squares Set, Stitched Wide Square Frame Set
- blank cards: 4 x 4" (10,2 x 10,2 cm), folded
- patterned paper: 3.5 x 3.5" (8,9 x 8,9 cm)
- colored cardstock
- colored ink pads
- glue, double-sided adhesive tape

I used some flowers, animals and expressions dies.
First, start by cutting out the main motives.


Then, cut four squares out of the patterned paper. Use the largest die of the set.
Also cut two white frames for each card and glue them together.
Paste all cutouts to the front of the cards.


Completed cards.


Thank you for stopping by.
Janja