Showing posts with label Wishes w/Shadow. Show all posts

Saturday, April 09, 2022

Protea for Mother's Day (new die)

                           New CottageCutz 
                   Australian Friends Release

14 New CottageCutz Designs


They are currently in the store and on sale at 30% off the individual dies. 
Hello CottageCutz friends! Thanks for taking the time to stop and visit with us today. It's Mary Marsh here bringing you the Saturday edition of the Blog.

Today for your viewing pleasure, I am featuring the new Protea die. I created a Mother's Day card for a friend. I usually send a lot of cards to my friends for Mother's Day, so this is my first one for this holiday. So, let's get started on some details of how I created my card.

Design Steps: 

I started my card by cutting the protea images. I used different shades of bright cardstock. I somewhat followed the coloring on the packaging. That's always a big help if you're undecided on what colors to use. I attached the protea image to a white square. It's the largest (3 1/2") of the Stitched Square dies.  
The card layout I used is an older sketch I had saved on my Pinterest page. Having a layout in mind is a big assist for me with cardmaking.  
Next, I selected the card colors and designer paper. I wanted something with stripes, and I found this blue pattern. I thought it works well with the shades of pink I used for the protea. I decided to use a blue ribbon to act as a divider between the panels. 

White Card Base: 4 1/4" x 5 1/2"
Designer Paper Layer: 4" x 2 1/2"
I stamped my Mother's Day sentiment directly on the flower vase. 
Now that my elements are prepared, I am ready to start card assembly. I attached the designer paper and the ribbon with double sided tape. I took the ribbon to the inside of the card, and I will add another layer of cardstock inside to cover the ribbon. 
I attached the image panel with double sided tape. I layered this panel with a bright pink cardstock. It measures 3 5/8" square.  I also scattered a few bright pink enamel dots.
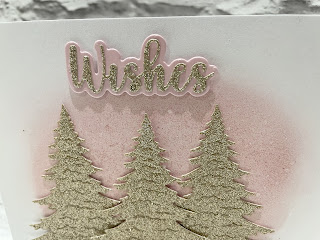
I decided to add another sentiment to finish off my card. I used the Wishes w/Shadow sentiment and cut it in 2 shades of pink. I decided to rotate the enamel dots from squares to diamond shapes. I moved them around and added to additional to highlight the wishes phrase. 
  
Well, that's it for me for this week. I hope I have given you an idea for a way to use this new die. See you next Saturday. 

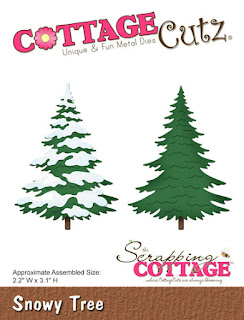
dies I used to create card:


Tuesday, December 07, 2021

Classy Christmas Card


Happy Tuesday Cottagecutz fans. It’s Wendy bringing you the blog today. We are less than 3 weeks until the big day so I wanted to create a quick and easy card, with flair and finesse. I also am so aware that I haven’t made my family cards yet so this will be my card of choice this year

I don’t have a full tutorial for this card as you will nail it in minutes but here are the instructions.

I used the Victorian Velvet Distress Ink to create a background. My choice of weapon is blending brushes as they give a beautiful background and there are no hard edges, it just blends so well. I then used a ‘Wink of Stella’ brush pen to flick some glitter on the card to give it some dazzle. It may be hard to see but the original looks to pretty. 

Next I used the Snowy Trees die and cut this out 3 times in non shed glitter card. I attached 2 of the tress to the card with glue and the middle one I used 1mm foam pads for dimension.

Finally I used the ‘Wishes’ sentiment to finish off the card in coordinating colours and we are done.

Here’s a close up, I really hope you can see how pretty the ink looks


Thank you for stopping by, It means heaps. I am going to be back on Friday with a full tutorial for you so have a wonderful week
Wendy

Ooh and don’t forget to keep logging onto our YouTube page for more inspiration. The designs are amazing


Dies I used:


Friday, September 03, 2021

Sweet Wishes

Happy Friday!  It's Jeanne today.  I have a card that I made for a double challenge - a color and sketch challenge at CAS Colours & Sketches. Talk about a card that went quickly!  The colors AND the layout were decided for me.

Here is the challenge.

I thought this would be perfect to showcase some of the images from the In the Kitchen stamp set.  I didn't have markers in the exact challenge colors so I used close matches in Copic markers and Spectrum Noir Tri-Blends.


 Next I put the card together.  To anchor the images I used a heart stencil in the corner and faded it out as it went to the upper right.

The mixer and flour sack are glued to the card and the apron is popped up using foam dots.

I used the Sweet w/Shadow and Wishes w/Shadow to create the sentiment.

I opted not to use the shadows though in order to keep it clean and simple.  I love the new Lil' Bluebird Designs stamps and the sentiments with shadow dies.  They are so versatile and right now they are on sale in the online store.

Products used:


Thanks for visiting today!  I hope you have a fun and creative holiday weekend.


Wednesday, August 25, 2021

Wishes

Hello!  This is Sukie and today I'm sharing a festive card.  My card features one of the die sets from the brand new Sentiments with Shadow die release.  There are 12 new sentiment dies and each has a shadow feature.  They are perfect for everyday cards and are currently on sale too!

I cut out the adorable llama from the Lil' Bluebird Designs Llama Love stamp and die set. I used my Distress Inks and watercolor pencils to color everything.  The sentiment is from the new Wishes w/Shadow die set.  I cut out an extra shadow piece.
This festive paper is from my stash and I used the Cottage Cutz Oval set to cut out the oval in the center of my card.  I placed a hot pink panel behind the oval and added it onto an A2 card base.
The llama was centered inside the oval as the focal point of my celebratory card.
Next, I adhered some pop dots between the 2 shadow layers of the sentiment and adhered it onto my card.  The pop dots provide some dimension to the whimsical sentiment.
A few enamel dots were sprinkled around the llama as the finishing touch on my card.
Here are the products used on my card, available in the store: