Showing posts with label Nested Scallop Rectangle Set. Show all posts

Tuesday, June 06, 2023

Folk Art Easel Card With Extra Opening

Happy Tuesday cottage cutz friends,
Melinda here and today I am sharing a card I created with some wonderful dies from the new Cottage Cutz Folk Art Release. There are some unique and fun dies in this set! Here is what I created.
My card is a top folding easel card with an additional inside opening. Here is a view of the card as it stands open with the easel base.


This is the top flap of the card. It is top folded so the card opening is at the bottom. It is a horizontal 5x7 top folding size.  I love the way it turned out.


To create my card, I started with two card bases of white cardstock. They are both folded 5x7 cards. To achieve these, I cut my papers to 7 x 10 and scored and folded them along the 10" side at 5" I turned them so the folds would be on the top. 

For the easel base, I did an additional score at 2.5" along the same 10" side. Essentially that is one flap of your card folded in half.


Once I did that, I took the second top folded card and glued the bottom 2.5" flap to the bottom of the back of the second card. 


I then used some patterned paper from an old paper pad from Hobby Lobby called Kellerkurtz & company. The pad has a vintage type theme. The two photos above show the different layers with the patterned paper only. 


Next I went ahead and cut out all the die cuts I planned to use in white cardstock. I decided I wanted the card to have a very minimalist type look even though the patterned paper was a bit shabby and vintage looking. Here is a closer look at the beautiful heart and butterfly dies from this collection. I added some Nuvo Pearl drops as well as some stickles and some clear glaze to the various areas to give them a bit of understated pizzaz.


Here is a look at the card when it is opened up and with the easel flap. I left two areas to write a sentiment and also for other co-workers to sign as this card is for a co-worker. This card turned out so nice and I love this new release from Cottage Cutz. Be sure to head over and pick yours up today!


Happy Birthday w/Shadow
(Out of Stock)


Well that about covers it for today. Be sure to head back by each day this week as the rest of the design team will be sharing projects featuring this fantastic set. Also be sure to come by Friday and Saturday as we will have ADDITIONAL group project featuring this amazing release!

Also, don't forget to head over to the Cottage Cutz YouTube channel for some more great content and inspiration!

Until the next time, have a wonderfully crafty day!

-Melinda

Sunday, April 16, 2023

Lattice Card with 3D Vellum Butterfly


Happy Sunday friends ღ

Kris here to share with you some crafty inspiration! I had some fun with vellum and metallic foil cardstock with the brand new Spring Butterflies from the new Easter/Spring Release.  

I decided to revisit a very old fun fold (I made some of these about 15+ years ago) but haven't made them in such a long time... it's called the Lattice Fold. 

Design Steps:

1.  I started with a double sided 12" piece of patterned cardstock and cut it to 5-1/2" x 8-1/2" - and scored the long edge at 4-1/4"

2.  I created a lattice template by cutting a piece of  65 lb. paper at 2-1/2" x 5-1/2"

3.  With paper placed vertically in front of me, I measured and made tick marks at 1/2" and 7/8" (from the left edge of paper) and drew straight lines to connect them as shown below.


4.  Along the very left edge of template, I made tick marks at 1/2".... 7/8".... 1-1/4".... 1-5/8".... 2".... 2-3/8".... 2-3/4".... 3-1/8".... 3-1/2".... 3-7/8".... 4-1/4".... 4-5/8"

5.  Along the 1/2" and 7/8" lines, I made tick marks at 1-1/4".... 2".... 2-3/4".... 3-1/2".... 4-1/4".... 5"


6.  I then used my ruler to draw diagonal lines to connect the tick marks as shown below.  Start at the top and connect the top tick mark on the left with the top mark on the 7/8" line.  Then 2nd line will connect to the 2nd tick mark on the left with the 1st mark in the 1/2" line and so on (see photo below)


7.  Fold your card base in half and align your template with the left folded edge of card.  Use clips to keep template in place and CUT only the diagonal lines.


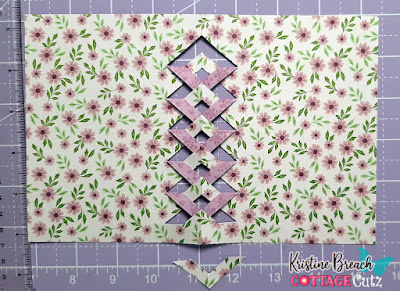
8.  Remove the template and open your base.  Carefully cut off the bottom mountain (or upside-down "V") as shown below.


9.  Skip the next mountain, and bend the next one down and fold tip under the mountain that it overlaps as shown.  Continue moving up, and skipping every other mountain.


10.  Next I took that mountain I cut off in the beginning and added it to the TOP to complete that unfinished lattice area, only gluing the top of the "V" on each side.


11.  Next. I cut a piece of coordinating cardstock (green) that is 4-3/16" x 5-1/2" and taped it to the inside right of card.  It's best to apply your tape/glue to the (inside) card base instead of the insert.

*IMPORTANT - do not just adhere tape or glue to your green piece as you normally would, or you'll have adhesive showing thru the lattice on the front of your card and possibly stick to your envelope.


12.  Next I applied some glue to the parts of the lattice that are near the edge of the green cardstock.


13.  I stamped a sentiment onto lavender cardstock and die cut it with the largest of the Nested Scallop Rectangles set, then attached it to a darker purple cardstock that I had cut at 3-1/8" x 4-1/8" and adhered to card front as shown.

14.  I die cut the Spring Butterflies 3x --- once from vellum and twice from pink foiled cardstock, but one of those I ran it thru the machine with less pressure so that it would keep the inner parts in tact.  


15.  I glued all of the pink full butterfly with all the tiny pieces directly to my card front as shown below.

16.  The next pink butterfly, I punched out all the tiny pieces, and only applied glue to the body and adhered to body already there.  Then I slightly bend the wings upwards for more dimension.


17.  The vellum butterfly, I punched out all the tiny bits and applied glue to just the body, then bent the wings upwards even more than the pink one, for a very 3D effect.  The glue I use is Dries Clear by Art Glitter Glue so it won't show under the vellum. 


Thanks so much for popping by today!  
Have a BLESSED Sunday y'all! ♥Kris

PRODUCTS:


Monday, March 13, 2023

Sweet Easter Wishes

Hello Scrapping Cottage peeps! 🐤

Kris here, sharing an Easter card featuring the CottageCutz Spring Bowl w/ Eggs.  


Design Steps:

I cut and layered the following, bottom to top:

• White card base = 4-1/2" x 11" and score at 5-1/2" for a top folding card
• Patterned paper (gingham) 4-1/2" x 5-1/2"
• Die cut largest from the Nested Scalloped Rectangles set (attach with foam tape)
• Patterned paper (scripty) 4-1/4" x 5-1/4" 
• Die cut largest of the Nested Stitched Scalloped Circles set
• Die cut Spring Bowl w/ Eggs, the Sweet w/ Shadow, and Wishes w/ Shadow from white cardstock and apply distress ink and/or markers.  Assemble. 
• Adhere bowl to lower part of scalloped circle with a thin piece of foam strip.  Adhere eggs behind the bowl with glue.
• Stamp "Easter" and trim.
• Run ribbon around the Scalloped Rectangle (between foam strips) and tie a knot on front right side.
• Add foam strips to each of the sentiments and adhere as shown.

Kept it fairly simple this week.  I hope you all have a funtastic week!
~Kristine

Products I used:


Saturday, November 12, 2022

Gingerbread and Cocoa Easel Card

Happy Saturday Cottage Cutz Friends!
Melinda here with you, and today I am sharing a cute and easy Christmas themed easel card I created with some dies from the FABULOUS Part2 Christmas release!
Here is my finished card. It is an A4 sized card. I created an easel card base to give this little card some extra wow. My card features one of the super adorable Ginger friends. I also included the phrase die, Cookies & Cocoa with those cute chocolate chip cookies and that adorable cup of cocoa. I also used the tree from the Merry Christmas Tree die from the Christmas Release Part 1.  I mounted the cookies and the cup of cocoa onto the smallest nested stitched doily from that die set. I then layered some patterned paper mats onto the two different largest sized scallop stitched rectangle dies for some extra layers and dimension. To keep the Easel open, I added some layers of the double-stitched rectangle dies and used some thick foam tape to give them some lift. I added the "Tis the Season Sentiment" to those dies along with some patterned and cardstock mats.


Here's a closer look at the front of the card standing in the easel position. Here you can see all of the fun dimension I added to the die cuts with some foam tape. For the cup of cocoa, I added some dimensional white paint and some stickles glitter to add some dimension to the "whipped cream". I also added some stickles to the cute little hearts and the little snowflakes.

TIP: Making an Easel card is super easy!
Simply score the top of your card in half. Then cut a piece of the same base of cardstock paper you are using and cut it to the same size as the top. You will always adhere it to the lower half of the scored top only. This will allow the card to lay flat for giving and storing and will allow the top to stand once you use something in the inside to create a "stop".


Here's a look at the inside of the card. I used a Scallop Stitched Rectangle die and mounted it to the top of the inside of the card. This is where I will write my personal greeting.

Here's a closer and side view of the inside, "Tis the Season" sentiment. You can see I added some glitter to the sentiment. It adds a nice touch without being too overbearing.

Here's a closer look at the sentiment "Cookies & Cocoa" die. I cut them out of some plain white cardstock. I then colored them in with my markers. 


Here's a view of what the card looks like closed.

Here's a closer look at the gingerbread girl. I cut her out of some gingery brown cardstock. I edged her with some chalk and then added the cute little stitch lines. I colored her bow and scarf with some pink markers and my spectrum noir glitter pen. The photo doesn't capture the subtle glitter from the pen. I also added some stitch lines to her scarf and bow. 


Don't forget to head over to the CottageCutz YouTube channel and check out all of the amazing projects on there. Our video team is doing a wonderful job of filling the channel with all sorts of creative content! You don't want to miss it!

Dies I Used


Double Stitched Rectangle Set


Nested Stitched Doily Set


Nested Scallop Rectangle Set


Here's a look at the entire release. Be sure to head over and grab them while they last!


Well that about covers it for today! Until the next time, have a wonderfully craft-die day!
Melinda Beltran