Showing posts with label Mary Marsh. Show all posts

Sunday, November 26, 2023

Easel Card using Strawberry Plant Die

Hello CottageCutz friends! Thanks for taking the time to stop and visit with us today. It's Mary Marsh here bringing you the Sunday edition of the Blog.

It's new release time!!! we have our annual Black Friday release available now in the online store. There are 19 different designs and they can be used for all seasons. The dies are broken into 2 different bundles with bundle pricing under $78. Bundle pricing is only available through Friday, December 1. Or you can pick up the individual dies for 30& off.  

Kristine featured the first sample on Friday - see it here. Marla has a new video on our YouTube channel. She does a review of Bundle #1 with a giveaway. See it here. 

Now onto my sample for today. I am featuring the new Strawberry Plant and the Sentiment Thank You Berry Much and I created an easel fun fold card.  
I needed a thank you card for a gift of homemade Strawberry Jam that I received from a friend. So, let's get started with some details of how I created my card. 

Design Details:

I started my card by first cutting the images with red & green cardstock. The sentiment is cut in white. 
Next, I started on my easel card. My base layer is red cardstock measuring 8 1/2" x 5 1/2". Then is gets scored at 2 1/8" and then at 4 1/4". 
Fold the score lines and now you have your card base. It forms a tent shape. 
Then cut another piece of red cardstock at 4 1/4" x 5 1/2". It will cover the entire front of card. You only need to tape the lower portion of the fold. This will be the panel that gets decorated. For those that like a video. Here is one that shows the steps I just did for you. 
I used a wood plank designer paper cut at 4" x 5 1/4" and taped this to the card front panel. 
For the card inside I cut a piece of white cardstock at 4" x 5 1/4" and also a piece of designer paper at 2" x 5 1/4". The sentiment berry will sit on the designer paper. I can write a personal note on the white panel. 
I attached the Berry sentiment with dimensional adhesive. I also cut the berry 3x so it would lift off the card at the height I wanted. 
To finish off my card, I attached the strawberry plant and scattered a few red enamel dots for added interest. That's my sample for this new release. See you next Saturday.


Saturday, November 18, 2023

Autumn friends Celebrate Thanksgiving

Hello CottageCutz friends! Thanks for taking the time to stop and visit with us today. It's Mary Marsh here bringing you the Saturday edition of the Blog.

It's new release time!!! We have our Christmas 2023 release in the online store that has 40 designs. It's an old-fashioned Christmas theme. You can pick up the individual dies at 30% off for a limited time.

We also have a new Fall 2023 release in the online store with 15 designs. You can also pick up these individual dies at 30% off for a limited time.

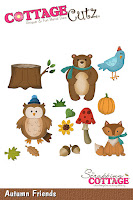
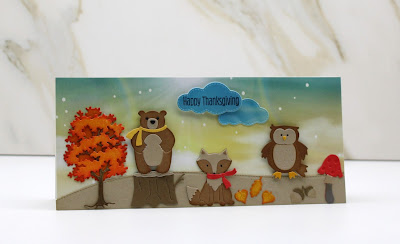
Today for your viewing pleasure, I am featuring the new Autumn Friends and the Fall Tree dies. I created a slimline Thanksgiving card for a family that has 2 young boys. I thought the whimsical style would be a perfect card for them. So, let's get started with some details of how I created my card. 

Design Steps:

I started my card this week with the colors. I used the colors from the Splitcoaststampers color challenge #974. We were to use poppy parade, crushed curry, pecan pie and crumb cake for the color combination. Optional was anything goes. I chose the addition of blue for this part. 
poppy parade, crushed curry, pecan pie, crumb cake 
I cut the Autumn Friends images in the challenge colors plus a few allowed neutrals. 

For the Fall Tree, I wanted the look of the trees we see in PA in the Fall season.  So, I cut in white cardstock and blended barn door and fossilized amber distress inks to get a beautiful Fall color. I colored the 3 leaves with the same inks. These inks are a match for the Stampin'Up colors. 
Next, I chose this pattern of designer paper for the card background. I liked the blue sky and the sun rays. It's from a pack called "heavenly skies" (Divinity Designs) and they are sized for a slimline card at 6" x 9".  
I cut a white card base 4" x 9" and the designer paper is also 4" x 9" to cover the white card front. 
 I attached the designer paper to the card base. And cut a slope in the crumb cake shade using the Hills Slimline die. They are both attached with double sided tape. 
I attached my images with clear drying glue except for the Bear & Owl. I used dimensional adhesive to have lifted slightly off the card base. 
To complete the card, I cut a couple of clouds using the Stitched Sun, Clouds & Umbrella die. I cut them from the leftover designer paper.  Stamped my Happy Thanksgiving sentiment and attached to the card base. 
That's it for me for this week. See you next Saturday. Happy Thanksgiving to all our American friends. 

Reminder: Marla has a new video and a giveaway on the CottageCutz YouTube channel. Click here.


Saturday, October 14, 2023

Holiday Angel

Hello CottageCutz friends! Thanks for taking the time to stop and visit with us today. It's Mary Marsh here bringing you the Saturday edition of the Blog.

It's new release time!!! We have our Christmas 2023 release in the online store that has 40 designs. It's an old-fashioned Christmas theme. You can pick up the individual dies at 30% off for a limited time.

We also have a new Fall 2023 release in the online store with 15 designs. You can also pick up these individual dies at 30% off for a limited time.

Today for your viewing pleasure, I am featuring the new Holiday Angel die and created a Christmas card that would be easy to recreate for multiples. 

Design Steps:

I used the Splitcoaststampers color challenge #968 for my card colors this week. We were to use lemon-lime twist, daffodil delight and coastal cabana for the color trio. Optional was anything goes. I used designer paper for that option. 

I wanted to do either Christmas or Fall with these colors and Christmas won out. Using the new Holiday Angel die, I thought I could make the colors work for a Christmas card. 
lemon-lime twist, daffodil delight, coastal cabana
We also have the option to use neutral colors and that's a big plus. I used gray for my card base, metallic silver for the layering panel and the gray designer paper. The designer paper reminded me of a starry nighttime sky.

Basic Gray Card Base: 4 1/2"x 5 3/4"
Metallic Layering Panel: 4 3/8"x 5 5/8"
Designer Paper Layer: 4 1/4"x 5 1/2"

 I used the Holy Nativity die (Christmas 2020) and cut just the phrase in black foil.
Cut the angel in a white glitter paper and used the challenge colors for her hair, wreath and sash. I colored her face, feet and hands with Copic markers E00 (skin white) and E21 (soft sun).
I attached the angel with dimensional adhesive to complete my card. That's it for me for this week. See you next Saturday.
Reminder: Marla has a new video and a giveaway on the CottageCutz YouTube channel. Click here.


Saturday, October 07, 2023

Fall Centerpiece (new die)

Hello CottageCutz friends! Thanks for taking the time to stop and visit with us today. It's Mary Marsh here bringing you the Saturday edition of the Blog.

It's new release time!!! We have our Christmas 2023 release in the online store that has 40 designs. It's an old-fashioned Christmas theme. You can pick up the individual dies at 30% off for a limited time.

We also have a new Fall 2023 release in the online store with 15 designs. You can also pick up these  individual dies at 30% off for a limited time.

Today for your viewing pleasure, I am featuring the new Fall Centerpiece die and I created a Thanksgiving card. So let's get started with some details of how I created my card. 

Design Steps:

I started by choosing my card colors.  I decided to use some rich jewel colors for the card base, layering panel and the designer paper. These are Stampin' Up colors of rich razzleberry, purple posy and the designer paper is a rich razzleberry shade. 
I embossed the purple posy layer with a diamond folder for some background texture. I used rich razzleberry ribbon to join the two panels. 

Rich Razzleberry Card Base: 4 1/2" x 5 3/4"
Purple Posy embossed layer: 4 1/4" x 3 1/2" 
Designer Paper Layer: 4 1/4" x 2"
I assembled the Fall centerpiece using the packaging colors. I also used the packaging for placement of the die cut pieces since I assembled this on the embossed panel. 
For my sentiment I decided to use the Thanks w/Shadow die.   I cut the shadow in a chocolate cardstock and the thanks word in purple posy cardstock.
To finish off my card I stamped the "let us give" phrase in rich razzleberry ink on purple posy cardstock and added a chocolate layer. I attached it with double sided tape and the Thanks phrase with clear drying glue. 
That's it for this week. I hope I have given you an idea for a way to use this new die. See you next Saturday. 

Reminder: Marla has inspiration on the CottageCutz YouTube channel. Click here.


Wednesday, October 04, 2023

Fall Designs Group Post (Day 1)

Hello CottageCutz friends! Thanks for taking the time to stop and visit with us today. This post is featuring cards using the new Fall Release. There are 15 designs in this release and are available in the online store with special pricing.

The designs are so perfect for all your Fall projects- birthday, Thanksgiving, thinking of you, encouragement and home decor just to name a few.  They allow you to add a beautiful touch of Fall to whatever you may be creating.

We have had a good response when we do a group post on a new release. It gives you the opportunity to see more card samples from the Design Team. There are 3 samples in today's post and on Friday we will have another 3 samples.

Now onto our samples for today. 

Card 1: Our first sample today is from Marla Harris. She is featuring the Harvest FoliageFall Branch w/Swing and Autumn Friends dies.   
She took a step away from the traditional fall colors and created a vibrant card ready to brighten someone's day. 
The jewel toned leaves make a great frame for her bird on the swing. It's an ink smooshing technique.  The embossed background was inked before she ran it through her machine. You can see the process video on her YouTube channel - here.  
 

Card 2: Our next sample today is from Pam MacKay. Her card is featuring the Harvest Pumpkins and Fall Barrel dies in a larger format - 6 1/4" x 4 1/4". 
Her idyllic scene is so reminiscent of many yards across the land. It calls to mind images of cooling weather, golden sunlight, and fields of pumpkins ready to be picked before the frost arrives.  


Card 3: Our 3rd and last sample today is one that I (Mary Marsh) created using the Fall Scarecrow die.  I just couldn't resist the happy expression on his sweet little face. It doesn't seem like he could scare the birds away. 
I stenciled some clouds using prize ribbon distress ink and added some grass with peeled paint distress ink. The sun is from the Stitched Clouds, Sun & Umbrella die.  
I thought it would be a great Thanksgiving card to send to friends who have young boys. 

That's it for our samples for today. Stop back again on Friday for Day 2 of the Fall Release to check out what the other designers have created.