Showing posts with label Festive Birthday Greeting. Show all posts

Saturday, June 18, 2022

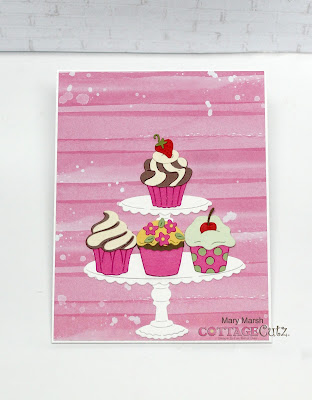
Birthday Cupcakes on Pedestal

Hello CottageCutz friends! Thanks for taking the time to stop and visit with us today. It's Mary Marsh here bringing you the Saturday edition of the Blog.

Our Sweet Treats dies with 13 new designs are still available in the online store. They are so perfect for any card making occasion you may have. The individual dies are currently 30% off.

Today for your viewing pleasure, I have created a Birthday card using the Pedestal w/Cupcakes die. This one will be going to my good friend who celebrates a summer birthday.  So, let's get started with some details on how I created my card. 

Design Steps:

Since I knew the die, I was going to use, I decided to use papers and colors that I think are more on the feminine side. I went with a magenta cardstock and designer paper for the card base and layering panel.

Magenta Card Base: 4 1/4" x 5 1/2"
White Layering Panel: 4 1/8" x 5 3/8"
Magenta Designer Paper: 4" x 5 1/4"
Next, I cut my cupcakes in complementary colors. I kept the pedestal white to have it stand out against the designer paper. 
I cut the happy birthday phrase from an older CottageCutz die. The "festive birthday greeting" is from the 2019 Birthday release. I cut in white and did an offset with the magenta cardstock just for a bit of variation. 
Now that my card elements are prepared, I am ready to start card assembly. I attached the designer paper to the white layering panel with double sided tape. Then I added my pedestal and cupcakes using a combo of art glitter glue (dries clear) and double sided tape. 
The happy birthday phrase is attached with art glitter glue. 
To finish off the card front I secured the image panel to the card base. 
I had an extra cupcake so I used it on the inside of my card. I stamped my sentiment, added a piece of the leftover designer paper and the cupcake. And this card is ready to get mailed out in a couple of weeks.
Well, that's it for me for this post. I hope I have given you an idea for a way to use this new die.

Reminder: Our YouTube Channel has a new video from Jen Hartsgrove. There is a giveaway for being a subscriber, liking the video and leaving a comment.  Click here

dies I used to create card:   


Saturday, June 13, 2020

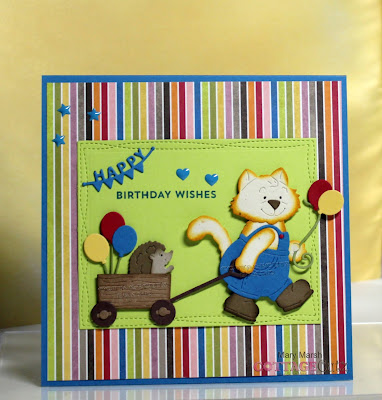
Kitty & Hedgie Birthday Wishes


Hello Scrapping Cottage friends! Thanks for taking the time to stop and visit with us today. It's Mary Marsh here bringing you the Saturday edition of the Blog.

The 19 new designs in the Garden release are still being featured in the online store. These new dies are perfect for Father's Day, birthdays, thank you, or even a thinking of you card for the person who loves to garden.

For my card today, I am featuring the new Garden Cat w/Wagon die and created a birthday card. This little cat and hedgehog are just too cute and I thought they would make a great whimsical card. So let's get started with some details on how I created my card. 

Design Steps:

I started off by selecting my cardstock and designer paper. I had a layout in mind with several layers,  but it didn't work for these images. So I flipped the designer paper over and decided to use the striped side. My original plan was to use the side of the paper with balloons but it wasn't working for me. This is also a square card. I hadn't planned on that when I started though (lol)!! I realized this was going to be a work in progress this week.

Blue card Base: 5 3/4" Square
Striped Designer Paper: 5 1/2" square 
Next, I cut the cat in an ivory confetti cardstock and sponged fossilized amber ink for a different look.  The wagon and hedgie are cut in different shades of brown cardstocks and also sponged in the matching inks for more depth. 

I plan on giving this card to a little 5 year old boy so I didn't want to place flowers in the wagon. I thought balloons and then pulled out the Festive Birthday Greeting die. It was released in June 2019. I cut 3 for inside the wagon and then 2 additional for the cat to carry. 
Because of the bold striped background, I needed another layer to place my images on. I picked one of the colors (lemon-lime) in the designer paper and used the largest Wacky Stitched Rectangle die. Looks like it's out of stock but the Stitched Rectangle die would be a good substitute. 

I thought I would use the Happy phrase that's part of the Festive Birthday Greeting die and then stamp birthday wishes in the corner of the rectangle. I stamped with a royal blue ink. 

Now I am ready to start card assembly. I attached the images to the rectangle panel with dimensional adhesive. That always gives a nice look to the card. 
Attached the designer paper to the card base with double sided tape and then the image panel with the same adhesive. For the balloons that the cat is carrying, I used a dab of ranger multi medium matte adhesive. 
To finish off my card I added a few royal blue enamel dots. And, that completes my card for this week. I hope I have given you an idea for a way to use this new die. See you next Saturday!

dies I used to create card:


Saturday, September 07, 2019

Mad Hatter "Unbirthday Cake"

Hello Scrapping Cottage friends! Thanks for taking the time to stop and visit with us today. It's Mary Marsh here bringing you the Saturday edition of the Blog. 

The new release of Birthday dies have been restocked in the online store.  So if you didn't get the ones you wanted previously, all 25 designs are in stock. This release is filled with cute little whimsical animals, birthday cakes, cupcakes and birthday phrases. Everything you need to create some outstanding birthday cards.

Today for your viewing pleasure, I am featuring the Mad Hatter Cake die. In case you aren't familiar with the story of Alice in Wonderland, she attends an "unbirthday" party.

Alice at first doesn't realize what an un-birthday is; when the Mad Hatter explains it to her, she realizes it is her un-birthday as well, and receives an un-birthday cake from the Mad Hatter Everyone has one birthday a year so all the other days are your un-birthday! My friend's daughter loves everything with an "Alice" theme. So I think I am going to send this to her.

So let's get started with some details on how I created my "un-birthday card".

Step 1: The sketch #765 over on Splitcoaststampers caught my eye.  It would allow me to use designer paper and the center panel is perfect for my mad hatter cake image.
I looked through my designer papers for one that would fit with the fantasy world theme of Alice in Wonderland. I found this paper and I thought the quirky design would work. It's from the Playful Palette collection by Stampin'-Up. I used the coordinating cardstocks for my card base and layering panel.
Black card Base: 4 1/4" x 5 1/2"
Sweet Sugarplum layering panel: 4 1/8" x 5 3/8"
Designer Paper: 3 7/8" x 5 1/8"

Next I cut the Mad Hatter Cake image using coordinating and complimentary cardstocks- berry burst, sweet sugarplum, peek-a-boo peach, dapper denim and emerald envy. 
For element 3 of the sketch, I cut black cardstock 1 1/2" x 5 1/8". For element 4, I used the 2nd largest (3 1/8") stitched square die and cut in sweet sugarplum cardstock. For element 5, I used the 2nd largest circle set die and cut in very vanilla cardstock. 
Step 2:  I am ready to start card assembly. I secured the panels with double sided tape. 
Attached the square and circle with double sided tape. On the mad hatter cake I used dimensional adhesive to lift it off the circle slightly. That always adds a bit of depth to your card. 
Since I wanted this to be an Un-Birthday card, I had to get a bit creative with the sentiment. I used the Happy banner from the Festive Birthday Greeting die and then computer generated my Un-Birthday phrase. 
To complete my card, I attached the panels to the black card base and added a few hearts for interest. 
That's it for me for this week. Hope I have sparked an idea for a way to use the Mad Hatter Cake die. 
To all our stamping friends out there not celebrating a birthday today, I share this day with all of you. A very merry, crazy, happy, lovely, silly, and sweet  un-birthday to you!!!
See you next Saturday!

dies I used to create card:


Saturday, August 17, 2019

Ballerina Mouse Birthday

Hello Scrapping Cottage friends! Thanks for taking the time to stop and visit with us today. It's Mary Marsh here bringing you the Saturday edition of the Blog. 

The new release of Birthday dies have been restocked in the online store. So if you didn't get the ones you wanted previously, all 25 designs are in stock. This release is filled with cute little whimsical animals, birthday cakes, cupcakes and birthday phrases. Everything you need to create some outstanding birthday cards.

Today, I am featuring the Ballerina Mouse die. I needed a birthday card for a little girl turning 3 and I was invited to the birthday party. So let's get started with some details on how I created my card.

Step 1: I found this interesting sketch #762 on Splitcoaststampers this week. I thought it would be a good layout to feature this new die and allow me to use designer paper, a birthday number balloon and a stamped sentiment. 
I wanted the papers to be girly and I found this designer paper with shades of pink, teal and cocoa. I used the coordinating cardstocks as layering panels. 
Cocoa Card Base: 4 3/8" x 5 3/8"
Pink Layering Panel: 4 1/4" x 5 1/2"
Designer Paper: 4 1/8" x 5 3/8"


I cut the ballerina mouse in a light gray (smoky slate) and her outfit in 2 shades of pink (pretty in pink and pink pirouette). Her ballerina slippers are cut in teal cardstock. 
For the number balloon. I used the Stitched Numbers die and the streamer is from the Ballerina Mouse die. 


For the circle elements of the sketch, I used the Circle (4th largest), Stitched Circle (4th largest), Double Stitched Circle (5th largest) and the Sweetheart Doilies (2nd largest) dies. The sizes fit my image and sentiment well.

Step 2: I am ready to start card assembly Next, I stamped my birthday sentiment. It's a one liner but with the help of my MISTI and masking I changed it to 3 lines. I stamped in teal ink.
Attached the designer paper to the pink layering panel with double sided tape.
Next I secured the ballerina to the circle layer with double sided tape. I am using the #3 balloon as element 5 of the sketch. I just moved it to the other side.
Then I added the sentiment circle.
I thought I was finishing off my card by attaching the cocoa card base and adding enamel dots to the sentiment circle. But I thought it still need something to balance the lower left corner.
So I cut the balloon bunch from the Festive Birthday die.
Still wasn't quite right for me.  I thought I needed something on the top left. I couldn't add any enamel dots because of all the dots on the designer paper. So I cut the happy phrase from the festive Birthday die in teal cardstock. And my card is complete.

Well that's it for me for this week. I hope I have given you an idea for a way to use this sweet Ballerina Mouse die. See you again next Saturday.

dies I used to create card: