The 19 new designs in the Garden release are still being featured in the online store. These new dies are perfect for Father's Day, birthdays, thank you, or even a thinking of you card for the person who loves to garden.
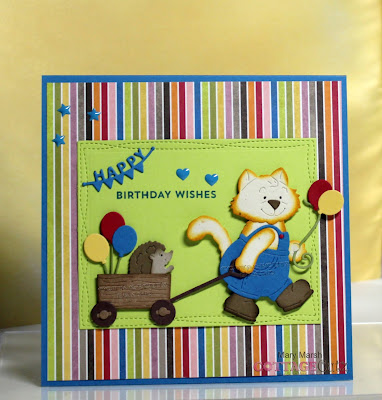
For my card today, I am featuring the new Garden Cat w/Wagon die and created a birthday card. This little cat and hedgehog are just too cute and I thought they would make a great whimsical card. So let's get started with some details on how I created my card.
Design Steps:
I started off by selecting my cardstock and designer paper. I had a layout in mind with several layers, but it didn't work for these images. So I flipped the designer paper over and decided to use the striped side. My original plan was to use the side of the paper with balloons but it wasn't working for me. This is also a square card. I hadn't planned on that when I started though (lol)!! I realized this was going to be a work in progress this week.
Blue card Base: 5 3/4" Square
Striped Designer Paper: 5 1/2" square
Next, I cut the cat in an ivory confetti cardstock and sponged fossilized amber ink for a different look. The wagon and hedgie are cut in different shades of brown cardstocks and also sponged in the matching inks for more depth.
I plan on giving this card to a little 5 year old boy so I didn't want to place flowers in the wagon. I thought balloons and then pulled out the Festive Birthday Greeting die. It was released in June 2019. I cut 3 for inside the wagon and then 2 additional for the cat to carry.
Because of the bold striped background, I needed another layer to place my images on. I picked one of the colors (lemon-lime) in the designer paper and used the largest Wacky Stitched Rectangle die. Looks like it's out of stock but the Stitched Rectangle die would be a good substitute.
I thought I would use the Happy phrase that's part of the Festive Birthday Greeting die and then stamp birthday wishes in the corner of the rectangle. I stamped with a royal blue ink.
Now I am ready to start card assembly. I attached the images to the rectangle panel with dimensional adhesive. That always gives a nice look to the card.
Attached the designer paper to the card base with double sided tape and then the image panel with the same adhesive. For the balloons that the cat is carrying, I used a dab of ranger multi medium matte adhesive.
To finish off my card I added a few royal blue enamel dots. And, that completes my card for this week. I hope I have given you an idea for a way to use this new die. See you next Saturday!
dies I used to create card:


4 comments:
Very cute card! It's so fun and festive! i love the cheery papers you used too!
The cat and wagon paired with the balloons makes a delightful birthday card!
Love the bright cheery colors so cute!
That's really cute, Mary!
Post a Comment