

Hello Scrapping Cottage friends! Thanks for taking the time to stop and visit with us today. It's Mary Marsh here bringing you the Saturday edition of the Blog.
You can still pick up the Autumn 2018 dies with 10 new designs at 25% off in the online store. There are some dies in this release that could be used for some cute outdoor scene cards that aren't fall related. And, if you need some card ideas for the dies look back on the blog because the DT has posted some beautiful cards for inspiration.
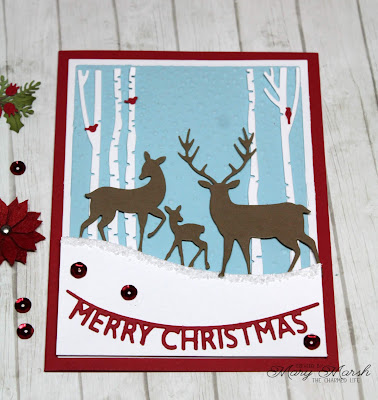
My card this week is featuring the Merry Christmas w/Deer Family die. It is part of our Christmas Part 2 release. I like making Christmas cards that feature an outdoor type scene. This one is relatively simple and would be easy to make multiples of. So let's get started with some details on how I created my card.
Step 1: I knew I was going to create a snowy scene with the deer, so I picked my card colors accordingly. I also wanted to get some red in there for a more traditional Christmas card.

White layering panel: 3 7/8" x 5 1/8"
Blue embossed panel: 3 5/8" x 4 7/8"
I used a snow fall embossing folder on the blue layer. I was looking for a quick way to get the snow fall look on my card. You could use a stencil and embossing paste, or even a snowflake stamp.


Step 3: Now that all the card elements are cut, I am ready to start card assembly. I attached the birch trees to the embossed panel first. I rolled up glue dots to give a slight lift off the background.
The snowbank is attached with dimensional adhesive. I attached the deer in the same way.
 T decided not to hang the Merry Christmas banner across the trees. I attached it with Ranger multi matte medium. I like this adhesive because it dries clear.
 To finish up my card I secured the image panel to the red card base. Scattered a few sequins on the snowbank for a more finished look there. To get a little color in the birch trees, I cut 3 small birds in red cardstock. The birds are from the Woodland Friends die. They are the perfect size and added just the subtle touch I was looking for.
Well that's it for me for this post. I hope I have given you an idea for using this new die. See you next Saturday!
dies I used to create card:


The snowbank is attached with dimensional adhesive. I attached the deer in the same way.


Well that's it for me for this post. I hope I have given you an idea for using this new die. See you next Saturday!
dies I used to create card:


6 comments:
Love your winter forest scene! The added sparkle is perfect!
This is such a tranquil scene, Mary! That die set is one of my favorites from the Christmas release. I like that you added the red birds.
You've created such a beautiful winter scene.
Such a gorgeous wintery scene you created! The forest looks amazing with the sweet deer!
Beautiful scene. The little red birds are so cute.
This is so pretty. Love the embossing folder and the glitter snow adds just the right touch.
Post a Comment