Friday, March 12, 2021

Spring Flowers Note Card Set

Happy Friday!  It's Jeanne today and I a note card set for you that features the three Spring Flowers in Jar dies from the new release.  These cards are quick to make and are the perfect size when you want to write a quick note or attach to a gift.

The cards are 3 1/2 x 5 inches.  I cut card bases for them from white cardstock but then used Bristol cardstock panels for my washes.  You can also use mixed media paper or watercolor paper for the front panels. 

 When I create a wash I tape the paper to a masonite board.  This ensures minimal warping of my paper.  For these cards I used ZIG Kuretake water pens and a brush for the water.  I like these because they have brush nibs and blend well.  You can also use regular watercolors or your dye inks.

For each card I picked two or three main colors and kept inking until the wash had good saturation.  I also would periodically lay down the die (blade down) to make sure my wash was roughly the correct shape.  I wanted the die cut to fit inside the wash.

After all three were finished and dry (and I use a heat tool to speed up drying) I used my stamping platform to stamp "Hello" in the lower right corner of the three panels.

I die cut my flowers from black cardstock.  Because these are fairly intricate dies I used a self-adhesive sheet on the back.  

You can see that the panels are still a bit warped.  I used several heavy books placed on top to help flatten them.

 All that was left was to adhere the panels to the card bases and add a clear crystal "water" drop.  These cards were very quick to create with regards to hands on time.  The hardest part for me was letting them sit under the books for a few hours to flatten out!

I hope you've enjoyed my cards today.  Be sure to visit the online store where the new release is discounted for a limited time!

Products used:

Thanks for visiting!  I hope you have a fun and creative weekend!


Thursday, March 11, 2021

Hatching Bunny Chick!

Hello Scrapping Cottage Friends,

It is Pam sharing with you on the blog today!

I am continuing to make Easter cards for friends and family.  Today, I am using the delightful Hatching Bunny Chick.  This Spring Collection has 22 sweet dies and they are on sale in the store right now.  


Design Steps:

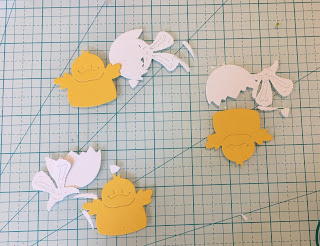
1.  Using the Hatching Bunny Chick die cut out 3 chicks.  I used white and yellow cards stock


2.  Shade the ears and egg shell with a light gray ink. Color the inside of the ears and the becks with copic makers.  Shade the chicks with a light orange ink and finally use black and white gel pen for the eyes
3.  Using the Stitched Alphabet die cut out Easter in pink.  Assemble the chicks with a fine tip glue
4.  The white card base is a slimline (8 1/2 x 7 scored on the 7 inch side at 3 1/2).  Cut a piece of pink card stock 8 1/4 x 6 3/4 and also cut a piece of green dotted DP 8 x 6 1/2.  Glue the pink to the green and then glue to the white card base
5.  Glue the chicks flat to the card (I started with the center chick).  Then pop up the letters (I started with the S and T) and your card is complete

CottageCutz Products


Thanks so much for taking the time to stop by today!  We are so glad you did!  Please check out the new release in the online store.  It is on sale for a short time only.

Blessings and Take Care
Pam


Wednesday, March 10, 2021

Oopsy Daisy . . . I'm Sorry I Forgot!

Hello!  This is Sukie and today I'm sharing a quick card. The die cuts on my card are from the new Springtime release. This release definitely make me eager for Spring!

I used the Spring Flower Jar die sets to create my card.  Jar 1, Jar 2 and Jar 3 were cut out in white card stock and then masked off to shade the flowers, greenery and jars.

To create the background for my card, I used a brick stencil and some ink to shade the white card stock.  I also inked the edges of my card panel. Next, I splattered it with some black paint for a bit of interest.

A strip of card stock was inked up to coordinate with the background and adhered across the panel.  The largest flower jar was placed in the center of my card.
A second jar was adhered on the right side of my card using the strip of card stock as a guide for placement.
The final jar finished off my card.  The flowers added a pop of color to the subtle brick background.
The sentiment was stamped on a hand cut flag and affixed in the bottom right corner of my card.
Here are the die sets used on my card, available in the store:

Monday, March 08, 2021

You Are Awesome!

Hi!

It's Anja here. I'm back for my Monday post. I have a simple and clean card for you today to tell someone how awesome she or he is. 

For this card I used:

- Cottage Cutz dies (Cat w/ Spring Bird, Bunny w/ Butterfly),

- Distress Inks,

- white card base (15x15 cm),

- white card stock for die cuts,

- black pen,

- white pen,

- plastic stencil,

- sentiment stamp,

- acrylic block,

- paper glue. 


First I cut and colored the cat. Next I did the background. I used a plastic stencil and two shades of blue ink. I used darker shade on the bottom and lighter shade on top. I placed the cat on the colored part. Last I added the sentiment. I stamped it on another white piece of paper, cut it out and then placed it on the card base. And my card was done. Quick and easy.


Happy International Women's Day to all the women stopping by. Hope you had a lovely day. 

See you again on Sunday.

Anja Z. 


Cottage Cutz dies I used for this card:


Sunday, March 07, 2021

Taking A Rest

Hi!

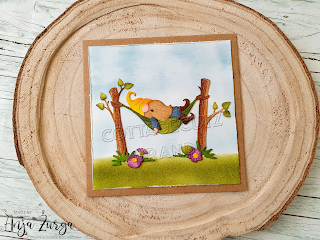
It's Anja here. I have a simple card for you today. I made a scene with a gnome taking a rest in a hammock. Can't wait for the warmer days to come and hook my hammock in the garden.

For this card I used:

- Cottage Cutz dies (Gnome Sleeping In Hammock),

- Distress Inks,

- craft card base (12,5x12,5 cm),

- white card stock for die cuts and background (11,5x11,5 cm),

- black pen,

- scissors,

- paper glue. 


First I cut and colored the gnome.

Next I did the background.

And for more interest I trimmed the edges of the paper. I used scissors for it.

And my quick and simple card was done.


Thank you for stopping by. Have a nice Sunday and see you again tomorrow for my Monday's post. 

Anja Z.


Cottage Cutz dies I used for this card:
Saturday, March 06, 2021

Overlapping Fun Fold with Bluebells

Hello Scrapping Cottage friends! Thanks for taking the time to stop and visit with us today. It's Mary Marsh here bringing you the Saturday edition of the Blog. 

We have a brand new release of dies in the online store. It's our Spring Release with 22 new designs. Everything you need to create Spring, Easter, Birthday, Mother's Day, Father's Day, Thinking of you cards and so much more.

The Design Team has been  showing samples using these new dies. So if you haven't seen them check back on the blog for lots of great ideas. The dies are currently on sale at 25% off so check all the new designs in the online store for some great selections. The Safari & Circus releases are still available at 25% off as well. 

Today for your viewing pleasure, I am featuring the new Bird w/Bluebells die. I created an Easter card with this sweet image and also a new to me fun fold technique. So let's get started with some details on how I created my card.

Design Steps:

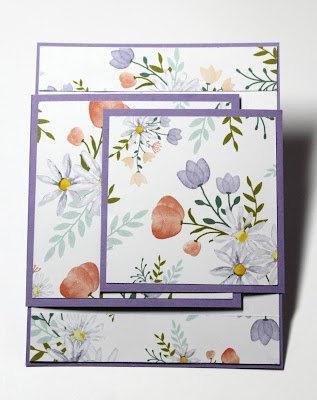
I started my card this week with the layout. I found this cute fun fold technique on YouTube and thought I would give it a try. I will be showing photos and panel sizes but if you want to see a YouTube video from the stamper who created the idea-click here

Panel sizes: 
Lemon-Lime card base: 4 3/8" x 5 5/8"
Heather layer panel: 4 1/4" x 5 1/2"
White inside sentiment panel: 4" x 5 1/4"
Designer Strips: 3/4" x 4"
Left panel: 3 1/2" x 4"
Designer Paper: 3 1/4" x 3 1/4"
Right panel: 3" x 3 1/2"
Designer Paper: 2 3/4" x 2 3/4"

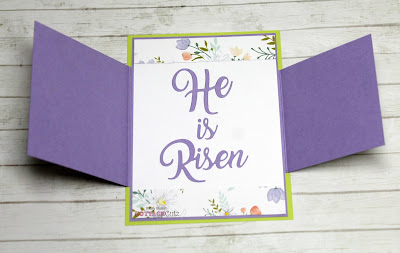
I cut my white sentiment panel and adhered the 3/4" strips of designer paper to the top and bottom of panel.
 I was thinking of stamping a Happy Easter Sentiment then decided on this phrase from the 2019 die - He is Risen Cross die.  I cut it in the highland cardstock that coordinates with the designer paper I used. 
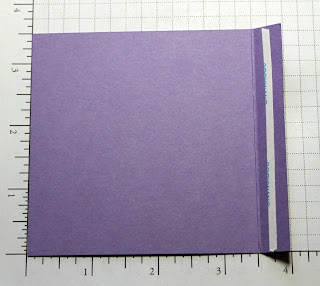
Next, I cut the side panels for my card. Sizes are above. The idea is to make the panels a square so you make the one side a 1/2" larger for the flap. I scored the left panel at 3 1/2" - it created my flap and now it's a square.   
I scored the right panel at 3"- again the score created my flap and also the square panel. 
The designer paper is attached with double sided tape, 
and for the flaps I used Scor-Tape. It's a stronger adhesive and I want to be sure the panels won't come off in the mail.
 
Now, I am ready to attach the side panels to the card base. The left side is attached first then the right side is centered and overlaps the left panel. 
Next, I cut my bird & flower images. I used cardstock that matched the designer paper. 
I was going too add the images directly on the cardstock but the background was just a bit too busy. So I cut a white square at 2 1/4". I didn't want to cover up all the designer paper on this panel because its to pretty. The images are attached with Ranger multi medium matte. I used dimensional adhesive on the little bird. The lemon-lime base panel was added to cover up the panel flaps on the rear of the card.  

Here is the card inside.

Well, that's it for me for this week. I hope I have given you an idea for a fun way to use this new die. See you next Saturday.

die I used to create card: