Tuesday, April 16, 2013

Cameo & Oval Frame


Good morning everyone!

It's Simona with you again.
Here is my fist step card showcasing beautiful 


I cut the die out 3 times, once out of purple coredination paper
and twice out of white paper. The girl silhouette cut with
white paper was sponged once with vintage photo
and once with dusty concord.
The frame and the ribbon cut out of purple
coredination paper were distressed with sand tool.


The musical background I made myself. I stamped the notes onto
the speciality stamping paper with Archival Ink Sepia and stamped
the corners with dusty concord. Then I used antique linen and
vintage photo to sponge the paper and spritz it with some
water at the end.  I stuck the girl silhouette together
and used the purple peace as a shadow liner.
To get the 3D glossy effect I used Glossy accents.


The sides were cut once out of DP with Martha Stewart punch
and once out of white paper for back lining and
distressed with vintage photo.
The Thank you sign is a free file from SVG Cuts. It was
cut out with Sizzix Eclips and colored with copics.


To finish the card I added some beige lace from the stash,
 rhinestones and some flowers.

I hope you enjoyed todays post.
Thank you for stopping by.

Hugs,
Simona

The dies used:

Monday, April 15, 2013

Dog on Chair

Hi, Friends! Today is my turn to showcase another 
wonderful die from CottageCutz.  This time
I created my card using the lovely 
Take a look:


Here's a closer look at the wonderful details this
die has.  The chair was cut from the same DP papers
and the dog with Cryogen paper and then 
colored with Copics.


Paper from My Mind's Eye-Oliver Coll.
Bazzill Kraft cardstock.  
Other: button, brown twine.


Get crafty!
Hugs,


Sunday, April 14, 2013

Dragonfly


CottageCutz Ornate Dragonfly

Hi everyone Cindy here with a SWEET CottageCutz Design.  I have made a a tag with this BEAUTIFUL  CottageCutz Ornate Dragonfly   I sponged my dragonfly with some pink distressed ink added some bling!!~


Hugs Cindy xoxo

Saturday, April 13, 2013

CottageCutz post - Hummingbird card

Hi Everyone! 


It's Olena here today to share with you a Beautiful Hummingbird card! I made this card using the Super CUTE CottageCutz dies- Hummingbird.


On this card I used the gorgeous CottageCutz Hummingbird die to create my card. I cut out  couple times flowers, leaves and bird using different colors of card stock, and then I sponge them with craft ink. Next, I used Zip Dry paper glue to give them a 3-D look. Inside flowers I put glitter glue.

 
I added  flower and leaves to card front as shown in picture above.
I also used Martha Stewart punches, EK Success punch and white gel pen.

 
For this card I used:


Friday, April 12, 2013

Butterfly Trio

Happy Friday!  Kathy here with my Butterfly Trio Card using CottageCutz's Butterfly Mini and Garden Bird Branch Dies


.

(Click on picture for a closer look)


I originally planned to post another project, but it's taking a little longer than I thought lol! While I was working on it, I thought of this idea with the butterflies and quickly put this card together!

I love this Butterfly Mini! The last time I used it I colored the pieces with chalk inks. This time I used double-sided designer papers (Secret Garden) and slightly inked the edges. I used the patterned side for the wings, and flipped the piece over to the solid side for the body. I cut the Garden Bird Branch in Certainly Celery Cardstock and trimmed a little of the bottom off to fit on the card.

For the white base, I embossed a small portion of the bottom and stamped the sentiment on the top. Then I just added some ribbons, lace, pearls, liquid pearls, and a button with a floss bow using two colors together. I added a lavender mat (Secret Garden) and white to a So Saffron card base. The finished card measures 4 1/2" x 4 1/2".

Here are the dies I used:


Thursday, April 11, 2013

So Glad You're My Friend Card


Hey Everyone! It's Lisa here and today I am a sharing a card I created using CottageCutz Blossom Branch  and Scalloped Doily Die!
I punched the edges of green cardstock with the Martha Stewart Floral Crochet punch. The little girl and fence were fussy cut from some pattern papers. 
Here I have used the Blossom Branch die and inked the branch and florals with distress inks. The Scalloped Doily Die was cut from a pattern paper. I placed a white circle of cardstock beneath it to have the pattern of the doily show up more.
A little sentiment and bow to finish it off!


Wednesday, April 10, 2013

MOM


Hello everyone, today I'm sharing a Mother's Day Card I created using all CottageCutz Beautiful Dies!!!


In this photo, I created my CottageCutz Zinnia Flowers with the plum design paper, it has a faint writing on it, next I distressed each and every layer with Dusty Concord Distressed Inks. For the leaves I used a green design paper with faint writing on it as well, and did the same but used peeled paint distressed ink to get the look I achieved. Lastly for the centers I used Viva Pearl Pen to create Pearls for the centers.


 On the CottageCutz Postage Stamp Die I used white Card Stock and distressed it with Antique Linen Distressed ink. I then stamped ODBD Stamps in memento black ink. For behind the Postage Stamp I used the CottageCutz Scalloped Doily but cut it in half to make a piece for the top and the bottom. I love the look it gives!!
I used Recollections Habitat design paper for my card :)

Thank you for looking and have a lovely day!!
Hugs to all,
Cheryl

Tuesday, April 09, 2013

CottageCutz Hoot Owl

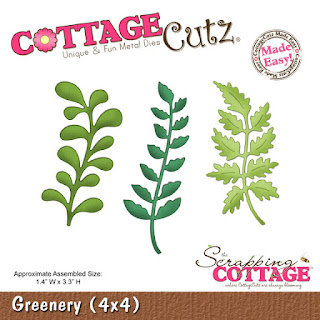
 Whoo is crazy about CottageCutz dies.   Owl tell you the truth....it's me!!!  Hi everyone.  Today I want to show you the Cottage Cutz Hoot Owl Die, Tea Time Doily, and Greenery.
 Isn't this owl just the cutest!  He was so much fun to create with and super easy.  I cut to branches to fill in my die cut and sprinkled some extra leaves in the branches.  After all it is springtime and things are blooming all around.  Here are the CottageCutz dies I used to create this card:

Thank you so much for stopping by today.  I sure do appreciate it.    Have a great day and success while crafting!

Monday, April 08, 2013

Quick and easy project and masking technique


Hello everybody, Vladka here.

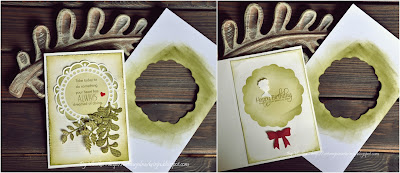
 Ornate Circle Frame and Greenery dies are perfect for almost every project. On my card they are having main part:
This time I also decided to use the negative of Ornate Circle Frame die cut for masking technique. I used it outside and inside of the card.
Quick and easy project, perfect when you don't have a lot of time and you need birthday card. On the front I also used little heart from Angle Wings Mini die. It gives a special touch. 
For such cards I also like to embellish the inside of the card and here I use the bow from Ornate Circle Frame die and Cameo from Hand Mirror and Cameo die. 
Have a great week!