Thursday, May 27, 2021

Adventure Awaits

 Hello Scrapping Cottage Friends

It is Pam sharing with you on the blog today!

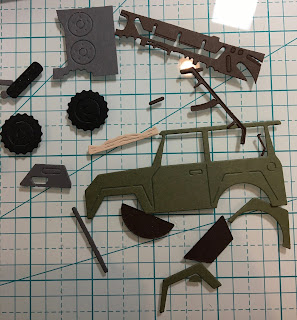
I have a fun and unique teacher's card for you today.  My niece just finished up her school year, as a teacher, so I thought I would make her a really different end of the year card.  She has a Jeep and loves to go on trips with her family.  So I made her this card but really I think it could be for any teacher getting ready for their summer vacation!  The inside will say enjoy your summer!


Design Steps:

1.  Cut the pieces out using the Safari Cruiser w/Banner die plus green, black, dark brown, grey, and tan card stock
2.  Use a variety of inks and a small applicator to shade the pieces.  When shading is complete assemble the Jeep with a fine tip glue
3.  Using the Safari Phrase die cut out the words twice on dark brown card stock.  Glue them together
4.  Use an Slimline kraft card base and ink the edges.  Use a piece of sunset DP cut slightly smaller then the base, use the Hills Slimline die to create the road.  Spray the road with a black ink to create some texture
5.  Glue the sunset DP to the card base, add the road, glue down the phrase and then the Jeep and your card is complete

CottageCutz Products


Thank you so much for stopping by!  I hope you have some wonderful adventures this summer!

Take Care and Blessings

Pam


Wednesday, May 26, 2021

Aloha

Hello!  This is Sukie and today I have a fun card to share for my design team day.  My goal was to create a summer themed card just to say hello.

I used several of the newly released Slimline dies to create my card.  My card base and water background was cut with the Rounded Rectangles Slimline dies. I also used the Hills Slimline for the water and dirt background. The clouds are from the Lift Flaps Stitched Rectangle Slimline die set.  The adorable Surf Mobile was cut out of some bright and cheery card stock.
The combination of ink and basic card stock gives my card base lots of depth and dimension for a tropical appearance.  
Once my background was complete, I affixed the clouds, stamping the "Aloha" sentiment on one of them.  I also trimmed one of the clouds for a better fit on my card.
The surf mobile was the final addition to my card.  The bright colors of the car were perfect for finishing off the bold design.
This will be a fun card to send to that special someone just to say hello or aloha!
Here are the die sets used on my card, available in the store:

Tuesday, May 25, 2021

Happy Birthday Fishes


Hello Scrapping Cottage friends! Thanks for taking the time to stop and visit with us today. It's Mary Marsh here bringing another Throwback Tuesday post. 

I am featuring the Goldfish & Bowl die from the 2018 Black Friday Pet release. I made a birthday card using our newest slimline dies. We have 9 Slimline designs and they are on a 25% off sale. These are wonderful, basic dies that should be a part of every card maker's collection especially if you are liking the new slimline style.

For my card layout, I am using the Splitcoaststampers sketch challenge #854. I thought the fish bowl would work well for element 3 of the sketch. 

I chose a soft blue dotted paper for the card background. This is cut with the 2nd largest Nested Rectangles Slimline die. It measures 3 1/4" x 8 1/4". I cut a white card base the same size as the designer paper and secured with double sided tape. 

I cut my Goldfish and bowl and added those to the card center. For element 4 of the sketch I used a couple more Goldfish. Stamped the punny sentiment and scattered a few white sequins to finish off this card.

That's it for me for this post. I will be back with you again on Saturday. 

dies I used to create card:


Sunday, May 23, 2021

Happy Birthday

Hi!

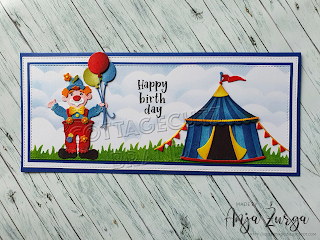
It's Anja here. I have a circus themed card for you today. 

For this card I used:

- Cottage Cutz dies (Clown with Balloons, Circus Tent, Nested Stitched Rectangles Slimline, Grass Slimline, Clouds Slimline),

- Distress Inks,

- dark blue card stock for card base (9,5x22 cm) and background (8x20,5 cm),

- white card stock for die cuts, 

- black pigment ink,

- sentiment stamp,

- acrylic block,

- paper glue. 


First I cut and colored the tent and the clown.

Next I cut background paper and made paper stencils for the grass and the clouds. I colored the background paper with Distress Inks. 

I cut additional papers for the background. I made the card base from dark blue card stock.

I added the sentiment to the middle of the background.


I adhered all the layers to the card base and my card was done. 


That's all form me for today. Have a nice Sunday and see you again on next week. 

Anja Z.


Cottage Cutz dies I used:


Saturday, May 22, 2021

Happy Birthday from the Circus Animals

Hello Scrapping Cottage friends! Thanks for taking the time to stop and visit with us today. It's Mary Marsh here bringing you the Saturday edition of the Blog.

We have a brand new release of dies in the online store. Your slimline cardmaking is going to get a lot easier. We have 9 Slimline designs and they are on a 25% off sale. These are wonderful, basic dies that should be a part of every card maker's collection especially if you are liking the new slimline style.

Today for your viewing pleasure I have a slimline birthday card using the Circus Train Animal dies + the Scalloped Stitched Rectangle Slimline die. 
I have a lot of nieces and nephews with young ones and I always seem to need a kids birthday card. These animals are perfect for a kids card. So let's get started on some details of how I created my card.

Design Steps:
I started my card this week with the layout. I saw this sketch #854 on Splitcoaststampers and I thought the layout would work well for the dies I am using. 
Next, I selected the background designer paper. I wanted something fun and found this bright dotted paper.
I cut it with the largest Scalloped Stitched Rectangle Slimline (3 1/4" x 8 1/4") die. The card base is at 6 1/2" x 8 1/4" and then scored at 3 1/4". I used pacific point cardstock (royal blue) cardstock. 
Then, I cut my animal images. The designer paper colors of blue, rose red and yellow would work for the hats and neck scarves the circus animals are wearing. I used different colors of cardstock to cut the animals. You could also cut in white and color with any medium you like i.e. Copic markers, Prismacolors pencils or distress inks. I forgot to take a photo of this step (lol)!

For element 3 of the sketch I used the largest Scalloped Circle die and then cut a portion off the bottom to give it a straight edge. I stamped my sentiment in pacific point ink. It's a long one line sentiment but with the help of my MISTI, I stamped on 2 lines. 
I started the assembly of my card. For element 2 of the sketch I cut another piece of pacific point designer paper 1" x 8", I attached the circle with double sided tape and then secured to the designer paper panel.  
Then I attached three of the Circus Animals in the circle using dimensional adhesive. The seal is attached in the corner for element 4 of the sketch. Instead of him balancing a ball, I have him holding a balloon. It's cut from the Clown with Balloons die. 
To finish off my card, I attached the image panel to the card base with double sided tape. For the 2nd  instance of element 4, I cut a spray of stars from the Circus Side Show die and attached to the right corner. I thought the middle looked empty so I added some rose red enamel dots. 

And that's it for me for this week. I will be back on Tuesday for our Throwback Tuesday post. See you then.

Dies I used to create card: