Showing posts with label scrapbooking layouts. Show all posts

Sunday, July 10, 2011

That Pout!

Good Morning everyone! I am SO excited to be sharing my first Design Team project for Cottage Cutz and The Scrapping Cottage! I created a scrapbook layout for you today, but before we move onto the project, here's a little bit about me:

Hey guys! It's Angelica (pronounced Ahn-hel-ee-kah, you might laugh but you'd be surprised how many people think my name is Helga when they meet me!) - I live in Green Bay, WI along with my super stamping family!

My parents own Peachy Keen Stamps, Inc. and I am the Lead Illustrator/Co-owner of Market Street Stamps, LLC. I absolutely love paper crafting! You can find me blogging all my creations on Handmade by Angelica.

As a busy mom of two lovely little girls - Lucy (3) and Marlee (2), a wife, and a small business owner, my days are packed, but I always try and make room for something crafty or artful each day. Even if it's just doodling a page in my art journal.

I've had the pleasure of meeting Joanne and Greg (owners of the Scrapping Cottage) as well as some of my new fellow designers a few times, and I am beyond thrilled to be designing for a wonderful company with such amazing people behind it! The Cottage Cutz design team is a fabulously talented bunch, and I'm flattered to design along with them.

And now for the layout! 
I don't scrapbook as much as I should. In fact, I can probably count on my two hands how many layouts I've actually completed. But, when I saw the 
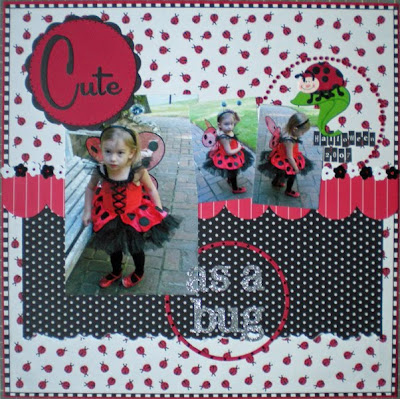
Peeker Pocket I knew I had to fill it with some fun pull-out journaling. I tend to get overwhelmed when I start a 12x12 page, so I decided to use the pocket size as my guide and created an 8x8 page which ended up being a perfect proportion, don't you think? 

{click photo to enlarge}
I added this photo of Marlee (shot by my pal Scott Eastman) and used her sweet pout as the inspiration for my Scrabble tiled title. I used Crate Paper (Emma's Shoppe Collection) and My Mind's Eye (Stella & Rose - Mabel Collection) to create this orange and blue color scheme. I just love these colors together!


{click photo to enlarge}

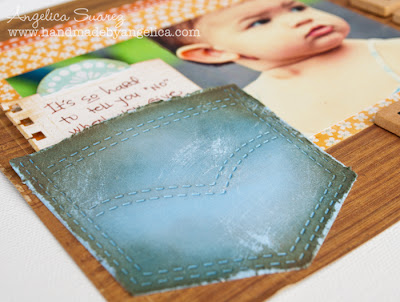
For the pocket (Peeker Pocket from Cottage Cutz), I used a light blue shade of cardstock and started distressing around the edges. All of my jeans get worn OUT, and I wanted it to look like a good, lived-in jean pocket. So, I took a bit of "Weathered Wood" Distress Ink after it was all frayed along the edges and sponged it on. I then added in a bit of "Faded Jeans" and a touch of "Vintage Photo" Distress Inks for depth. After both inks were blended onto the pocket, I took a medium grit piece of sandpaper and scratched it up for even more of the worn-in look. 

To create this easy-peasy journaling tag, I cut my cardstock down to fit inside the pocket (about 3" x 3.75"). I stamped my Vintage Notepad background stamp (from Market St. Stamps) in "Antique Linen" Distress Ink and punched the side with a border punch to make it look like notebook paper.

I think I'm going to make a bunch of these during the girls' naps this week and keep them on hand for some of my future layouts - I love the large 4x4" size of the pocket - it's super versatile for embellishing and for adding in journaling! For complete details on what products I used, please visit me on my blog, I'll have them posted in just a bit!

Thanks to the Cottage Cutz crew for this fantastic opportunity!  And thank all of you so much for visiting The Scrapping Cottage and reading a bit about me! I'm so looking forward to sharing and getting to know everyone! 

Hugs,
Angelica

Saturday, September 25, 2010

Beachy Fun!!

Since it is still so incredibly hot down here in Alabama (we are still hitting high 90's everyday), I figured I might as well work on some fun summer layouts! The beach dies from the Aug under the Sun Release are so much fun and are such must haves for all of your summertime activities.

For my layout today, I am featuring the Cottage Cutz Pail and Shovel die. This die is another one of those great dies that comes with several different shapes any of which could stand alone. In my pictures, my girls were carrying their sand bucket to use to hold their crab catch. Therefore, I just used the bucket to accent my title. I "hung" the bucket from the curve in the letter "s" from my title to emphasize the bucket.


I also used the Cottage Cutz Loops Edger to add some accents around the layout. I LOVE theses edgers because I did not have any ric rac the right color and I was getting irritating and then I remembered my edgers! Of course once I started looking through my edgers, I found my Loops one and decided to use that one instead of ric rac. I hope you have a great weekend and get a chance to do a little scrapping, too!!


Saturday, September 11, 2010

Christmas Countdown

These are the dies I am showcasing today:


Christmas is closer than you think and it is time to start working on your Christmas lists. If you have not already added these adorable little Gingerbread men to your Cottage Cutz collection, you are definitely missing out. The Gingerbread shape is quick and simple to put together and so much fun to accessorize with the different Accessories Dies available.


On my layout, I chose to make my little Gingerbread a girl by adding the pigtails to her hair. I also used Stickles to add additional accents.

Saturday, August 14, 2010

Anything goes with Christmas!!

As soon as I saw these adorable sunglasses from the July #2 Cottage Cutz Release, I knew I had to have them. If there is one thing my girls have always loved, it's dressing up. And nothing completes a good outfit like a pair of shades. I actually have several pictures picked out that are going to look great with this sunglasses shape but I picked these first. Since these pictures were taken around Christmas, I wanted to give the layout an overall Christmasy feel. However, the real reason behind the pictures was the fact that my DD put on my sunglasses and thought she looked so cool! So I used the sunglasses mini die to add an accent border long the bottom to help accentuate the sunglasses in the pictures which are the true focus.
I use lots of different cardstocks in my scrapbooking. For me, it is sometimes more about the perfect color match than the brand of cardstock. However, there are definitely differences among the brands. Some cardstock leaves a white edge after you cut out your shapes. Now depending upon the colors in your layout, and the placement of your diecut, that may not matter at all. On this particular layout, my background was off white, plus I wanted my sunglasses to pop a bit. Therefore, I took one of my Copic markers and edged the sunglasses shapes. By doing this, I was able to get rid of the white edge and give a crisper look to the diecuts. This is one of those techniques that when you look at the layout, you don't say, "Wow, that's some good edging on those sunglasses". But if I had not done it, they would not have looked as clean and crisp.

I hope you enjoyed this quick little tip to help you get the look you want with your diecuts! Have a great rest of the weekend and happy scrapping!!!


Saturday, August 07, 2010

My little nature girl

Hope everyone is having a great weekend! My post today is featuring the Cottage Cutz Bluebird and the Cottage Cutz Loops Edger. I purchased this new paper from Bo Bunny and I wanted to create my accents to match - in comes my Cottage Cutz. The CC Bluebird is the perfect compliment to the bird on the patterned paper.


Here is a close up of my die cut so you can see some of the details of the shape. As you can see, I used the grey from the paper for the bird's beak as well as the branch and leaves so it would coordinate perfectly with my paper.

I took these pictures of my daughter to show what a prissy little girl she was. In order to play in the dirt, I had to put a towel down on the ground so she wouldn't get any dirt on her! That was my little nature girl!! 

Glad you could join us today! Come back tomorrow for more inspiration and fabulous projects featuring our Cottage Cutz dies.
Ruth Ellen


Saturday, July 31, 2010

Yellow Watermelon??!!

I have been saving these pictures of my girls eating yellow watermelon just waiting for the right die to come along to embellish the page. And of course, I found the perfect shape from the Cottage Cutz July #2 Release. This Watermelon die is really a must have for any Summer page or other project. I love it because not only it is super cute, but this die comes with three different shapes for you to use all on one die!! You can't beat that!!


Naturally, since my page showcases pictures of my girls seeing and eating their first yellow watermelon, I wanted to coordinate my watermelon embellishments to match. I would never have been able to find watermelon stickers that were yellow!! Instead of using colored cadrstock, I pulled out my Copic markers to color the green and yellow parts of the watermelons. This way, I would be able to achieve more of a mottled look similar to the imperfections you would see in real watermelons. (Plus it is just so fun to color the pieces of the Cottage Cutz shapes with my markers).

You will also notice that I used the Cottage Cutz Rick Rack Edger die on my layout. This die is a life saver!! Never more do I have to go without the look I want because I don't have Rick Rack in the right color (and let's face it, I NEVER seem to have the right color!!). In order to get the longer length for the horizontal piece, I used my WfiW tip I posted previously about how to get longer lengths from the 7" Cottage Cutz Edger dies. If you missed that tip or you want a refresher, just click here to review the edger technique.

Thanks for stopping by today! Come back tomorrow to see another fabulous creation from the uber talented Nikki! I am sure she has something wonderful in store for us!!

Friday, July 09, 2010

Bloom Page

Good morning!  Welcome to The Scrapping Cottage Blog on this blooming beautiful morning!  I have a scrapbook page to share with you today.  I'll be honest with you and say that working on this page reminded me why I don't scrapbook nearly often enough.  You see, I have a hard time knowing when it's time to stop, and my pages kind of take on a life of their own.  I seriously need to learn that I don't have to use every die or stamp made to do one page.  Oh well, I had fun, and that's all that REALLY matters.  Here's my Bloom page ready and waiting for some wonderful pictures to finish it off.

 For this page, I used the following Cottage Cutz dies:  Flower 1 Layer, Flowervine Edger, Daisy with Swirl, Watering Can, and Scalloped 3 Edger.  Yes, I did get a lot of them in there, but I was having so much fun!  The Bloom sentiment was cut with my Cricut using the Storybook cartridge. 
All of the die cuts, except the sentiment were cut with white card stock, then colored with my Copic markers except the sentiment.  The sentiment was cut with pink card stock, then outlined with Copics and highlighted with a white gel pen.  
I added some rain drops as an accent for the page.  I've actually got some pictures in mind that will work beautifully for this page, and if I can only find them I'll be one happy scrapper  Thanks for stopping by today.  I wish you a blessed day filled with happy scrapping!!


Friday, May 21, 2010

Cute as a Bug

I hope everyone is feeling happy and scrappy on this Friday morning!!

Today, I am featuring the Cottage Cutz Ric Rac Edger die and the Grasshopper Die.


I used the patterned paper as my inspiration to create my grasshopper shape. I love that I can make him coordinate perfectly with the paper because of the versatility of the Cottage Cutz dies! I am all about the matchy-matchy!! :)
In order to create a 12" long strip with the ric rac edger die, I used the same technique I demonstrated on my last Watch for it Wednesday post. If you want to see that technique again, just click here.


This picture is of my adorable new nephew when he was just a few days old. It is so fun to have a little boy around for me to scrap!

Don't forget about the contest we have running right now! Check out the sketch from this week's Watch for it Wednesday post and use it to create a layout showcasing one of your favorite Cottage Cutz dies (as if you can really have just one favorite!). The entries so far are really cute so keep them coming!! Who couldn't use a little free spending $$$ at the Cottage!! So don't miss your chance!!

Have a great weekend!!

Monday, May 10, 2010

Easter Blessings

Today I am showcasing the Cottage Cutz Daisy (because it is just so awesome I can't seem to make a layout without it any more!!) and another one of the fabulous new edgers - The Scallop Three Edger.

In my last post, I showed how to turn these new 7" inch edgers into full length, 12" long borders. For this layout, the 7" length was all I needed to add some interest to the edge of my photograph.

I also used the Cottage Cutz Daisy to create a perfectly coordinated flower accent and used a button for my flower center for some added dimension and texture.


When I first saw these edgers, I had no idea how incredibly versatile and useful they would end up being in my scrapbooking! I am definitely going to have to add some more of these to my ever-growing wish list!!

Thanks for stopping by today!! Come by tomorrow for another fabulous Kreation by Kay!!!

Friday, May 07, 2010

My Professional Flower Girls :)

My dh and I are both the oldest in our families and were the first ones to get married. By the time the younger siblings started getting married, we had already had my oldest dd. She was a flower girl in her first wedding when she was not quite 2 years old and is about to be in her 5th wedding in June. The June wedding will be my younger daughter's 2nd.

These photos were taken during the rehearsal for my brother's wedding. I loved these pale yellow dresses so I wanted to be sure to emphasize that by using the solid buttercream colored cardstock as my base. But I also wanted the pictures to pop a little bit so I added the patterned paper beneath the photos.

And did you notice the floral borders on either side of the blue patterned paper??! Yep - those are the 12" Daisy borders I created during my Watch for it Wednesday post this week. I also cut out some of the borders in yellow so I could use the centers in my coral flowers. If you missed this technique, be sure to go back to this week's Wednesday post and check it out!!

Thanks for stopping by today and I hope everyone has a great Mother's Day Weekend!!

Friday, April 30, 2010

Look how my Garden grows :)

I have the hardest time each month deciding which of the fabulous new Cottage Cutz I want to order!! And I know I am not alone in my dilemma!! These Seed Packet Shapes from the April Garden Release are sooooooo cute and naturally I wanted them all, but I decided to go with some I thought could work "double-duty". You know me...I am all about getting the most from my dies.

I chose to get this Sweet Pea Seeds Shape because I thought I could incorporate it onto pages of my little Sweet Peas. I knew I definitely wanted the Seed Packet Frame to go along with it because it is perfectly designed to coordinate with the different Seed Packet Shapes available in this release.


I cut the stems out of the same green cardstock I was already using in the layout, but I lightly stamped over it with my Cat's Eye Chalk ink to give it more of a mottled look. I also used my Copic Markers to color in the different Sweet Pea flowers and petals. This is another shape that went together surprisingly easily considering all of the detail that you see. The stems are just two pieces, and then the leaves at the bottom just sit right on top of the stems. Once you have the two stems glued together, it is easy to place each of the Sweet Pea flowers right where you want them.


Thanks for stopping by today and I hope everyone has a fun and crafty weekend!! Tell us how you are going to be spending National Scrapbook Day tomorrow!!

Friday, April 16, 2010

My Little Ladybug

As soon as I saw this new Ladybug die from the Spring Cottage Cutz release, I knew I had to have it because I had these pictures of my youngest daughter just waiting to be scrapped! I love that this little ladybug is so cute and whimsical making it a fun shape to use on a variety of different projects. And once your purchase the Ladybug die for yourself, you can perfectly coordinate your ladybugs with whatever shade of ladybug you need no matter what colors are in your papers! You know I LOVE that!! :)

For this ladybug, I simply cut out the different body parts from different colors of cardstock. There are only two leg pieces to attach (not six different legs!!) so really, this die goes together pretty quickly considering how much detail you see. I used my tip from this week's Watch for it Wednesday post to put the black spots onto the ladybug's back. So much easier than trying to put adhesive on the back of each of these smaller pieces!

Thanks for coming by and have a great weekend!!

Friday, April 09, 2010

Cherish these moments...

My post for today features a layout using the new Cottage Cutz Daisy Shape. This shape is a great little 3x3 die with so many possible combinations making it about 3 or 4 shapes for the price of one. Now that is my kind of die! Just think of all the different ways you can personalize these flowers with different papers, textures, materials, etc.

For my layout, I wanted to use the Daisy Flower shape to create a perfectly coordinated accent. I love being able to match the colors in my patterned papers as closely as possible when choosing my embellishments. For this reason, the Daisy shape was a must have for me because now I can use it to create great looking multi-layered flowers that coordinate perfectly no matter what papers I am using on my projects!


The Cottage Cutz Daisy Shape is a simple die to piece together and it would be easy to make yourself a whole little garden of these pretty little Daisy's to keep on hand when you need an accent.

Thanks for stopping by today and I hope you have a great weekend!!

Friday, April 02, 2010

Egg-straordinary Fun!!

I figure with Easter coming up this weekend, the Cottage Cutz Egg Carton and Chicks is the perfect die to showcase today since many of you will probably be dyeing your Easter Eggs this weekend! This die is part of the Cottage Cutz Easter Release.

This shape was so fun to put together because I felt like I was dyeing Easter Eggs but without all the mess! Plus, this shape is a perfect opportunity to use up scraps of paper as you create your different eggs. Every piece of cardstock I used on this layout came from my scrap drawer.

Here is a close up shot of this adorable Egg Carton Shape. So many fabulous details on this shape! I used my Copic markers to add some details and shading on the chicks and egg carton. I also used some pop dots behind a couple of the chicks to give a 3-D effect.


The March Spring Cottage Cutz release has now started shipping so join us next week as we begin showcasing dies from this release. I don't know about you, but I can't wait to see new projects using these Spring dies! Until then, have a Happy Easter!!

Friday, March 26, 2010

Egg Hunt

For today's post, I chose to create a layout using the adorable Duckling, Just Hatched Cottage Cutz Die from the Easter Release. I am so glad I ordered this little duck! At first I wasn't sure how I was going to use it, but then I realized it is just so perfect for any Easter page I might be working on. I can see this little guy showing up a lot in my albums in the future.


I used my Copic Markers to add some shading to the cracked egg and some outlining to the duck. There are so many great Spring Cottage Cutz dies to choose from right now at The Scrapping Cottage! Be sure you get your orders in early enough to fill your own Easter baskets!!

Friday, March 19, 2010

Spring is in the air!!

Working with these new Cottage Cutz dies from the Easter Release is really putting me into a Springtime mood! I thought this new Prima paper would be perfect with the Cottage Cutz butterfly. I also used the Cottage Cutz Mini Daisy to accent the corner of my photo mat.

Be sure to check out the newest March Spring Cottage Cutz release!

Friday, March 12, 2010

Signs of Spring

Today, I am going to be showcasing the fabulous new Cottage Cutz Daffodils Die.
The Daffodils die was the first one on my list from the Cottage Cutz Spring Release. Fortunately, the family from whom we bought our current house loved blooming plants. In our backyard, there is a ring of daffodils planted around an old bird bath. My girls love these daffodils! I try to make a point to take pictures of the girls with the flowers each year. Luckily, we have a fantastic "crop" each year because there is nothing my girls love more than picking flowers!


To create my diecut, I ran the Daffodils die through my die cutter with white cardstock and then used my Copic markers to color each of the different pieces. I used "Buttercup Yellow" to color the daffodils petals and then I matched the green leaves to the greens of the striped fabric paper. These flowers piece together so quickly and easily. I can't wait to use it again to create even more unique daffodils.

I hope you have a fun and scrappy weekend!!

ETA - We finally had a little sun today, so I was able to get a better picture!

Friday, March 05, 2010

Bunny Love

I think the Cottage Cutz Boy Bunny from the Easter Release is just the perfect Easter Bunny to add to any Spring or Easter project! Since the bunny in my pictures is white, I decided to make the Cottage Cutz Bunny white as well. I used a very light grey Copic marker around each of the white pieces to give them a little definition and then I changed the color of his clothing to coordinate with my papers. These are old Imaginisce papers but still some of my favorites when I am working on Spring and Easter layouts. Good thing I stocked up at the time!!

Remember, only 4 more days left to take advantage of introductory pre-order pricing on the newest Cottage Cutz March Spring release dies!!

Friday, February 26, 2010

Patio Picnic

I am getting so tired of this cold winter weather so what better way to warm up than by working on a bright springy layout! The new Cottage Cutz Butterflies from the Valentines Release are going to be must haves for all of your spring projects this year! This die is sooooooooooo cute and the butterflies are so easy and quick to put together! I love how I can customize the butterflies with the exact colors I want and the direction I need it to face!

This layout was inspired from PageMaps because as you know I love to play with sketches! So get out your Spring papers and get to scrapping!

Friday, February 19, 2010

Easy Bake Fun!

I am having so much fun creating layouts and other projects using the yummy new shapes from the Cottage Cutz Valentines Release. There are so many possibilities my fingers just can't keep up with my "to-do" list!

One of my oldest daughter's favorite Christmas presents this year was her Easy Bake oven. I think this gift is a right of passage for all little girls. I can still remember my own Easy Bake Oven. So of course I had to take some pictures of our maiden voyage of the new Easy Bake oven. Big sister was not thrilled with little sister helping, but if there is one thing she loves most, it's sweets. So little sis couldn't wait to play Easy Bake Oven, too!!

As soon as I saw the Bakery Shoppe from the Valentines Release, I knew it would be the perfect addition to an Easy Bake Oven layout!

This shape pieces together very easily. I recommend starting from the bottom of the Bakery and working your way up to the top to make sure you end up with enough space for everything. It can easily be customized for any layout by changing the colors in the cute awnings and trims. I chose to pull out colors from my girls' pink shirts, a darker pink from the polka dot paper and a touch of yellow from the paper and the cookie.

Thanks for stopping by the Cottage Blog! If you haven't joined our Facebook group yet, click the image on the right of the blog and become a fan! TGIF!!