Showing posts with label scrapbooking layouts. Show all posts

Friday, February 05, 2010

The Making of a Gingerbread House

As soon as I saw this Limited Edition Gingerbread House Die, I knew I had to have it! I mean, who can't use a Gingerbread House die, right?! Every year, my girls and I make a Gingerbread house together. When they were younger, it was hard to keep the decorations from disappearing into their little tummies. But this year, they were really into the decorating and actually worked on it together as a team without wanting to eat all the little candies. Well sort of ;).

In order to jump start my layout, I used a Pagemaps sketch. I had taken so many pictures during the decorating process that I needed something to help focus me onto the best ones for a layout. This sketch worked perfectly for me.


I love all the wonderful detailing on this Gingerbread House die. I just ran it through my die-cutting machine with brown cardstock and then again with white cardstock. I built the house with the brown pieces and then used my Copic markers to color each of the candies and other fun details I had cut from the white cardstock. This method cuts way down on your piecing together time of your more intricate dies. And isn't it the wonderful details of dies like this Gingerbread House that we love the most!


Happily, there are still a few of the Limited Edition Gingerbread House dies available. If you haven't picked yours up, add it to your Valentine's shipment so you don't miss out because once it's gone - it's gone for good.

Thursday, January 28, 2010

Reel Fun!

As soon as I saw this Bait Shop Die from the Camping/Outdoors Cottage Cutz release, I couldn't wait to get my hands on it. It looks so much like our boat house at the lake. In order to make it even more authentic, I swapped the door and the window so that they were in the same places that they are on our actual boat house.

I have so many pictures of my girls fishing off the dock with Granddaddy (my Dad). But that is such a big part of the fun of going to the lake house that I just can't help but get the camera out every time! Now....these pictures were taken when my oldest daughter (now 7) was only about 3 years old. (See I told you I was going to be better about digging back into my picture files!!) You have to look closely at each picture to see the little fish that she has caught, but he is there.


In order to create my Bait Shop, I started with a light grey paper to match the wood planks in my pictures. Then I used my Copic markers to add some shading and detail. I also colored some of the smaller, detail shapes with the Copic markers because it lets me get a nice weathered look that is more difficult to achieve with colored cardstock alone.

This Bait Shop Shape is so versatile and could so easily be turned into a little rustic hunting cabin or even a tool shed. Plus I love all of the "extra" shapes I get with this die like the paddles and the cooler that can be used as embellishments on other projects and in combination with other dies.

Thursday, January 21, 2010

Polar Bear Club

This picture is from my crazy relatives in Charlotte, North Carolina. They started this tradition a couple of years ago, but this year they used this photo on a Happy New Year card.


So did you guess it???? Yes, I used the Grizzly Bear from the Camping Release and turned him into a Polar Bear. I don't know about you, but I think he makes a great looking polar bear, too. Now I can use this die all year round!

Thursday, January 14, 2010

You stole my heart

When I saw this adorable Mother and baby Raccoon shape from the Cottage Cutz Camping release, I knew I had to have it!! Raccoons have always been my favorite animal ever since I was little. I have collected raccoons of every shape and size for years so of course it was only natural to add this Raccoon Die to my collection!

I picked up this Bo Bunny paper over the weekend for the same reason - I can't resist the raccoons! This is actually supposed to be a Valentines line but I thought it would be fun to use for sweet baby pictures. I used several old heart punches to create my different shapes hearts.
The Raccoons were so easy to cut out and piece together thanks to the handy cheat sheet included with the die. I simply ran the die through my machine three times with each different color of brown I had picked out to use. All I had to do then, was pull each piece as I needed it until I had two raccoons pieced and ready to go!

Don't forget about our Guest Designer Contest going on right now!! You have until Friday January 22nd to get in your entry. Click here for more details :)

Thursday, January 07, 2010

Going Outside!

Yesterday was a GREAT day at the mailbox because I had a package from The Scrapping Cottage!!! Brand new dies from the Cottage Cutz Camping Release! As much as I have enjoyed working with the Christmas dies, I was anxious to dive into something new with some of these fun outdoorsy shapes.

I am so lucky because my parents have a lake house and we have been taking the girls there since they were babies. Consequently, I have oodles and oodles of lake pictures - most of which involve water activities in some way. My Dad has always loved fishing so he has worked with the girls to get them interested in it, too and boy has it worked! They absolutely LOVE fishing with Granddaddy!!!


My layout today features the Fishing Shapes Set. This is a really fun die because it comes with so many fun little shapes. For my layout, I added a thin piece of thread to the fishing pole so that I could hang one of the fish off the pole. This is an easy trick to really make your die cut shapes stand out.
I used my Copic markers to color the individual shapes from the die so that allowed me to get some nice shading especially on the two fish shapes. Anna technique from yesterday would work great on the different hooks on this die as well!!
Just think of all the catchy phrases (no pun intended - well maybe a little) you could come up with to go with the different shapes on this die...What a catch!...I'm hooked!...Catch me I'm falling for you...Got net?...Put a cork in it (funny card to a fisherman)...Something fishy this way comes - just to name a few.
I hope you enjoy seeing all the fun projects this month using the new Camping and Fishing and just all things Outdoor Shapes!!

Thursday, December 31, 2009

Trimming the Tree

I fell in love with this Cottage Cutz Poinsettia Shape from the Winter Wonderland Release the moment I saw it! I love all the layered leaves because it really allows you to customize your flower how ever you would like and is just such a true to life representation of a poinsettia.

I was working on this Trimming the Tree layout and I thought the poinsettia shape would make such a lovely addition to the layout. See, I always decorate with poinsettias each year, but they don't necessarily make it into my Christmas photos because of where they tend to be placed (bathrooms, foyer, that kind of place). So by adding the poinsettia die cut to my layout about decorating the Christmas tree, it reminds me of the poinsettias that are all around us but you just can't see them in the pictures.


I hope everyone has had a chance to start looking over your Christmas pictures so you know which Cottage Cutz dies you need to add to your next order to go with all of your upcoming holiday layouts!!

HAPPY NEW YEAR!!!!!!!!!!!

Thursday, December 24, 2009

North Pole Friends

This year for my Mother's birthday, my brother and I "bought" her Santa to come to her annual Christmas party - the real Santa! This guy was amazing!!! He just embodied Santa. And it was an extra good present for me because I was able to get some wonderful photos of Santa with my girls.

For these pictures, I wanted to create a layout that was different than just the ordinary sitting-on-Santa's-lap layout. As I started looking through my Cottage Cutz, I got the idea of doing a North Pole kind of scene as the perfect background to my special Santa pictures. I borrowed an idea from one of Natasha's layouts where she cut this tree border and layered it. I loved how she did it and always wanted to try it out on one of my own layouts.


I used the Cottage Cutz Elf Workshop as well as these adorable little Cottage Cutz Festive Penguins. These little penguins were so fun to put together!! I think they are a must have for any Winter layout. This was definitely one of those dies that I am so glad I got because it is so much cuter when you have it in your hands and start thinking of all the different things you can use them for! The Cottage Cutz Mini Holly shape is absolutely the perfect decorative photo corner! I could see putting this holly on all kinds of different things for just a little added flair. I also used the Cottage Cutz Mini Christmas Tree to add to the Elf Workshop. Be sure to click on the layout so you can get a close-up of the Elf Workshop and Festive Penguins.
I hope everyone has a very Merry Christmas!!!

Saturday, December 19, 2009

My Christmas Elves

I know I usually post my projects on Thursdays but we had a little Christmas pageant issue come up at my youngest daughter's preschool on Thursday. So, instead of taking a picture of my layout and uploading it for you guys, I was helping out with some last minute costumes. I figured y'all would understand :)

Sooooooo.................I am loving these Cottage Cutz Elves from the Holly Jolly Christmas Release!! They are so cute and SO much fun to put together!! I especially love the little bells on the shoes of the CC Elf with Present Shape. Another great Cottage Cutz touch!! I added gold stickles to the bells to really make them shiny and fun. Doesn't he just look like is running across the page!


If you haven't ordered your Christmas Cottage Cutz shapes, you don't know what you're missing!!

Thursday, December 10, 2009

Snow Day!!

We had a December snow over the weekend so of course I couldn't wait to grab this adorable Cottage Cutz Snowman from the Holly Jolly Release for my layout. Now before everyone starts laughing at our pitiful little snow, you have to know that flakes of any kind are a big deal in Alabama!! And the fact that we actually had some accumulation in December is almost unheard of for us!! My poor children are now expecting snow for Christmas (which I am trying to explain just doesn't happen in Alabama!)

To really bring this snowman to life, I cut him out of white cardstock and then covered the cardstock with Icicle Stickles. The reason I did it this way instead of just using glitter cardstock, is that I knew that as the Stickles dry, they will curl up the paper a little bit which would give my snowman a more 3-D feel. I also used black stickles for his eyes and buttons. I used my Copics and chalks to outline the body and to add a little rosy cheek before I added the stickles. You can choose whatever color or patterned paper you want for his scarf to really personalize his outfit to your layout!

I'll have to make a layout next of our little snowman that we built - although I will probably need the Cottage Cutz Mini Snowman for that one!! ;) You can see how much we had to work with for our snowman!

Thursday, December 03, 2009

First Christmas Layout

I just can't get enough of these Holly Jolly Cottage Cutz Shapes!! This Santa Claus Shape is one of my favorites from this release! I love that he is so realistic looking and that he is carrying that big pack of toys. I just knew he would look perfect on so many different Christmas layouts.

I used this Jolly Santa on a layout of my youngest daughter on her first Christmas morning. In addition to the Santa Claus, I also used the Cottage Cutz Mini Christmas Tree, the Cottage Cutz Mini Gingerbread man, and the present from the Elf with Present Shape.


These cute litte mini shapes are so fun to decorate with Stickles! I also used shiny gold paper for the tree star as well as shimmery green paper for the tree itself.

Saturday, November 28, 2009

Holiday Hugs

I know we are just barely through with Thanksgiving, but can you blame me for not being able to wait any longer to play with these fabulous Holly Jolly Cottage Cutz dies!! As soon as I saw these adorable Elves I knew I had to have them. For the past couple of years, we have had our own elves come to stay with us during the Christmas season. My oldest daughter absolutely LOVES them!!! She named her elf Candy Cane Red and named her sister's Candy Cane White. Our elves are playful and happy and would never make a mess in the house! They mostly like to move around at night or when we are gone and play with the girls' toys and stuffed animals. Last year, my oldest daughter insisted that we take a picture with the elves in front of the Christmas tree and this is one of the pictures. I added the Elf with List die to draw attention to the little elves that the girls are holding in the picture. These Cottage Cutz Elf dies are going to be so fun to use to document the stories of our elves for years to come!

Wednesday, November 25, 2009

Watch for it Wednesday #36

My tip today is a fun way to use Perfect Pearls and a Mini Mister. You will need Perfect Pearls, a Mini Mister (they normally come in sets of 3), and some Ranger Re-inker (I used Peeled Paint - great neutral base with just enough die to make the Pearls show up). Now, you want to pick a couple colors of Perfect Pearls that you want to use. I chose Perfect Bronze and Sunflower Sparkle because they both said Autumn to me. Put a tiny scoop of each color into your Mini Mister. Then drop 3 drops from the Re-Inker bottle into the Mini Mister (FYI - You MUST use a re-inker and not regular alcohol inks. Alcohol inks are not designed to be aerosolized and are TOXIC if used in this manner!!) Now, just fill the Mini Mister up the rest of the way with water and mix it all together.

You are now ready to start spraying!!

Here is a before picture of a whole bunch of leaves that I have cut out to be sprayed with my Perfect Pearls solution. I have gone ahead and inked the edges and also outlined the leaf veins with my Copic markers before I spray them with my solution.

When you are ready to spray, make sure you have the area surrounding your pieces covered unless you want your work surface to have a new Bronze coating ;)

Hold the Mini Mister about 12" or 14" above your pieces and give it a couple of sprays. When you are first starting out, you are going to be tempted to over-spray. It will take a few minutes for the spray to dry so that the color will show up. Spray it a couple of times and then let it dry before you spray again. You can always add more color - you can't take it away once it is there! You may even want to practice on some spare sheets just to get a feel for it and to see if you like more or less color.

I gave this leaf a heavier coating than my others so you would really be able to see the change. The spray really gives the leaf such a wonderful sheen.

Here are the rest of my leaves. I know it is hard to see the bronze flecks on the leaves but hopefully you get the idea. Once all of my Perfect Pearl leaves were dried, I added them to my layout. I used the Cottage Cutz mini maple leaf die from the August Cottage Cutz Release to cut out all of the leaves. Then before I sprayed them with my Mini Mister, I inked the edges and then outlined the inside veins of each of the leaves with my Copic Markers. I also used the Cottage Cutz Raking the Leaves Die as another Fall accent to my page. And once again, the November Pagemaps were my inspiration for my page design.

Another really cool effect of spraying the leaves with the Perfect Pearls mixture is that as the leaves dry, they tend to curl up just a little. This curling makes for much more realistic leaves. I mean, when have you ever seen perfectly flat leaves, right?!!
This technique would also be great to use on your Winter layouts to make snow glisten and shine! Just change your Pearl colors! Really, what projects couldn't use a little something extra ;)
Here are a couple of close-ups to give you a better view of some of the details :)


I hope you liked this tip. Now, run out to the store and stock up so you can start spraying your cards and layouts!!

Thursday, November 12, 2009

Silly Scarecrow

The Cottage Cutz Autumn release has so many fabulous dies to add to your papercrafting projects. One of my favorites from this release is the Cottage Cutz Scarecrow Die!! It comes with so many different pieces and ad-ons that enable you to make the Scarecrow in a variety of different ways! It is the perfect addition to any Fall layout.

I had so much fun creating my scarecrow for this layout! I wanted him to resemble the scarecrow in the picture, but not match it exactly. I couldn't decide what color cardstock to use for his pole so I decided to mount him onto a Popsicle stick. (Well, actually, it is a rub-on tool I had laying on my scrapbook table). This method allowed me to really pop the Scarecrow off the page and also add a fun new element to the overall layout. Instead of using the cardstock cut-outs of his arm ties, I used real thread to tie around the Scarecrows arms. Here again, another easy way to add some extra texture to your die cuts.

On a side note, for today's layout, I used one of the new November sketches from Pagemaps. Sketches are a great way to get your creative juices flowing. Some sketches may have all the elements you want and your layouts can closely resemble the original sketches. Other times, sketches can be a great starting point as you let your own vision take your layout in a totally different direction. Either way, they can be a fun tool to use with your scrapbooking.

Monday, November 09, 2009

THE FARM


There is nothing more enjoyable then going to the Farm with my little grandsons. They are growing so fast and the CottageCutz Autumn release is perfect for this memory.


The CottageCutz dies are so easy to use, they gave my layout a great look.
I used the CottageCutz Chicken Coop, the Fence,
the Chicken Family and Crows.


Friday, October 30, 2009


Firstly I would like to start off by wishing our Blog readers a ‘TERROR’IFIC AND ‘SPOOK’TACULAR HALLOWEEN.


Being Halloween today, I thought this was the perfect opportunity to use my CottageCutz Halloween dies again. I decided to do another Halloween layout this week, but I didn’t want to try cram everything into one page, so decided to spread it out over a 2 page layout.


For this layout I used the following COTTAGECUTZ DIES:-
COTTAGECUTZ Witch On Broom CC4x4-082-D,
COTTAGECUTZ Haunted House CC4x4-074-T,
COTTAGECUTZ Spider from Witch Hat CC3x3-017,
COTTAGECUTZ Skull MINI,


I also used the following QUICKUTZ DIES:-
QUICKUTZ Snake QK-E-0761,
(The Scrapping Cottage has a very limited number of these never released SNAKE QK-E-0761 & LIZARD QK-E-0760 dies for sale in their store for only $7.99 each OR $12.95 for BOTH, and that includes a free CottageCutz MINI die of your choice. Have a look at THE SCRAPPING COTTAGE for these great bargains - They would make a great addition to your Quickutz collection.)
QUICKUTZ City Skyline Border die CC-BDR-040,
QUICKUTZ Suburban Skyline Border die CC-BDR-038,
QUICKUTZ Fence Border die CC-BDR-041,
QUICKUTZ Bats REV-0241-D,
QUICKUTZ Sign RS-0265,
QUICKUTZ Broom RS-0578,
QUICKUTZ Trick-or-Treat pumpkin KS-0885,
QUICKUTZ Cauldron KS-0577,
QUICKUTZ Witch RS-0184,
QUICKUTZ Spider web C-0088-S-REV,
QUICKUTZ Haunted Mini Alphabet Set 4x8-HAUNTED-M,


Friday, October 16, 2009


Today I would like to share a layout I did of my daughter Emily dressed in a Witches Halloween Costume. I have to say that she did NOT like being dressed as a witch and cried the entire time because in her words “Emmy not a witch, Emmy mommy’s princess”.
Don’t look too closely at her face painting, as my face painting skills are Non Existent. It didn’t help that the Green Face paint turned blue when I put it on Emily’s face – Who knows!!!! I think I will just stick to doing my die cuts and leave the face painting to the kids as I’m sure they would have done a better job.


In this layout I have used the following Dies & Products-

COTTAGECUTZ WITCH LEGS CC3x3-018,
COTTAGECUTZ WITCH WITH CAULDRON CC4x4-079-D,
COTTAGECUTZ WITCH HAT (spider only) CC3x3-017,
COTTAGECUTZ CREEPY TREE CC4x4-080-D,
COTTAGECUTZ GHOST WITH LEGS CC3x3-015,
QUICKUTZ PUMPKIN KS-0969,
QUICKUTZ BATS REV-0241-D,
QUICKUTZ REVOLUTION 4x4 SPIDER WEB
QUICKUTZ HAUNTED MINI ALPHABET 4x8-HAUNTED-M
TIM HOLTZ DISTRESS INKS


We love it when you leave comments as your feedback is very important to us. It helps us know what you do and don’t like, and what you would like to see more of on the Cottage Blog. We are here to help you as much as we can so if you have any questions or suggestions we are happy to try and help you as much as we can.

Thursday, October 15, 2009

If the broom fits - FLY IT!!!

No, you are not seeing things and I did not misspell the word "witch" for my page title. When my oldest daughter was 2, she called witches, "itches". It was really the cutest thing! So, when we found this fancy witch costume, we knew it would be absolutely perfect for her for Halloween. In an effort to not be too scary, we called her a Glitter Witch. The Cottage Cutz Flying witch is the perfect addition to Halloween pages and projects where you don't want a scary witch! Actually, as I was putting her together, I kind of had the feeling she might be a little bit of a Diva witch with a little outfit tweaking!

Wednesday, October 07, 2009

Watch for it Wednesdays!! #29

For my Watch for it Wednesday tip this week, I wanted to get you thinking about ways to have more fun with your page titles and card sentiments. There are lots of different ways you can spice up your titles. For instance, if you are making a Halloween-themed layout, you could have a little ghost flying out of a letter, maybe some spooky eyes peaking out from the inside of a smaller letter, or a spooky cat perched on top of your title letters. On my example this week, I added the Cottage Cutz Mini Pumpkin inside one of the O's from my "Boo" page title. Since my title font has such nice large letters, this adorable little pumpkin sits perfectly inside the O. 
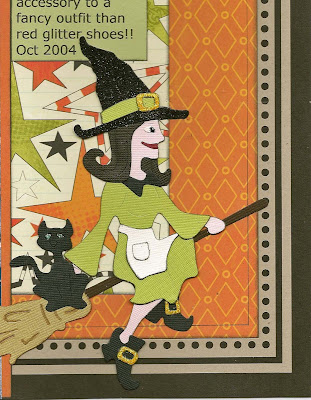
If you want to take your creativity one step further, you could actually replace a letter with a shape that matches the theme of your layout or card. For instance, if you were using Halloween as your title, change the o to a small pumpkin, the n to a screeching cat, the l to a witches broom, and so on. You can have equally as much fun with lots of other themes and holidays.

So, get your creative juices flowing and try to really mix things up on your next paper crafting project!!

Friday, October 02, 2009


My Blog Post today is a double page layout using some beach photos that were taken a few years ago on a Day Trip out to the Great Barrier Reef. It was so magical out there that no photos seem to capture the true beauty of this amazing wonder of the world.
I have been waiting for the perfect opportunity to use my COTTAGECUTZ ‘UNDER THE SEA’ dies and thought these would be the perfect photos to use with them.


On my layout I have used the following COTTAGECUTZ dies & products-
COTTAGECUTZ Sea Weed Forest CC4x4-068
COTTAGECUTZ Peek-a-Boo Clam CC2x2-010-D
COTTAGECUTZ Octopus CC4x4-057
COTTAGECUTZ Sea Turtle CC4x4-061
COTTAGECUTZ Shark CC4x4-060
COTTAGECUTZ Mermaid CC4x4-062
KAISERCRAFT Self Adhesive Pearls
TIM HOLZ Distress Inks

Don’t forget that COTTAGECUTZ DIES are sold exclusively at THE SCRAPPING COTTAGE. They work exactly the same way as your Quickutz dies do and the only difference is that the COTTAGECUTZ DIES are now pink and they have more detail to them – which I L-O-V-E.


I also used the following Quickutz dies-
QUICKUTZ 2x2 Crab RS-0020
QUICKUTZ 2x2 Rocks KS-0439
QUICKUTZ 2x2 Skeleton KS-0186
QUICKUTZ 2x2 Monkey & Barrel KS-0232
QUICKUTZ 2x2 Treasure Chest KS-0782
QUICKUTZ 2x2 Anchor RS-0033
QUICKUTZ 4x4 Pirate Ship Rev-0081
QUICUTZ 4x4 Chalkboard Rev-0045 (for the small photo frame)
QUICKUTZ Clouds Border Die CC-BDR-032
QUICKUTZ Limited Edition EXOTIC ISLAND Alphabet