Showing posts with label Scalloped Stitched Rectangle Slimline. Show all posts

Tuesday, April 05, 2022

Happy Birthday Slimline Baby Animal Cupcakes Card

Happy Terrific TuesDIE Scrapping Cottage friends!
Melinda here with you for another fun Tuesday. My project is my first ever slimline card! Here's what I made.

I just loved having a go of this great sized card!

This card is very easy to duplicate!

I started by scoring my base. I took an 8.5 x 11 paper and scored it right down the middle at 4.25.


I went on to cut out some mats as well as the scallop stitched slimline piece.


Here are those pieces assemble.

Next I cut all of the main facial features with white cardstock. I was then able to color the pieces I wanted.


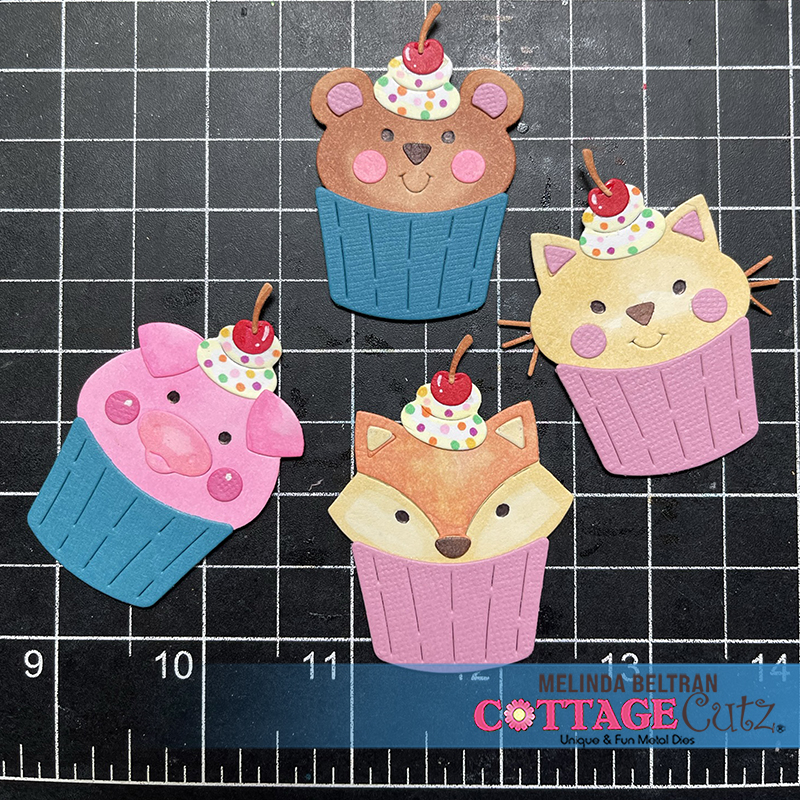
Here's a look at  my completed baby animal cupcakes. I added those toppings to each. Super cute!


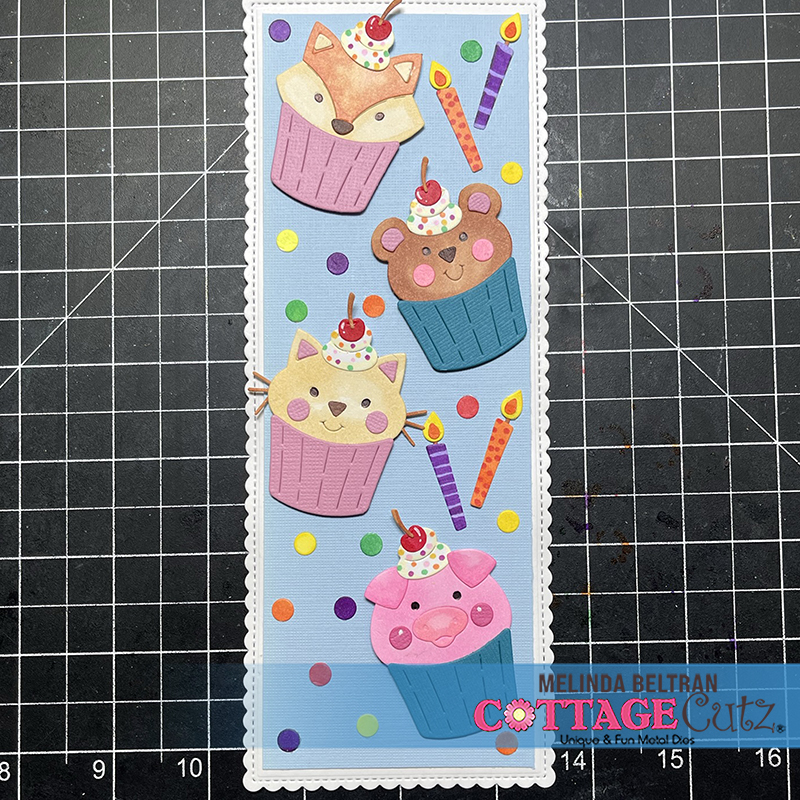
Here's a shot showing how I assembled them onto the scallop stitched mat. You can see in this photo that I added some of the candles and a whole bunch of the little circles that cutout. I just used my markers to color them all.


Here's a closer look at the finished card.


And another view as well. These cupcakes are adorable! So many uses for these pieces! Like I said, this is one card that would be super easy to reproduce and have a lot of fun doing it. 
Here is one last look at the card again! I enjoyed making this slimline card and see many more in my crafty future! These dies make it so  much fun to create!


And speaking of fun dies.... Have you seen the newest release!!! 
ADORABLE FROM DOWN UNDER!
Hurry for a limited time...
New CottageCutz 
Australian Friends Release
Save 50% on Bundle
Save 30% on Individual Designs
14 New CottageCutz Designs


The Dies I used to create this project:


In case you didn't hear, The CottageCutz YouTube channel is filling up with beautiful projects and great how-tos!  Head over and check out the latest video! 

Well that about covers it for today! Until the next time, have a wonderfully crafty day!
Melinda Beltran

Friday, February 04, 2022

Cute Bunny Peeker Bookmarks


Happy Friday Cottagecutz fans. I hope you’ve had a lovely week and are looking forward to the weekend. I shall be trying to fit in as much crafting as possible this weekend as I have a knee op on Monday 
(deep joy!)

Anyway, back to the project in hand,

I really wanted to use some of the longer nested shapes and then I thought, bookmarks! I used the 7” ‘Scalloped Stitched Rectangle Slimline’ and cut it out in 3 colours twice. I wanted to the bookmark have some heft so it lasted well so I stuck them together


Next I printed out my nieces names and popped their names on white card. Once printed I cut them using the 6 and 1/4” ‘Nested stitched Rectangles’ and then glued them onto the main tag


Next I cut from the ‘Miss Spring Bunny’ die, 3 heads and 3 sets of arms to be used shortly. I used a matching bow in the bunnies ear too


I wanted a focal point to the bookmark and something that the page of your book could link onto. So I cut out the 2nd largest ‘Nested Stitched Scalloped Circles’ twice in each of the main colours. In one of the scalloped circles I cut out the middle so that it will look like the bunny was peeking over the circle. I also cut out 3 white nested circles 

I stuck the white circle to the scalloped circle and then the rim on top of that


So the bunny was attached to the scalloped circle then attached to the end of the main bookmark. Make sure you use 3D foam pads so you have that give for the bunny to sit on the page you mark in your book

I added the little chick to each die and also a diamanté to finish on the bow


 I really hope that you like the project for today and have inspired you to make little gifts for Easter.
Have a wonderful weekend and I will see you next week
Hugs
Wendy

Dies I have used:


Don’t forget to check out our YouTube page. I know Theary has made a wonderful project this week


Sunday, August 08, 2021

Sparkly Sheep

Hi!

It's Anja here for my Sunday post. While I'm still waiting for the new slimline dies and stamp sets to arrive, I'm still making cards with cute Country Farm release dies. This time I made a card with sparkly Sheep. 

For this card I used:

- Cottage Cutz dies (Curly Sheep & Lamb, Scalloped Stitched Rectangle Slimline, Nested Stitched Rectangles Slimline),

- Distress Inks,

- white card stock for die cuts,

- black pen, 

- white ink,

- embossing ink,

- sentiment stamp,

- acrylic block,

- heat gun,

- white embossing powder,

- sparkle brush marker,

- Perfect Pearls powder,

- brush,

- water spritzer,

- adhesive foam pads,

- paper glue. 


First I cut and colored the sheep and the lamb. 

Next I cut the scalloped rectangle and embossed the sentiment on top using the white powder.  

Then I colored the rectangle with Distress Inks. 

After that I sprinkled Perfect Pearls mixed with water over the paper. I used the heat gun to dry it. 

I cut another rectangle piece for the card base. I glued the colored rectangle on top of it and added the sheep and the lamb. I used adhesive foam pads to adhere it. Last I used a sparkle marker to add some shine to both the sheep and the lamb. And my card was done.


And that's all from me for today. Before I go I want to invite you to The Scrapping Cottage online store to check the new Lil' Bluebird Designs release.
 
Have a nice week and see you again on Sunday.

Anja Z.


Cottage Cutz dies I used:


Tuesday, June 15, 2021

Just For You

Hi!

It's Anja here for my Throwback Tuesday post. For today's post I used three dies from Springtime release and made a simple and classy card.

For this card I used:

- Cottage Cutz dies (Spring Flowers in Jar 1, Spring Flowers in Jar 2, Spring Flowers in Jar 3, Scalloped Stitched Rectangle Slimline, Nested Rectangles Slimline),

- grey card base (9x23 cm),

- white and patterned card stock for die cuts,

- sentiment stamp,

- black pigment ink,

- acrylic block,

- scissors,

- washi tape,

- adhesive foam pads,

- paper glue. 


First I cut all the flowers. I cut two sets of each. I arranged it and glued it on patterned paper. Then I cut the rectangle out of the paper. I used the third largest die from the set. I also cut a scalloped rectangle from white card stock. I used washi tape to help me die cut the slimline dies. I glued both cuts on the grey card base. Last I added the stamped sentiment. I adhered it with adhesive foam pads. And my card was done.


And that's all from me for today. Have a nice week and see you again on Sunday. 

Anja Z.


Cottage Cutz dies I used:


Tuesday, June 01, 2021

Ho Ho Ho

Hello Scrapping Cottage Friends

It is Pam on the blog creating with you today!

Today is Throw Back Tuesday so I am taking advantage of this fun day by getting a head start on my Christmas cards!!  I am using a super cute die from the 2019 Christmas Release Part 2.  It is called Ho Ho Friends.  I decided to make two versions one horizontally and one vertically.  Not sure which I like better maybe you can help me decide!!


For the vertical card I used a green slimline base and for the horizontal card I used a white slimline base.  For both versions I used the Hills Slimline die for the snow which is cut out of glitter paper.  For the top card after I glued the hills to a piece of white card stock (only glue down the very bottom of the hills so I could tuck in the Ho Ho Ho). I ran it through my die cutting machine using the Scallop Stitched Rectangle Slimline. For the bottom I just glued the layers directly to the card base and added some DP for sky.

After I got the base done I cut out 2 of each of the reindeer, penguin and Santa shaded them with inks and glued them together.  I also cut out 6 of the holly and lettering using the Ho Ho Friends die
I added the holly to the letter H and tucked them into the snow.  Next I added the characters to the letter O and tucked them into the snow.  The last step is to add glossy accents to the holly berries, penguin beck and reindeer nose stamp the sentiment and glue to card and it is complete

CottageCutz Products


Thanks so much for stopping by for our Throw Back Tuesday.  I hope I was able to jump start your Christmas card ideas!
Blessings
Pam