Sunday, March 31, 2019

Bunny With Coffee

Hi!

It's Anja here. Today I made a wish well card. I used the cover theme to decorate the inside.


For this card I used:
- Cottage Cutz dies (Egg Painting Bunny, Love Latte & Donut, Coffee & Donuts, Nested Wacky Stitched Square Set),
- Distress Inks (Spun Sugar, Worn Lipstick, Wild Honey, Picked Raspberries, Hickory Smoke, Vintage Photo, Pumice Stone, Black Soot),
- white card base (10,5x15 cm),
- patterned paper (2 10,2x14,7 cm),
- white card stock for die cuts,
- Versafine black ink,
- acrylic block,
- white pen,
- sentiment stamp,
- pink liquid drops,
- paper glue.

First I cut and colored the bunny, coffee and donuts.


Then I cut two background papers and two squares.


I glued the patterned paper and the smaller square to the cover and then stamped the sentiment under the square. I used the other paper in the bigger square for the inside.


Next I glued the bunny, coffee and donuts. I used liquid drops to decorate the donuts.


And my card was done.


Next week I'll show you the projects with the Easter release dies.

Before I go I'm inviting you to the store for the Anniversary Sale. You can get the dies for great price.

Have a nice Sunday everyone and see you again next week.

Anja Z.


Cottage Cutz dies I used:


Saturday, March 30, 2019

Vase with Flowers (new die)

Hello Scrapping Cottage friends! Thanks for taking the time to stop and visit with us today. It's Mary Marsh here bringing you the Saturday edition of the Blog.
If you haven't seen the 36 new Spring dies, take a peek at them in the online store. You definitely won't be disappointed.There are a variety of designs so perfect for Easter or Spring card making. 

For my card today I am using the new Spring Vase w/Flowers die. This is such a pretty vase and would be great for an Easter, Mother's Day, birthday or anniversary card. I thought I would make it a Birthday card for a good friend of mine. So let's get started with some details on how I created my card. 

Step 1: Having a layout in mind at the card start is always a big boost for me. I love working with the sketches that are out there in the online world. That way I can just choose the card colors and designer paper and I am good to go. I liked this week's sketch #742 on Splitcoaststampers because it would allow for a more clean and simple card design. 
I decided to go with Spring like colors for my card. The card base is a seafoam green, Layer 2 is a medium purple, layer 3 apple green, layer 4 a daffodil yellow and layer 5 a lighter purple. I cut 1/2" cardstock strips and then taped them to a white cardstock base. That way I could be assured everything would be straight and also make placement easier on the card base. 

Seafoam Green Card Base: 4 1/4" x 5 1/2"
1/2" x 3 1/2" cardstock strips: colors listed above

I wanted bright Spring like colors to continue with the vase and flowers so I used a variety of colors. 
The greeting panel -layer 6- I made a little larger to accommodate the sentiment I am using. It's 1" x 3 1/2". even though this is a birthday card I used a friend's sentiment on the front. My birthday greeting will be on the inside of the card. 
Step 2: Now that all the elements for my card are cut I am ready to start assembly. I started with the 1/2" strips of cardstock. They are on a cardstock base so I just had to secure them to the card base. 
I brought the greeting panel down lower than what they had it in the sketch. I didn't want the flowers up on the top part of the card. I think it balanced out my card nicely.
I finished off my card by adding a few enamel dots to the bottom of the card. That's my sample for this week. I hope I have given you an idea for a way to use this Spring Vase. Mother's Day is approaching and this would be a great die for those cards.
Also we have a brand new release of dies in the online store. It's our Magical Fantasy Release. Each die is cuter than the next and they are currently 25% off.  The DT will begin showing card samples soon. See you next Saturday.


die I used to create card:


Friday, March 29, 2019

Bunny and Butterflies

Happy Friday!  It's Jeanne today with a card that makes quite a statement and is easy to create as long as you don't mind inky fingers!
I love the intricate silhouette dies.  They just call for a beautiful background!
For this card I used a favorite method.  I wipe Distress Oxide inks on a craft mat, spray with water and dip my mixed media (or water color) paper in the puddles.  I use a heat gun to dry between layers.
The backgrounds always turn out gorgeous and no two are alike.  For this one I started with a piece of paper about 6 x 9 inches and several shades of blue and purple inks.
I cut the background down to 4 1/4 x 5 inches and mounted that to a 4 1/4 x 5 1/4 inch dark purple panel.
Next I cut my images from a piece of pearlized white card stock.
Using paper snips, I cut the butterfly from the eggs.
I glued the Easter die cut to the panel,wrapped ribbon around it and tied a small bow.  Then I adhered it to an A2 card base made from the same pearlized card stock.
I glued down the body of the butterfly and bent the wings up slightly to add dimension.  Finally I added some pearls.

Dies used:
http://www.scrappingcottage.com/cottagecutzeasterbunnyandbutterflieselites.aspx

http://www.scrappingcottage.com/cottagecutzspringbutterflyweggselites.aspx

Thanks for stopping by today.  I hope you have a fun, creative weekend!


Thursday, March 28, 2019

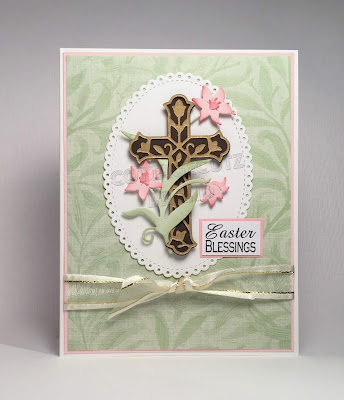
Easter Blessings

Hello Scrapping Cottage Friends!

It is Pam sharing with you today.

I can't believe we are at the end of March!  And Easter is just a few weeks away.  Time seems to go faster and faster the older I get!  Today, I am using a gorgeous die from the Spring Release.  I hope you can spend some time in our store to check out this amazing collections.

Designer Steps:
 1.  Cut out the pieces using the Cross with Spring Lilies die.  I used dark brown, light green, soft pink and gold card stock for the pieces
 2.  Shade the pink flowers and the leaves with in and then assemble the pieces
 3.  The flower wraps beautifully around the cross.  Add some small drops of glue to attach the leaves
 4.  Use a white A2 card base, a piece of pink card stock cut slightly smaller and a pieces of DP cut just slightly smaller then the pink.
 5.  Use the Nested Stitched Eyelet Oval over second from the largest and cut it out of white card stock.  Then pop the cross up on the oval as shown
5.  Layer the DP to the pink card stock and then glue the oval to the DP.  And before you glue the pink card stock to the white card base add the sheer white ribbon and your card is complete
CottageCutz Products


Thanks so much for stopping by.  We really appreciate the time you spend with us!
Blessings
Pam


Wednesday, March 27, 2019

Happy Easter Card

Hello!  This is Sukie and today I'm sharing this sweet Easter card for my guest designer.  The bunnies in this die set are absolutely adorable.
I cut out all of my pieces from the Spring Potted Bunnies in white card stock and shaded them with my Oxide Inks.  The colors of the pots are deeper shades so they would pop on my card.  A few extra carrots were cut out for embellishments.  The strips of grass were cut from the Spring Grass die.
The inspiration for my card came from the pretty striped paper I had in my stash.  The colors remind me of Spring which are perfect for an Easter card.  I layered a piece of white card stock to break up the background.
To create the scene on my card I pieced the strips of grass along the bottom edge of the white card stock. The strips of grass were trimmed on the edges so that it would fit perfectly.
Next, the potted bunnies were placed along the bed of grass.  The carrots were adhered as extra embellishments.  The "Happy Easter" sentiment is from the Scrappy Moms (retired) For Peep's Sake stamp set.
Here are the dies I used to create my card available in the shop: