I know it's Thursday not Wednesday - we'll just call this Watch for it Wednesday on Thursday ok?
I remember in elementary school making these little pockets out of a square. I made all sizes and was fascinated that you could even drink out of one of these, but you had to drink fast or you'd get wet.
Anyway, I thought these would make cute Valentine pockets to hold a little note and a treat.
They're really simple to make.
 I started out with a 5" square of double-sided patterned paper.
I'm using BoBunny Bandit paper. This paper went great with the Camping release and now I'm using for the Valentine release too!
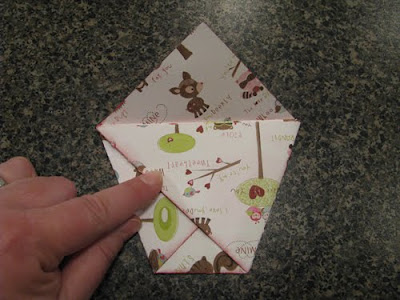
 Fold it in half to make a triangle. Scoring it first helps it to fold better.
 Then take the left side corner and fold it up to the right side and crease.
 Then take the right side and fold to the left and crease.
 Take the top portion and fold one triange to the front and one to the back.
I used some Distress ink to ink all my edges before I applied my adhesive.
I added a border punch piece and used the cute little mini CottageCutz Love Postage Stamp die to embellish my pocket.
I cut a piece of white cardstock that is 2 5/8" wide and 4" long and folded it half for my tag.
You can also take both triangle flaps at the top and fold them over to make an envelope flap.
The CottageCutz mini's are just perfect to add a little touch of love - they are so cute!


5 comments:
HOW CUTE! I remember making those as well. The paper is so sweet!
What a fun little project!! And I love the Cottage Cutz Mini stamp shape! It is the perfect accent for your card and pocket.
These are so much fun and easy to make! Love the Little Cottage Cutz stamp on it! xxD
What a cute Valentine project! The Cottage Cutz mini stamp is adorable and perfect for your project.
What a cute project! Love the papers for sure! just so adorabl! Thanks for the instructions on how to make the envolope!
Post a Comment