Tuesday, December 26, 2023

Thank You Berry Much Card

Hey crafty friends,
So glad you stopped in today! Whew what a whirlwind this holiday season has been.... but wait it's not over yet...lol! We still have the new year coming. Today it's my turn to share here on the Cottage Cutz blog...so I wanted to take a break from all the holiday "stuff" and create a thank you card that is completely out of this season...
I needed a thank you card, so I decided to go with a fun, bright and very spring"ish" card. I used the new Strawberry Thank You Berry Much die that was part of the recent Black Friday release. This die is a fantastic one to have in your craftty arsenal!

Here's a closer look at the berry. I cut it out in white and also some patterned paper. I did ink the edge of the large berry and then added the white letters. I then used the Strawberry plant die and added the flowers and the smaller strawberries. I anchored all of the berrylicious goodness onto a double-stitched circle cut from some patterened paper. Lastly, I used the double stitched rectangle die and cut that out in white. I added a multi-colored polka dot mat to that and then seated all of that onto my card base that has another patterned paper mat. I do like to put lots of layers on my cards.

This is a quick and easy card that you can recreate very fast and in a variety of themes to have on hand.

Dies Used For This Project
Strawberry Plant

Sentiment, Thank You Berry Much


Well, that about covers it for today. Be sure to come back real soon. You will want to keep up with my crafty adventures! Until the next time, have a wonderfully crafty day!
Melinda

Saturday, December 23, 2023

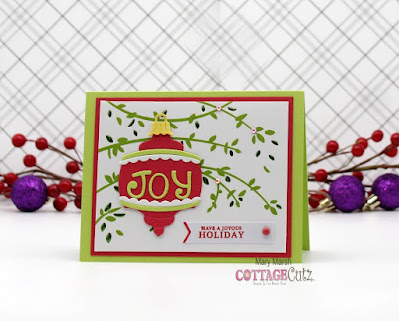
A Joyous Holiday


Hello CottageCutz friends! Thanks for taking the time to stop and visit with us today. It's Mary Marsh here bringing you the Saturday edition of the Blog.

We have 2 new releases in the online store. The Christmas 2023 release is available and currently at 30% off individual dies. The Black Friday In The Garden release is also available at 30% off individual dies.

For today's card, I am featuring the new Old-Fashioned Ornament 1 die and created my last Christmas card of the 2023 season. It is another quick card because I was under a time crunch (LOL)!

Design Steps:

I started my card with the colors from this week's color challenge #979 on Splitcoaststampers. We are to use sweet sorbet, lemon-lime twist, daffodil delight and petal pink for our color combo.  
sweet sorbet, daffodil delight, lemon-lime twist, petal pink

The background foil paper was something I had in my stash and the color was a perfect match. I stamped a sentiment in sweet sorbet ink on a flag and added some bright pink jewels since I don't have the petal pink color. I also added a sweet sorbet enamel dot to the flag.  
The A2 card base is lemon-lime twist.
Card base: 4 1/4" ' x 5 1/2"
Designer paper Layer: 3 3/4" x 4 3/4"


I cut my ornament in the challenge colors. I think it turned out so pretty. 
Attached the image to the designer paper layer with double sided tape. I also add a layer of sweet sorbet cardstock to the panel. 
Sweet Sorbet Layering Panel: 5" x 4"

To complete my card, I attached the image panel to the card base.
 
Well, that's it for me for this post. Merry Christmas everyone. See you next Saturday. 

Reminder: Marla has a new video up on the CottageCutz YouTube channel and there is a giveaway. Click here.


Friday, December 22, 2023

Gingerbread Cottage Birthday Wishes

Happy Friday crafty friends!  

Kris here sharing a "Sweet" birthday card featuring the Gingerbread Cottage from our Christmas 2023 Release!  All the dies in this release are 30% off for a limited time, so a great time to pick some up for those last minute holiday cards for this year OR to get a head start on next year's cards!  The Black Friday Release is also on sale for a limited time! 


DESIGN STEPS:

I started with an A2 pink card.  I then die cut the Lattice Slimline die in white.  Then, with the card horizontal, I placed it on top and cut the bottom off a li'l short as shown below. 


Next, I cut a piece of white cardstock to an A2 size, then I cut it diagonally following the stripe on the lattice.  

I placed it into my Misti as shown below and stamped my sentiments (from the Hey Sugar stamp set from La-La Land Crafts) in Pink and Green.  


I decided to add a bit of light blue (Tumbled Glass) ink around the house so the snowy roof doesn't blend in with the white background.  


I adhered this piece to the card front. 

Next, I die cut a piece of light pink glittery cardstock with one of the Hills Slimline set and attached to card front. 


I die cut my Gingerbread Cottage  from white cardstock then colored with Copics and Distress Oxide inks, then adhered to card. I tucked the lollipop behind the snow, I glued the chocolate swirled candy to snow and popped up the strawberry, tree and house with foam dots.


Thanks so much for stopping by today! 
 Be sure an check out our YouTube channel
for more inspiration and giveaways!

Christmas Blessings to you all ♥

~Kristine


Thursday, December 21, 2023

Last Minute Little Gift

Hello Friends

It is Pam sharing with you today!

I am using our new releases dies from Black Friday to create a last minute gift for a sweet friend who loves to garden and make cards.  She is like me and spends a lot of time at her craft desk. So I thought this little garden themed easel card calendar would be cute sitting on her desk. 

For my project I have used several of the new collection dies: Greenhouse, Hanging Plants, Wildflowers and Sentiment Thinking of You (the little flowers).

Design Steps: 

1.  Start by cutting all of pieces using the following dies and card stock: Greenhouse pink, black, silver and light green.  Sentiment Thinking of You yellow and pink.  Hanging Plants brown, green and dark green.  Wildflower purple and green.  Slimline Grass light green
2.  For the base cut a piece of card stock 8 1/2 x 5.  Fold in half and then fold the front flap in half again.  
This will create the base for your easel card.  Cut a piece of white card stock  5 x 4.  This will be the easel panel
3.  Use the piece of 5 x 4 white card stock and ink the background blue.  Glue down the grass at the bottom and making sure not to glue the top of the grass so you can slide in the greenhouse
4.  Glue the black greenhouse frame and then add the pink pieces
5.  Add the rest of your greenhouse plants as shown.  Place the shovel and watering can outside of the greenhouse as shown above.  I placed my entire panel onto a scalloped black retangle for stablitiy and just to make it pop a little more
6.  Place glue on the flap as shown above and then place the greenhouse panel on top of the panel only  glueing down the bottom portion of the greenhouse panel
7.  You card should look like the picture above.  Add some pearls, black rhinestones and silver gems to spice up your little greenhouse

8. For the background on the bottom piece cut out a piece of black polka dot paper 4 7/8 x 4 1/8.  Glue the paper down.  To create the stop for the easel you will use the little mini calendar


We have more inspiration on our YouTube Channel check it out HERE

Thanks so much for stopping by!  And I will see you next Thursday.

Blessings and Take Care


Tuesday, December 19, 2023

Dog Treat Jar and Card Set

Hey crafty friends,
So glad you stopped in today! It is coming down to the wire before Christmas! Today I am sharing a super cute and quick gift for my little grand dog. Here is what I made.
I made this super cute card and little treat jar with tag for Kylo, my little grand doggy. He is the sweetest little guy! 

Here is a closer look at the cute little treat jar. I picked uup a jar from the dollar store and filled it wit little milk bone treats that are in red, white and green. I added this super cute little tag. It features the sweet little Christmas Reindeer Puppy die from the new Cottage Cutz Christmas Die release.


Here is a closer look at my card. It is a top folding card and I used the Doghouse w/Pup & Hydrant die as well as the Love My Dog, Love My Cat dies for the card. I also used the Wacky Stitched Rectangle set. I wrote his little nae on the cute little sign and I did the same with the word Grand.

Here is a closer look at the cute little tag. I put the little doggy onto the smaller rectangle wacky stitched dies. I cut the smaller of the two mats in patterned paper and the larger one in black cardstock.

Here is one last look at my cute little set.


Dies Used For This Project


Well, that about covers it for today. Be sure to keep up on all the fun and creative things the designers here are coming up with. Until the next time, have a wonderfully crafty day!
Melinda