Tuesday, July 12, 2022

Floral Card

Happy TuesDIE Cottage Cutz Friends!
Melinda here with you on this Terrific Tuesday. I hope you are enjoy these wonderful days in July! Today I am sharing a very simple but effective card I created with one of the dies from the new Strawberries and Bees releaseHere is what I came up with.
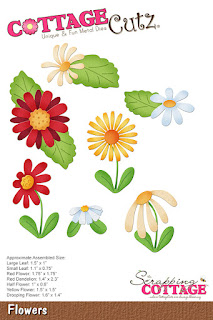
I created this pretty card with a simple floral theme. I used the wonderful new Flowers 4x6 die that is part of the new Strawberries and Bees release. I die cut several of the flowers in the die out all in white cardstock. I then lightly colored them with a some light shades of pink and gray.

Here is a closeup of one of the flowers. It has two layers as part of the flower. I just curled the petals to give them more movement. I also stuck a small piece of foam between the two layers to give them some additional lift.
Here is a shot looking at the card straight forward. I nestled the various flowers onto the largest double stitched oval from that set. 

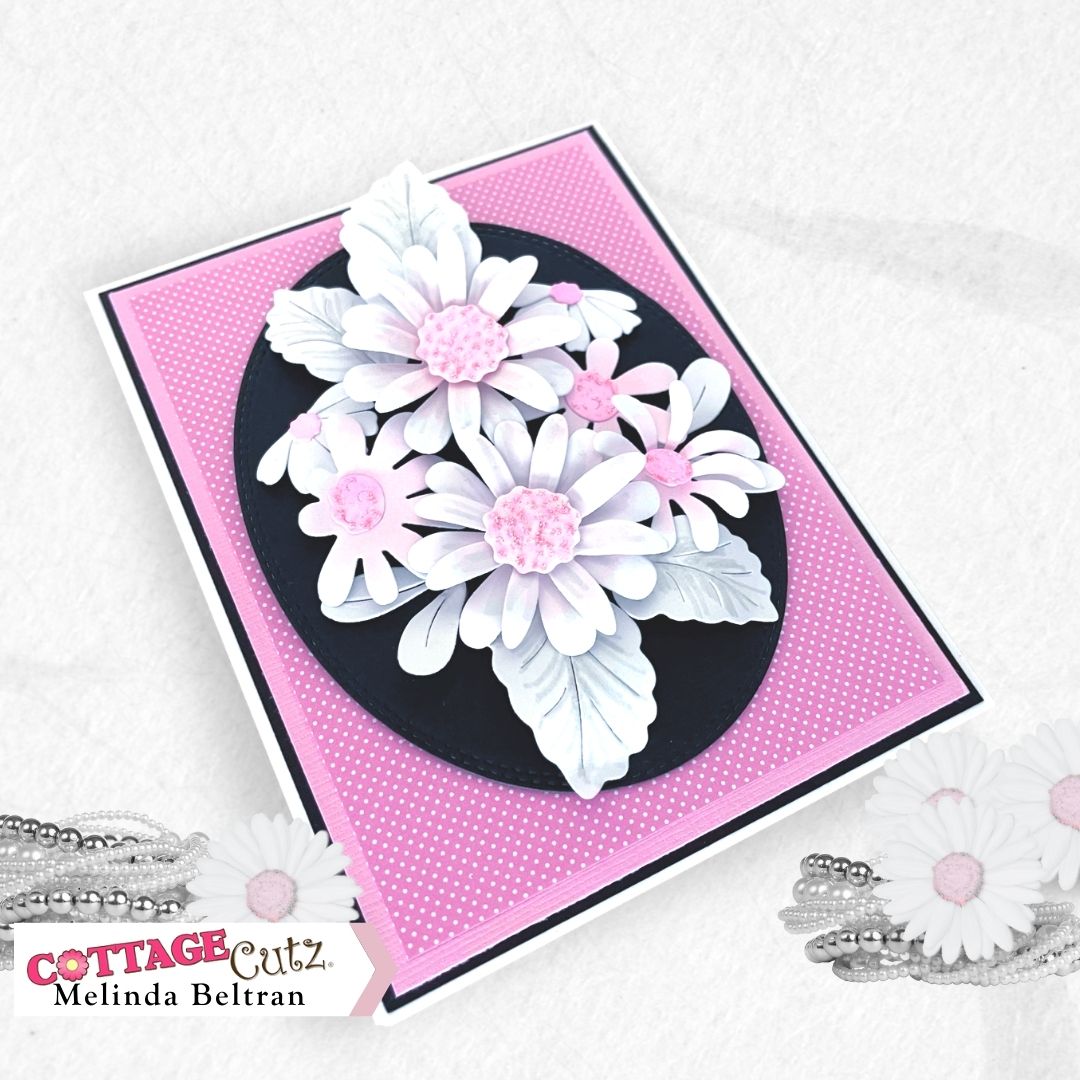
Here is a view with the card at an angle so you can see more of the dimension of the flowers and leaves. I added some stickles to the centers of the flowers for a little extra touch. I then mounted the black oval with all the flowers onto three layers of mats. A Black, Pink and Pink and White Polka dot layer. All of that went onto a top folding standard A4 white cardstock base.

I purposely put no sentiment on it as I am not sure if this will be a thinking of you or a birthday card. We shall see :-)


Dies I Used


Be sure to check it out and all the amazing creations from the design team!

Make sure you head over to the CottageCutz YouTube channel and check out all of the amazing projects on there. Our video team is doing a wonderful job of filling the channel with all sorts of creative content! You don't want to miss it!


Well that about covers it for today! Until the next time, have a wonderfully craft-die day!
Melinda Beltran

Monday, July 11, 2022

Strawberry Cottage Fun fold

Hello CottageCutz friends! Thanks for taking the time to stop and visit with us today. It's Mary Marsh here bringing you the Monday edition of the Blog.

It's new release time!!! We have new dies in the online store. It's our Strawberries and Bees release with 16 new designs. You can pick up the individual dies are 30% off.
The new dies are perfect for all your cardmaking needs. They would work for so many occasions as our design team have been showing. 

Today for your viewing pleasure I am featuring the new Strawberry CottageStrawberry Gnome Boy and the Fresh Strawberry Patch dies. I created a pop and twist fun fold card. I have step by step instructions below but if you like to watch a video. Here is a link to one I found on YouTube. So, let's get started with some details of how I created my card. 

Design Steps:

I started with my card front and cut the Strawberry Cottage using the colors from the packaging.
white image panel is cut at 4 1/8" x 5 3/8" 
I used stencils and created some background clouds with broken china distress ink and a little grass with mowed lawn distress ink. 
Stamped a sentiment in blueberry ink. This ink matches the doors and windows of the cottage. 
Attached this finished panel to the red card base to complete front of card. 
red card base 4 1/4" x 11" and scored at 5 1/2"
Now I am ready to start my card inside. 

I started with decorating the four inside panels.  I decided to use the Strawberry Gnome Boy and the Fresh Strawberry patch dies for 2 of the panels. Then I added 2 sentiment panels. The cupcake is from the Lady Bug Cupcake die. 
I layered these on a white cardstock panel measuring 10" x 3 1/2". I scored and burnished it at 2 1/2", 5" and 7 1/2".
Next, I started on the pop-out mechanism. I cut a piece of white cardstock at 8" x 3 1/2". I scored it at 1 3/4" on the short side. then on the long side I put a tick mark at 2 1/4"& another at 5 3/4".
I used the scoring blade on my paper trimmer to make the next score lines. It's easier for me to line up at an angle on the paper trimmer. You score on both sides of this panel. Tick mark to tick mark. 
When it's finished you will have an "X" pattern. 
Then you pinch this panel in, so it forms a sort of arrow shape. 
Then to attach this to the inside of the card you use a strong adhesive (I used score tape) and attach to the top of the arrow only. You do this on both sides of the arrow and then lay it inside the card at the top of the card and close it. The photo below shows the mechanism open without the image panels attached. Before I attached the pop out mechanism, I decorated the inside panel with strawberry designer paper and stamped another sentiment. 
Now I am ready to attach my image panels to the mechanism. You use a strong adhesive- again I used score tape- to the top right and bottom left part of the mechanism only. Then the image panel is attached to the mechanism and you fold and close it. 
This is what it looks like when it's opened.
I made a short video to show you how it pops up when you open the card. 

And that's my card design for this week. I hope I have given you a fun idea for a way to use these new dies. See you this coming Saturday with another fun fold idea. 

Reminder: Our YouTube channel is active again. Check out the latest video from Jen Hartsgrove for a chance to win the die she used. Click here


Dies I used to create card:


Sunday, July 10, 2022

So Berry Sweet


Hi my crafty friends! Today a I have a bonus slimline card featuring the "Strawberry Girl" and the "Berry Phrases" dies from the new "Strawberries and Bees" release available now in the Scrapping Cottage. For a limited time, you can purchase the individual dies at a 30% discount.

For my card today, I began by die cutting all of my images from Neenah Solar White Classic Crest card stock. I paired the "Ice Cream Truck" and the "Nested Stitched Doilies" from previous releases, to help create a mini scene. Instead of using my Copic markers today, I chose to ink blend the images with my Distress Inks. Here is a list of the colors I used:

Festive Berries, Picked Raspberries, Spun Sugar, Worn Lipstick, Mowed Lawn, Twisted Citron, Tea Die and Vintage Photo.

The "Ice Cream Truck" comes with little hearts for the sign, but to tie in the berry theme, I added the small strawberries from the "Strawberry Cottage" die and the larger strawberry from "Strawberries w/ Mouse" die. I had a few left over from another project coming soon to the CottageCutz YouTube Channel. I die cut my sentiment from the same white cardstock and chose not to color it to keep the focus on the scene.

The finished card is an odd size. My scene didn't quite fit on a mini slimline card base and it was too small for a full size slim. Therefore, I created a custom base of 3.5" x 7.5". I can easily create an envelope using my envelope punchboard or simply put it in a number #10 envelope.

That completes my card. I hope you will head over to the CottageCutz YouTube Channel and subscribe, so you don't miss any of my upcoming projects.

Thanks for stopping by. Until next time Marla


dies I used to create card:


Saturday, July 09, 2022

Bee Happy - Spinner Card

Happy Saturday friends! 

Kris here with a fun interactive card!  Have you gotten your hands on this ADORABLE Strawberries & Bees Release yet?!  It's so fun to piece together and make really fun cards....and they're all 30% off for a limited time 😀

I've used the cute Bee Gnome and the Bee Phrases to create this fun spinner card!


How I made it:

1.  I cut a piece of thick white cardstock 11" x 5-1/2" and scored it at 5-1/2" to make a square card base and set it aside.

*Next... if you already have some honeycomb papers - Great!  I did not, so I used some paper stencils.

2.  I cut 2 pieces of 80 lb. white cardstock:  the first one 5-1/4" square and the second 5" square.

3.  I sponged wild honey distress oxide ink with a honeycomb stencil onto the 5-1/4" square

4.  I sponged salty ocean distress oxide ink with a larger honeycomb stencil onto the 5" square.

5.  I die-cut my Bee Gnome and Bee Phrases  from white cardstock and colored with Copics.

6.  I laid (most of) my images onto the blue honeycomb piece and figured out my placement for the spinner.  Then I laid the 2nd and 3rd smallest dies from the Nested Wacky Stitched Circles die set onto the upper middle part of the card and taped them with a low-tack tape and removed the die-cut elements before cutting.  


7.  Next, I needed a small circle that is bigger than the opening for spinner, so I die-cut the smallest from the Pierced Wide Circle Frame die set  and I used the very center circle that was cut from the middle of that die.  (see photo below).

8.  I sponged that small circle with the wild honey distress oxide ink so it would blend in with the paper showing thru the channel, and glued a tiny spinner element to the middle of it.  If you don't have that, you could use a tiny button or stack 2 circle foam dots together.... as long as it's round and smaller than the spinner channel. (see photo below)

***Note:  this is the same concept as the penny spinner, however, a penny will show thru the channel as it's larger than the largest bee in these sets, so if you want to add weight,  you can add a magnet or washer, maybe even a dime? (I didn't try that) etc. to the back of your yellow circle which will help it spin better!  ☺


9.  Next, I added foam strips to the back of the blue cardstock (around all edges and some pieces closer to the circle opening, but not too close that it prevents the circle spinner from passing) and center circle piece and adhered to the yellow honeycomb piece.

10.  I placed the spinner circle piece in between the 2 blue layers as shown above and added a tiny bit of glue to the top of the white spinner and centered my bee onto it.  

11.  I glued the sentiment and white honeycomb grouping to the blue layer, and popped everything else up with foam dots.

12.  Lastly, I adhered that whole piece onto my white card base, making sure there's equal amount of white border all around and Voilà!!  


PRODUCTS I USED:


I hope I've inspired you to try this or your own creation using the new

~Kristine

Thursday, July 07, 2022

Sweet Wishes

 Hello Friends,

It is Pam creating with you today!

The new release is just plain adorable.  It is called Strawberries and Bees perfect for those fun summertime cards. There are 16 designs in this new collection and you can get the individual dies for 30% off right now! This sale will not last so shop today to get the incredible savings.

Here is my card using the new release die Strawberry Gnome Girl!


Design Steps:

1.  Cut all the pieces using the Strawberry Gnome Girl die and the following colors of card stock: green, blue, black, tan, red, and white
2.  Shade the hands and nose with a pink ink and a small applicator.  Assemble the pieces with a fine tip, fast drying glue
3.  Use an A2 white card stock base and cut a piece of black 4 1/8 x 5 3/8, cut checked black and white DP 4 x 5 1/4 and finally use the second from the largest Scalloped Rectangle die cut on white.  Stamp the sentiment in black ink on the white rectangle as shown above
4.  Glue the black card stock to the white base, glue the checked DP to the black.  Wrap the scalloped rectangle with black and white twine and glue dot a bow to the twine just slightly off center as shown above.  Pop the whole rectangle onto the center of the card front.  Pop dot the little gnome to the card as shown and then add a few black pearls and some yellow Stickles to the center of the flowers
5.  I decided to add a little decoration to the inside of the card.  Cut a piece of black card stock 4 1/8 x 5 3/8, piece of white 4 x 5 1/4 and a strip of checked DP 4 x 1.  Cut the vine using the Strawberry die and white, green and red card stock. Assemble the vine 
6.  Glue the black card stock inside of the card.  Stamp the sentiment to the white card stock as shown. Then glue the white on top of the black. Glue the checked strip to the left side of the card and add the strawberry vine.  Add some yellow Stickles to the white flowers and your card is complete

CottageCutz Products


Here is the new release so please check it out in our store today!!

We have more inspiration on our YouTube Channel check it out HERE
Thanks so much for stopping by!  And I will see you next Thursday.

Blessings and Take Care