Saturday, November 13, 2021

Santa Gnome in Present

Hello CottageCutz friends! Thanks for taking the time to stop and visit with us today. It's Mary Marsh here bringing you the Saturday edition of the Blog.

IT'S NEW RELEASE TIME! The new Christmas dies are in the online store with 40 new designs from Christmas Part 1 and 19 new designs from Christmas Part 2 and they are on a limited time sale at 30% off.

I send a lot of Christmas cards and during the busy holiday season, I need to make a few cards that are more simplified in design and can be reproduced quickly. This allows me to spend time on more detailed designs. 

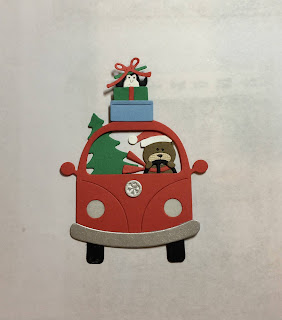
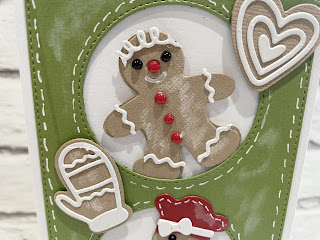
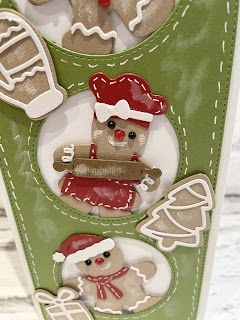
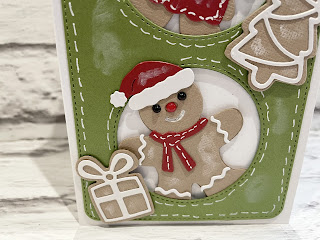
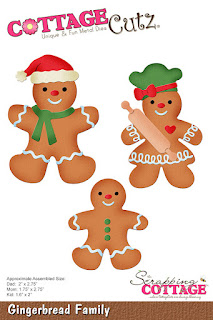
Today for your viewing pleasure, I have a design featuring the whimsical Santa Gnome in Present die from the Christmas Part 2 collection. We have so many cute gnomes in the collection this year. Here is a card I made using another one of them. 

 So let's get started with some details on how I created this card.

Design Steps:

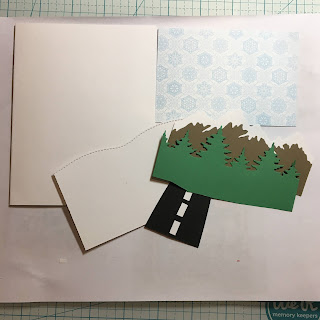
I started my card this week with the layout. As I have said so many times before having the sketch in mind helps start as well as simplify the card making process for me. I liked the sketch #869 at Splitcoaststampers. I thought it would work well for this cheeky little gnome. 
Then I also used the colors from the Splitcoaststampers color challenge #869. We were to use cherry cobbler, gold and shaded spruce. Perfect colors for the Christmas gnome. 
cherry cobbler, gold, shaded spruce


I had the perfect designer paper that had all the challenge colors. My card is a 5 1/4" square. For the diamond shape, I used the largest Stitched Square (3.5") die and the circle is the 2nd largest (3 1/4") from the Circle set

cherry cobbler base: 5 1/4" square
gold layer: 5" square
designer paper layer: 4 7/8" square

Next, I cut the Santa Gnome in the challenge colors. I used Art glitter glue to assemble the image. I like this one because it dries clear. 

I stamped my sentiment on an angle in the circle using the shaded spruce ink. I used my MISTI for placement. 

Now that my card elements are prepared, I am ready to start card assembly. I used double sided tape to attach the panels. The Gnome is attached with dimensional adhesive. I also changed the Christmas ornament, I decided to cut it from the designer paper to give a bit more contrast against the green present box. 
To finish off my card, I attached the panel to the cherry cobbler card base and also scattered a few gold sequins. That's my card sample for this week. I hope I have given you an idea for a way to use the Santa Gnome in present die. See you next Saturday!

Reminder: The CottageCutz You Tube channel is up and running again. We have new videos every Wednesday. Plus there is a giveaway on the channel. Details on the channel. Check it out here.

dies I used to create card:


Friday, November 12, 2021

Santa hitching a ride


Happy Friday Scrapping Cottage fans. I really hope you’ve had a good week and are looking forward to the weekend ahead.  Today I’m sharing a simple and fun card with you, I just love the last 2 releases (well I love all Scrapping Cottages dies).

Firstly I took a piece of pale blue card measuring 6” x 4” when folded. I thought it gave the card a winter look. I then took the ‘Hills Slimline’. And cut them twice, one higher than the other so they could be overlayed. I glued the bottom panel but used 1mm foam pads for the next layer. 
I thought it would be nice to add some trees to the background and I used the trees from the ‘Winter House Accessories’ die. I cut them out of white glitter card and it is hard to see but they really glisten


Next I cut out Santa from ‘Santa’s Delivery’ die and all of the elements from the ‘Snowman Reindeer Die’. I cut the car out twice and layered it on top of each other to give it some depth. when you cut the car out,  it cuts the holes for the lights. I stuck a piece of card behind this and them and used some of my large crystal diamantés so they looked like headlights

I then assembled all remaining elements.I left the snowman’s arm until last so that it fit the steering wheel when put together


I attached the car and Santa using 1mm foam pads. Santa looks like he’s hitching a ride but I’m not sure that he’ll fit in the car. He may have to wait for his sleigh. I cut some holly from the ‘Woodland Christmas Set’ to put in the right hand corner out of the same glitter card as the trees and added some diamantés for berries

So here’s the final card. I really hope you like it. I had so much fun putting this together. I wish you a safe and happy weekend with lots if time to craft
Wendy


Dies I used


Thursday, November 11, 2021

Christmas Tree Hunting!

Hello Friends,

It is New Release Time!  The collection is Christmas Part 2!  There are are 19 new designs just as adorable as the Christmas Part 1 release.  For a limited time there is 30% off individual dies.  You can check all of these fantastic dies out right HERE!

I am having fun with one of the new release dies today. I am using the Christmas Van w/Bear.  Also I want to mention the CottageCutz You Tube channel is up and running once again. We have new videos every Wednesday. There is a give away this week so please check it out HERE!


Design Steps:

1.  Using the Christmas Van w/Bear die cut the pieces using: red, green, blue, silver, black, white, and brown.  After you cut out the pieces assemble them using a fine tip glue
2.  For the card base use an A2 white card, piece of snow DP 3 x 4 1/4, piece of white cut with the Slimline Waves.  Brown, white and green cut with the Mountain and Tree Slimline.  The road was cut freehand out of black and white card stock
3.  Glue the snow DP to the top of the A2 white card base,  add the mountains and tree line then finally the snow bank and road
4.  Place you van on the road using pop dots and finally stamp and layer your Merry Christmas sentiment and glue it flat to the top left as shown below

CottageCutz Products


Thanks so much for stopping by today!  And don't forget to get those Christmas gifts and cards started early!! We have so may wonderful dies to spark those creative juices!!!

Take Care and Blessings

Pam


Wednesday, November 10, 2021

Let's Create a Stunning Light-Up Christmas Card


Hi, it's Marla back again with another YouTube tutorial.  Today, I'm excited to share this stunning holy night Christmas card with you today over on the CottageCutz YouTube Channel.  The Nativity Manger Scene die used on this card is what would be considered a silhouette die.  Silhouette dies paired with a beautiful background, such as the one created here, make mass producing stunning Christmas cards a breeze. Rather than stamping a sentiment,  I added the delicate script Peace on Earth die which really compliments the simplistic beauty of this nativity scene. This die is part of the new Christmas Part 2 release and is on sale now for a limited time.

I couldn't stop with the gorgeous layered background. Nope, I added an interactive wow factor to this classic design by pairing these dies with EZ lights from Pear Blossom Press to literally shine the light on this scene.  The name really says it all EZ, because that's what they were. Simply add the battery, poke a few holes and tape your lights in place.  The illumination adds a majestic touch to this manger scene, wouldn't you agree? Adding lights are a perfect compliment to take your CottageCutz scene building cards to a whole new level.


I hope you join me over on the CottageCutz YouTube Channel to see how incredibly easy this card was to create.

BONUS...The Scrapping Cottage is generously giving away the Peace on Earth die to one lucky winner.  Head over to the YouTube Channel to see how to enter this GIVEAWAY.  
Until next time.... Marla


Tuesday, November 09, 2021

Gingerbread family


Good morning CottageCutz friends, it’s Wendy bringing you the blog today, I really hope you’ve had a lovely weekend and are braced for the week ahead.

Today I’m bringing you a light touch tutorial and Friday will be a full tutorial

I just love this gingerbread family and I liked the die as parts could be easily separated

To begin with I cut my base card from white pearlescent card measuring 9” x approx. 4”. I then cut the ‘Circle windows’ Slimline’ in green pearlescent card and attached to my based card worth 1mm foam pads. I only did this around the edge so that I had enough room to slot the gingerbread family in.

Next I cut out small 3 elements of the gingerbread family and their component parts. I assembled and added some white stitching using a gel pen for effect.  /i also did this around the card

Next I added the family to the card, starting with the child at the top, mummy in the middle and daddy at the bottom. Here are some close ups for you


I had a wonderful die from a few years ago with I really wanted to play with which was the ‘Handmade cookies 2’. I thought they were a perfect match for my card so I cut out the base in fawn Bazzill card and then overlayed with white pearlescent card. I then scattered these about on the card when they looked grounded.

To finish off, I added some white gelato to make the gingerbread and the card look like it had flour / icing sugar on it. I think this really worked with the theme

I really hope you like the card today. I had such fun making it and I hope it inspires you to start making your Christmas cards

Have a a wonderful week and I will see you Friday for a full tutorial
Wendy


Dies I have used


Monday, November 08, 2021

Forest Friends

 Hi everyone welcome to another Monday with the Scrappin Cottage. Today I am sharing the  Windows Slimline card using the newly released Christmas Van w/Bear and Woodland Christmas set.


I used speciality papers to create the van and added the diecut piece to the bottom window on my slimline card
You can see how shiny it is in the image below

I next used craft colored paper to diecut the woodland deer and decided to leave it as it 
and adhered it in the second frame. 
The top window I colored the trees with my copics and used some white glitter paper to give a look of snow to the Forest Friends Border die (as seen below)

I glued the piece to a piece of white cardstock and this completed my card for today.