Friday, February 26, 2016

Love you More!


Hello everyone, Cheryl here with another post using the Beautiful CottageCutz Dies from the Birthday Release.

I had so much fun creating my card for today. I did the panels for layering, and then added the frames for additional layering on my card. I LOVE layers, and anytime I can add tons, I do :) hehehe
Products used to create my card are listed below :)
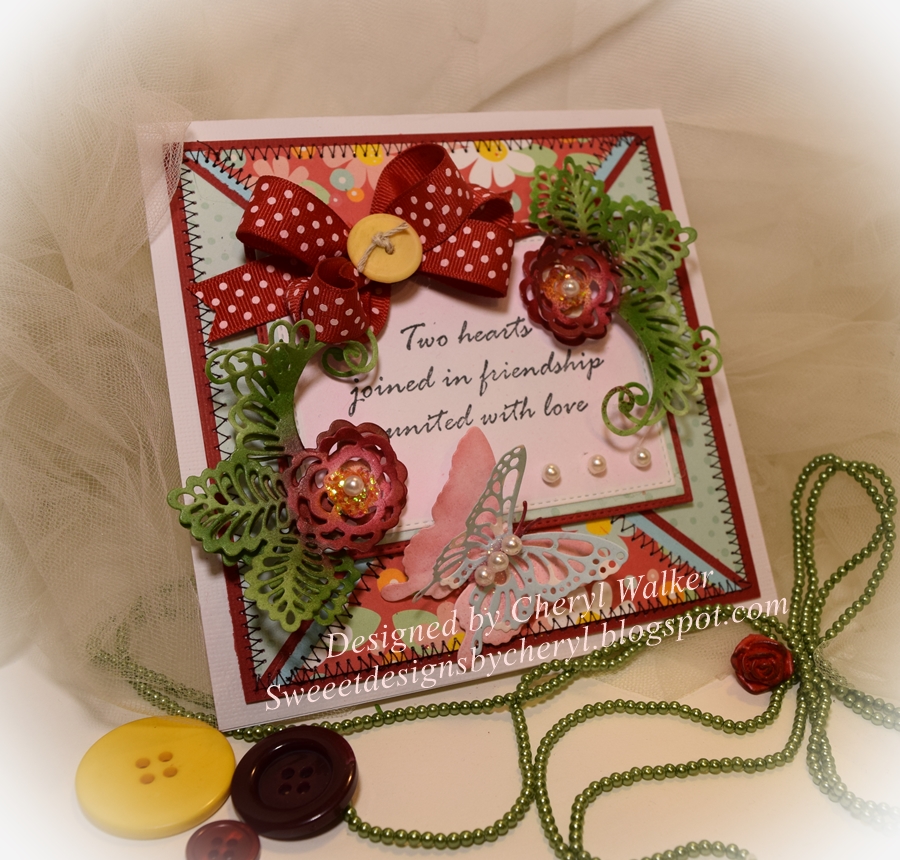
Lacey Rose die, and airbrushed it using Copic markers. For the centers I used a glitter, and some old pearls. I did cut these out in white card stock, and cut 4 of them, so I could layer for a 3-D look

Butterfly Lisbeth was cut in a pink card stock, and a blue pattern paper, layered and I did add some pearls to it as well.

Basics Rectangle stitched frames-  I use the basics to cut the white, and red pieces, I also used the Rectangle for the blue polka dot layer too.

Embellishments- Red polka dot ribbon, old button, twine, pearls, Stamped sentiment,and sewing to complete my card for today.

http://www.scrappingcottage.com/cottagecutzlaceyroseelites.aspxhttp://www.scrappingcottage.com/cottagecutzbutterflylisbeth.aspx

Hope you enjoyed my post for today!
hugs to all,
Cheryl

Wednesday, February 24, 2016

Design Team Announcement for March through August 2016


CottageCutz would like to introduce you to our Design Team for March through August 2016. We are happy to have Janja Albreht, Anita Kejriwal, Donna Idlet, Mary Marsh and our returning Design Team member, Vladka Servinek designing for us. We are very pleased to have these very talented ladies creating for us! We are all looking forward to seeing what amazing creations they come up with!

Tuesday, February 23, 2016

Climber rose

Hi, Janja here!
Due to the extremely beautiful blooms and their fragrance, roses are very popular. A lot of years and care is needed for growth from small seedling to the mighty garden queen.


For the roses, I used the CottageCutz floral spray die. I prepared a couple of cuts, shaded them with Distress ink and arranged them into a climber rose.
Young rose sprouts embrace the fancy happy birthday banner. I glued it on an oval from the stitched oval set. From patterned paper I cut an oval with the 5th die from the center. In the hole I insert a stitched oval in white color (the 4th die from the center), that I previously sprayed with Distress inks.


List of used dies:


Enjoy and have fun.

Janja

Thursday, February 18, 2016

Balloons and Clouds

Hi, Vladka here!


The card I did today has the focus on the right side. It was inspired by my balloons and clouds dies. I also used Distress Inks along with my dies.

First I prepared my white card base and additional white cardstock piece of paper (approximately 4.25x5.5 inches tall). 

I added some Peacock Feather Distress ink on my acrylic block and spritzed some water on it. I then took a piece of plastic acetate and gently pressed it against the block to pick up some of the ink. I took that inked up plastic and then pressed it to my paper to transfer the ink to the paper to get a splotchy look. Sometimes this technique is also called "smooshing".


While I was waiting for it to dry, I cut my die pieces. I used white cardstock to cut my Balloons, Clouds and Gift TagTopper. I used coordinating Distress Inks to color the balloons. 

I usually cut off any parts of the card that over hang outside the cardbase but this time I decided to let the balloons stay in once piece. This looks more like they are flying up in the sky! :)
I glued everything together with liquid glue and foam squares. At the end I just added Gift Tag on the left side of the card and my card was finished.


I hope this gives you some idea how you can use beautiful dies from birthday release and combine them with some old one which are in your stash maybe. 
Have fun creating!
________________________________________
Card Supplies I used:

CottageCutz dies: they are listed below
Card stock: white cardstock
Distress Ink: Fossilized Amber, Twisted Citron, Mermaid Lagoon, Dusty Concord
Other:  scissors, paper trimmer, Sizzix, scor-buddy, water, plastic acetate
______________________________________________

Tuesday, February 16, 2016

Birthday Surprise

 
Hello everyone, Cheryl here with a card I made using the New CottageCutz Birthday Collection. This is a super CUTE Collection of dies, and I just LOVE the Balloons, they are super fun to work with. I used Glitter again on these, as I think its a fun way to dress them up, and give them some sparkle! Also used the Beautiful New CottageCutz Fancy Happy Birthday die.

http://sweeetdesignsbycheryl.blogspot.com/
 
CottageCutz Basics(New)-Stitched Square set/Square Set used to cut out the white and brown card stock. Next I airbrushed the white stitched layered with Pink and Blue reminds me of mixed cotton candy...hehehe
Balloons,Variety(New)- cut in pink ,brown and white card stock. Next I dipped them in glue and added different glitters to each.
Fancy Happy Birthday- Cut in brown card stock
Embellishments- Glitter, sewing , Seam Binding


CottageCutz Dies are linked below- so if you click on them, they will take you directly to each item :)
http://www.scrappingcottage.com/cottagecutzfancyhappybirthdayelites.aspxhttp://www.scrappingcottage.com/cottagecutzballoonsvariety.aspxhttp://www.scrappingcottage.com/cottagecutz-jan2016.aspx

Thank you for looking and have a lovely day!
Hugs to all,
Cheryl

Saturday, February 13, 2016

Movie Night invites


Hello everyone, Cheryl here and super EXCITED to share with you all some Movie Night Invites I designed using the CottageCutz Lights , camera , Action Release.


Absolutely LOVE these, as they turned out super CUTE! Will have to have a MOVIE night, and use them to invite Family & Friends over.


Supplies Used:
Film Strip- cut in white card stock, and colored with copics
Clapboard-also cut in white card stock, and colored with copic markers (3)
Movie Night and Ticket - cut in white card stock and colored
Popcorn & Cotton Candy(past release)- cut in white and design paper, and airbrushed with the copic airbrushing system
Other supplies:
design paper, glue, copics to color, airbrushing, stickers, thickers, paint, toilet paper roll, card , glitter

First I flatten my toilet paper roll using the big shots machine, and then cut out the ends using a circle punch. I then painted with black paint, inside and out/set aside to dry. Next I cut my design paper to fit and leave a tad bit of the edges showing black. Then I glued on the paper using a liquid glue. Next is time to decorate(Fun Part), and work on the slider card for the inside. This is where it will say "DATE/TIME/PLACE" :) you can print it out on the computer, or use stickers like I did.


These are super fun and EASY to make!! Hope you enjoyed my post today, and thank you for stopping by!
hugs to all,
Cheryl

Thursday, February 11, 2016

Birtday gifts


Hi, Janja here!
Today, I prepared a birthday card for a young girl. I used a die from the new release CottageCutz Birthday: presents, bags & bows.


I put packages on white background, previously sprayed with distress inks. The background was cut from  CottageCutz Basic set: square. For the bows I used bows, variety die.


Since it is for birthday, I added a gift tag topper


If you want to add a gift card, put it in the gift envelope. I used the gift card envelope die. I  decorated it with a small bow - build-a-bow die and rose - lacey rose die


List of used dies: 


Have a nice day. 
Janja

Monday, February 08, 2016

Spring Butterflies

Hi, Vladka here!
The card I did today was inspired by spring colors! I used Distressed Inks to get the look I wanted. Let’s go step by step so you too can create this card. I used white cardstock for the background with some stamped leaves for more interest. For the stamping, I used yellow and green Distress Inks. I also spritzed some water on it to get more of a watercolor look.
  

I cut out the circle with the new die from the  Stitched Circle Set and added some splashes of yellow Distress ink mixed with water. When everything was dry, I cut out two Butterflies. One out of yellow cardstock and one green. I attached them over the circle with the splashes. I added the  Happy Birthday Cupcake expression out of white cardstock (after I cut off the cupcake) to the middle of the two butterflies.
 
This is a clean and simple card for someone’s birthday. The colors just scream happy!! Also check out our other dies from the Happy Birthday release. They are all so beautiful and fun to play with!!

Have a great day!
____________________________________
Card Supplies I used:

CottageCutz dies: they are listed below
Card stock: white, yellow and green cardstock
Distress Ink: Fossilized Amber, Peeled Paint
Other:  scissors, paper trimmer, scor-buddy, brush, water
______________________________________________