Sunday, July 21, 2013

CottageCutz Bella Springtime Tree

Greetings friends and bloggers, it's Carol here today!   Have you ever had a die touch your heart and you just know that there isn't much that needs to be done to a card because the die speaks for itself?  That is what the Bella Spring Tree die is all about.  It's feminine swirling branches are just lovely against this green and white gingham paper.
 The Bella Spring Tree was cut on dark brown cardstock and white cardstock.  Little pearls were added to the flowers on the brown tree and it was attached to Resplendent Rectangles.    The corners are 1-1/8" brown squares that were cut in half and decorated with pieces cut from the white cardstock tree to fit inside the triangle.  It carries the theme of the tree to the edges of the card so perfectly and adds another element of femininity.
Nothing says summer like Gerber Daisies.  These were created from a punch.  The centers are flocking and they were mounted on top of the Bella Leafy Branch.  Two little Martha Stewart Butterflies complete the card.  Thank you so much for stopping by today to view my project.  Happy Crafting!  See you soon.  Here are the CottageCutz dies used:


Friday, July 19, 2013

CottageCutz Bella Butterfly (Profile) Altered Box

 Greetings friends and bloggers.  It's Carol here with today's creation - an Altered Laughing Cow Cheese Box.  My family eats this cheese so I have quite an assortment of boxes at my disposal!  This box when it is altered is just so beautiful.  You can't go wrong with this as a gift presentation.  Put a gift card in here and you have yourself a WOW gift.
To begin, cut two of the CottageCutz Bella Butterfly (Profile).  To get this old vintage rose color, I used a light gray cardstock and distress inked it with Victorian Velvet distress ink.  Isn't it cool!  Then paint the two butterfly pieces with glitter glue and sprinkle with plain white Martha Stewart glitter.  Let dry and put the two pieces together with pop dots.  You can shape the wings once it's dry to look like this.  The Laughing Cow Cheese box was painted with two coats of white acrylic paint.  None of the labels were removed.  The paint covers those labels nicely so you do not see them.
For the roses, I used a medium flower punch for the small roses and a "Whale of a Punch" flower for the large rose.  I punched them out on the light gray cardstock and distressed with Victorian Velvet distress ink.  They were painted with crystal effects and sprinkled with Martha Stewart Coarse Glitter.  The Bella Springtime Wreath was cut from the gray cardstock as well and distressed on the outer edges then attached to the largest Spellbinders Nested Circle die cut.  This was attached to the largest Spellbinders Nested Scallop Circle die cut and attached to the top of the box.
To decorate around the outer edge use tinsel trim which can be purchased at Michael's.  The Roses have been mounted on top of the Bella Leafy Branch.  Pearls were added to the scallops around the die cut.
Thank you for stopping by today to view my altered Laughing Cow Cheese Box.  I hope I have inspired you to save your boxes and try this for yourself.  I promise once you make one, you will want to make more.  They are so sweet and so fun to make.  Happy crafting.  Here are the CottageCutz dies used:


Thursday, July 18, 2013

Butterfly Spring Floral and Oval Doily


Hi all, Vladka here! 


Every card is a little story for me. It is "written" with papers, layers, die cuts, embellishments and sentiments. It is the combination of what we see, what is inside of us and of our experiences.  


Natural Brown-white combination is still part of me, I just can't resist it.  For Background I recycled some cardboard box to get the corrugated cardboard. I've colored it with Walnut Stain and Vintage Photo Distress Inks and used also a little white tempera. But background is nothing without a little stamping with text motive and without die cuts. I used Butterfly Spring Floral and Oval Doily and Frame dies from Scrapping Cottage.


I hope you like the look and maybe you will also be inspired to create something on your own. Have a nice day!


Wednesday, July 17, 2013

Happy New Baby

Hello everyone!
Today's card was designed for The Scrapping Cottage & Really Reasonable Ribbon. For my Sweet Baby card I used CottageCutz Baby Buggy , CottageCutz Grass Border, and Scalloped Doily.The Ribbon I used is the Beautiful Pink Gingham Print from Really Reasonable Ribbon.

I absolutely LOVE making baby cards, they are sooo sweet and super fun to make. So for the Baby Buggy I used some shimmer card stock, and embossed it with dots. Next I cut the grass border and layered it a few times, so it would look like the buggy is traveling through grass. All this is layered on the beautiful CottageCutz Scalloped Doily!
My tag is the CottageCutz Love Tag,and stamped with a Stampin Up! sentiment, and I did airbrush it with copics.

Thank you for looking and have  a lovely day!
Hugs to all,
Cheryl

Tuesday, July 16, 2013

Monochromatic


Hello everyone!

It's Simona with you today showcasing beautiful


As you can see I went for the monochromatic look this time
and I also used the Butterfly Spring Floral (Elites) die
 to accent the Oval Doily & Frame die.


I cut the die out of white cardstock twice and placed it behind
the Oval Doily & Frame die. Some parts of the die I cut 
away with scissors. The background was also cut out 
of white cardstock, dry embossed with Cuttlebug folder and 
inked with Distress Ink - Barn door. I cut two strips of white 
cardstock, punched it with the Martha Stewart Lace punch 
and attached it behind the embossed background on the top 
and bottom. Then I distressed it with the Barn door ink.


Here is a closer look at the center of the card.
I added the double bow with the brad and some liquid pearls.


Thank you for stopping by!
Have a great day!

Hugs,
Simona

The dies used:


Monday, July 15, 2013

Spring Tree Frame

Hi, Everyone! Today I have created a new card
for The Scrapping Cottage, with the 


Used designer paper from Heidi Grace and Bazzill cardstock, 
to cut the frame and finish the card.  Placed the picket fence
between the layers.


Also used a paper doily, twine, pearls and large button to
embellish my card.  Sentiment was attached with a small brad.


Hope you have enjoyed your visit and 
come back again! 
Hugs,

Sunday, July 14, 2013

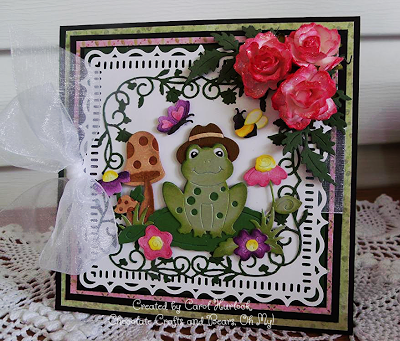
CottageCutz Mr. Spring Peepers

Hi everyone, Carol here today with a CottageCutz Creation.   It's summertime here in the South and to me that means every time after a summer shower these big ole frogs that live around here come out and make a racket.  I mean it gets loud and there is no mistaking that sound!  For today I want to share with you Mr. Spring Peepers.  Isn't he just adorable with his hat sitting on his lily pad enjoying his day amongst the flowers.
 The frog, lily pad, leaves, and greenery were cut out from two different colors of green cardstock.  Peeled Paint distress ink was used to shade Mr. Peepers.  All the other pieces of the die were cut on white cardstock and colored with Copic Markers.  The butterfly and the bee are so cute and I can see using them again without Mr. Peepers!
 To create the card, Martha Stewart Punch Around the Page Flourish Lace was used punched on a 5 x 5 piece of white cardstock.  The Bella Floral Frame was cut with green cardstock and fits nicely inside the perimeter of the punched white cardstock and frames Mr. Peepers nicely.
Three Prima flowers were added to the corner along with some die cut leaves from the CottageCutz Greenery die.  Thank you so much for stopping by today to view Mr. Peepers.  He was so much fun to create with.  Here are the CottageCutz Die used:


Saturday, July 13, 2013

What Can I Say? You Made My Day!

Hello Everyone from Olena.

Today I am sharing a cute Spring Tweetie card I created with Beautiful 
For this card I used NEW die cuts from Spring Collection - "Spring Tweetie" die (4x4). 
This bird is so cute. 


First I made cloudy background for bird. For this, I used oval template and blue Copic marker with Airbrush system.
Next, I cut bird 2 times using green, brown, cream and yellow card stock and then, sponged with craft ink. For small flowers I used "Springtime Strawberries die cuts from Springtime Collection too.


Then, I glued image on cloudy background and added sentiment "What can I say? You made my day!" on it.


For this project I used:


 Have A Wonderful Week! 
Olena