Tuesday, July 12, 2011

Poppy Thank You

 This week I made a card and mini gift bag using the Cottage Cutz Flower with Stem die. That is a simple name for a flower. . but I just call it the Poppy die. The bag is 4" x 6" on the front and 1 3/4" deep. From a 6 1/4" x 11 1/2" piece of Lava Red card stock. The basic same layout as the card behind the flower except a stripe 2" wide, just so the red flower can be done on a red bag. The Lava Red card stock is really rather showy against the lime and cream stripe.
 The card is rather simple. I used a stripe card stock on the top 2/3rds and solid card stock on the bottom 1/3rd. I call this layout on the bottom of the card . . the Chopstick. . OK I know. . what the heck am I rambling on about chopsticks. There is a lot of times you end up using a printed card stock that you can not really match the solid color card stock to directly. In this case I wanted the stark red of the poppy to stand out from the lime, blue cream and brown in the stripes. I started with the bottom 1/3 in Divine Mocha Brown, than a 1/2" title strip in Parakeet Green. Than took three other colors . . Lava Red, Hillary Green and Truffle Brown to cut random chopstick shape strips of card stock. I than glued them down randomly. this allows you to include some of the colors from the flower into the card as a pattern. The silver metallic border and letters are from class a' peel stickers.
 The stem of the flower was done in Hillary Green card stock with YG23, TG67 and BG96 Copics, The Poppy was done in Lava Red card stock and R27 Copic. The center of the flower in Mocha, Truffle card stock with E77 Copic. The thing that is really hard to see here is there is also random black dots on the leaves, stem and flower made with a Prismacolor 03 pen. You can really be surprised by randon pin prick style dots on a project. It ads a nice highlight. The last highlights were made with a Sakura Sparkle Pen.
 Here is the same card, slight change in shape of the card. . done in a deep turquoise card stock on the flower. A more manly color makeup.
Here is the chopsticks for the brown, rust and turq card. The rust was the title bar and the chopsticks were done in greens and turq.

Thanks Barry

Monday, July 11, 2011

Swedish Style Bird

Hello Everyone!  Lots of new changes happening here at the Cottage!  How FUN!  Welcome to the new DT members.  Looking forward to getting to know you!

I was away for 2 weeks.  Had a wonderful time with family and friends!  I so enjoyed seeing my 8 sisters and having a slumber party with lots of yummy food, laughter, and sitting around a campfire.  I am trying to make this a yearly event!

I also got to meet Kathy Jakopovich, The Peachy Queen, and her family.  Angelica, her daughter, just introduced herself to the Scrapping Cottage Design Team.  I am thrilled she is joining us with her artistic talent and sweet personality.


Now on to my card for today.  I use the Bird with Flowers die from the Flower Power Release.  As I designed the card, it reminded me of the Swedish style of art with vivid colors.  I was thinking of the Dala.  I made the card first and then searched for a photo that I thought could have been the inspiration.  A little backward, I know, but art takes me on a journey.

I enjoyed making this card and I hope you like it!  Thanks so much for stopping by!
Hugs and smiles,
Janice


Sunday, July 10, 2011

That Pout!

Good Morning everyone! I am SO excited to be sharing my first Design Team project for Cottage Cutz and The Scrapping Cottage! I created a scrapbook layout for you today, but before we move onto the project, here's a little bit about me:

Hey guys! It's Angelica (pronounced Ahn-hel-ee-kah, you might laugh but you'd be surprised how many people think my name is Helga when they meet me!) - I live in Green Bay, WI along with my super stamping family!

My parents own Peachy Keen Stamps, Inc. and I am the Lead Illustrator/Co-owner of Market Street Stamps, LLC. I absolutely love paper crafting! You can find me blogging all my creations on Handmade by Angelica.

As a busy mom of two lovely little girls - Lucy (3) and Marlee (2), a wife, and a small business owner, my days are packed, but I always try and make room for something crafty or artful each day. Even if it's just doodling a page in my art journal.

I've had the pleasure of meeting Joanne and Greg (owners of the Scrapping Cottage) as well as some of my new fellow designers a few times, and I am beyond thrilled to be designing for a wonderful company with such amazing people behind it! The Cottage Cutz design team is a fabulously talented bunch, and I'm flattered to design along with them.

And now for the layout! 
I don't scrapbook as much as I should. In fact, I can probably count on my two hands how many layouts I've actually completed. But, when I saw the Peeker Pocket I knew I had to fill it with some fun pull-out journaling. I tend to get overwhelmed when I start a 12x12 page, so I decided to use the pocket size as my guide and created an 8x8 page which ended up being a perfect proportion, don't you think? 

{click photo to enlarge}
I added this photo of Marlee (shot by my pal Scott Eastman) and used her sweet pout as the inspiration for my Scrabble tiled title. I used Crate Paper (Emma's Shoppe Collection) and My Mind's Eye (Stella & Rose - Mabel Collection) to create this orange and blue color scheme. I just love these colors together!


{click photo to enlarge}

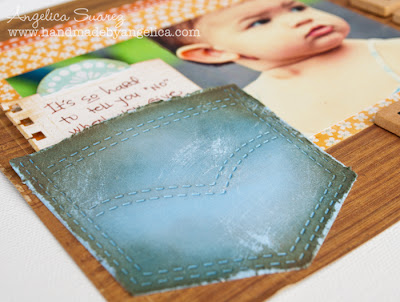
For the pocket (Peeker Pocket from Cottage Cutz), I used a light blue shade of cardstock and started distressing around the edges. All of my jeans get worn OUT, and I wanted it to look like a good, lived-in jean pocket. So, I took a bit of "Weathered Wood" Distress Ink after it was all frayed along the edges and sponged it on. I then added in a bit of "Faded Jeans" and a touch of "Vintage Photo" Distress Inks for depth. After both inks were blended onto the pocket, I took a medium grit piece of sandpaper and scratched it up for even more of the worn-in look. 

To create this easy-peasy journaling tag, I cut my cardstock down to fit inside the pocket (about 3" x 3.75"). I stamped my Vintage Notepad background stamp (from Market St. Stamps) in "Antique Linen" Distress Ink and punched the side with a border punch to make it look like notebook paper.

I think I'm going to make a bunch of these during the girls' naps this week and keep them on hand for some of my future layouts - I love the large 4x4" size of the pocket - it's super versatile for embellishing and for adding in journaling! For complete details on what products I used, please visit me on my blog, I'll have them posted in just a bit!

Thanks to the Cottage Cutz crew for this fantastic opportunity!  And thank all of you so much for visiting The Scrapping Cottage and reading a bit about me! I'm so looking forward to sharing and getting to know everyone! 

Hugs,
Angelica

Saturday, July 09, 2011

The Scrapping Cottage Challenge #3

Good morning, and welcome to The Scrapping Cottage Blog.  It's the second Saturday, and that means it's time for a new challenge.  Before we get to that, though, we want to thank all of our wonderful entrants from last months challenge.  It's always so much fun to see what you're doing with your Cottage Cutz and Cottage Impressions, and your work was inspirational!!!   
Our random winner from the previous challenge is entry #7,    
Barbara Vinson!!!!!!!!!!!
Congratulations to you, Barbara.  Have fun shopping at The Scrapping Cottage!!!!!

Now, on to challenge #3.  I thought it might be a good idea to start thinking about Christmas.  After all, it is only 168 days till Christmas!!  LOL!!!   The theme for this month's challenge is Christmas in July.  There are no specific requirements, other than using Cottage Cutz, or Cottage Impressions, and that your  newly created card, layout, or altered item have a Christmas theme.   Here's my card, and for this one, I used both Cottage Cutz dies and Cottage Impressions stamps. 
One lucky winner from all the entries will be chosen at random to win a $25.00 gift certificate to spend as they choose at The Scrapping Cottage.  Woohoo!!  What could be better?  Getting ahead on Christmas projects AND a shopping spree!!  I can't wait to see what you've got up your crafty sleeves for Christmas!  Just use the Mr. Linky Widget below to link your work.  Happy stamping and crafting!!!


Friday, July 08, 2011

We have SIX new Design Team Members!!

Congratulations to our new DT members! They are:
Cheryl Walker
Gini Cagle
Lori Leng
Angelica Suarez
Pearl Liu
Erika Taylor
We are so excited to welcome these talented ladies to our design team here at the CottageBLOG and know you will love the unique styles each of them bring. We will be continuing our Second Saturday Challenges and adding some tutorial videos as well as some guest designers in the coming months.
Stay tuned for bios on each of these ladies in the weeks to come.

Exciting News!

Photobucket

The Scrapping Cottage is excited to announce that they have teamed up with My Little Shoebox!  CottageCutz dies are now available to coordinate with each of My Little Shoebox 6 new collections: Playtime, Pretty Little Things, Trick or Treat, Audrey,Enchanted Garden, Destination as well as their very popular Sew Cute Collection.  Please visit your local scrapbook store for MLS paper collections to coordinate with our CottageCutz dies.


You may check out these fabulous dies available for pre-order right now.  You're going to LOVE them!


To learn more about My Little Shoebox products click here.


Wednesday, July 06, 2011

Flower Power and some Polka Dots

A few weeks ago I went to my nephews wedding and their colors were red, white & black. It reminded me how much I like these colors together and so I was inspired to make my card with their wedding colors. This was so simple but elegant just the same. This same theme would look great with pink and black, brown and aqua, and the list goes on. I think this will be my next project to make up a bunch of these with different colors for my stash :)


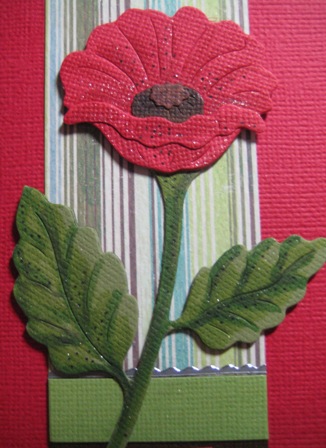
I used the Daisies Layered Die and Leafy Foilage from the Flower Power release. I cut out the flower three times and layered the pieces together. For the center I stacked several of the center cutouts together to make it nice and thick and then cut out a white one for the top and applied Glossy accents to it. I shaped the petals a little to give it a dimensional look.
And there you have it!
Don't forget - you have until this Friday night to complete the Second Saturday Sketch challenge for your chance to win a $25 Gift certificate to the store.
Click here for details.

Tuesday, July 05, 2011

Simple Filigree Card

 This is a simple way to use the Cottage Cutz Floral Doily die to show a screen look to a card. (I have used yellow card stock to show the contrast, yellow was not used in the card) I cut a 3 1/4" circle in the front of my card and glued the Floral Doily over the hole. This created a window like.  . trellis on the front of the card. I than added the Cottage Cutz Flower Petals die flower over the lower corner (half on half off).
 The flower I cut from Basill Bling card stock and highlighted in two shades of pink Copic markers. The Stem was cut twice from the die, once in a lime green and the second from a leaf green. I cut the leaves off the second cut and added them behind the lime branch. This added a bit of base color contrast, than highlighted the whole branch in three shades of Copic greens. A mini bow was added to the stem. I thought the jewels added a bit of bling to the flower, because of the jewels in the stripes of the paper. If you go back to the first picture you will see the random stripes done with Stickles and the added jewels. (its hard to see, but there are 14 random stripes of various sizes with 6 jewels added) This is a great way to jazz up a simple stripe paper.
 This is a shot from the inside of the card.
What a great flower die. A lot of possibilities . .  This really is a simple card that you can get several done and add the matching envelopes, put in an organza bag and give as gifts.

Thanks Barry
This added little goodie is a gift tag, I DOUBLED the paper on the Floral Doily to add weight to the tag. Attached the same flower. Looped organza ribbon through the filigree and feed a bead onto the two stands of ribbon, tied a knot above the bead. The tag is ready to attach to any gift.


Friday, July 01, 2011

Layout of Love

Good morning!!  It's a red hot Friday morning in Missouri, and I have a red hot scrapbook layout to share with you today.  ;-)  I pulled out some of my dies and stamps from the Valentine release and paired them up with one of the new dies (Bird with Flowers) from the new Flower Power release at The Scrapping Cottage to bring you this fun creation.  From the Valentine release, I used the Label 1 die, and the Frame 1 background stamp, as well as the Valentine sentiments stamps.  I got the sketch from the current Scrapping Cottage challenge. There's still time for you to play along, as you have until the 8th to upload your creation for a chance to win a great prize!!
Here's the page map to follow for the current challenge, and you can find all the details here, to link up your work.  We're sure looking forward to seeing your fabulous creations!  Good luck, and thanks so much for stopping by today on this beautiful day.  I wish you a safe and happy 4th of July weekend, and lots of happy stamping and scrapping!!!


Thursday, June 30, 2011

Hello, sunshine!

Summer time is officially here - finally! - and what could be more appropriate than a bright and cheerful welcome for Mr. Sunshine. :) I love this summer sun die by Cottage Cutz.


For his sweet face I used one of the face stamps from the gingerbread doll set. Isn't it cute. :)


Before I sign off today for the last time, I want to take this opportunity to thank Joanne and the Scrapping Cottage, Kay our DT Coordinator and all the DT members for making my time on this team so much fun. I have thoroughly enjoyed  the past year as part of this talented team of crafters, sharing my work and showcasing the fabulous Cottage Cutz products Joanne brings to us. Thank you all so much for such a wonderful experience!!!

See you 'round Scrapendipity's Studio! :)
HUGS and craftyness,

Wednesday, June 29, 2011

New Flowers to Love

I'm in love with this new Layered Flower die. So many possibilities!

I made these flowers for my Bridal Shower layout and I just love the dimension. I added some Glossy Accents to a few of the centers.


Lots of pretty flower dies from the newest release "Flower Power" Be sure to check them out. Don't forget our Second Saturday Challenge going on right now for a chance to win a $25 CottageCutz Gift certificate. You can read about it here.

Have a great Wednesday!

Kay


Tuesday, June 28, 2011

Gift Card Holder . . 1st BD

 This is a Gift Card Holder, rather than a traditional card it is a ""and the winner is"" type card!. You do the front or a face of a card and mount into an envelope type frame. This card was made with three of the Cottage Cutz dies, Surprise Phrase, Eyelet Circle and Birthday Peeker Bear. I made a pouch type slop for the gift card and sat the bear peeker over the edge. The bear head was mounted on foam dots to make it level with the thickness of the gift card. The corners of the card face were punched with a bubble corner punch and than the front of the card was mounted on a brighter card stock. The color than showed through, I cut assorted color dots and added like confetti in the corners.
 I made the bear pink with rose ink highlights.  All the colors in her hat were used in the rest of the card.

 I used the verse SURPRISE centered on a eyelet circle. . on the outside of the flaps. Almost like a buckle. The envelope frame was made with swiss dot card stock for texture. Because the inside of the card is thick and the envelope frame is heavy card stock. . the envelope frame does not want to stay closed.
As you can see. . I did not glue any of the flaps. I also made the envelope frame smaller than a traditional envelope so you can than put this into a envelope to mail or give. This way when the person who receives the card pulls it out of the mailing style envelope. . . . the flaps will automatically open because of the bulk of the paper and. . ""It POPs Open""  This is a good office style card because everyone who contributed to the gift card can write a comment on the flaps of the envelope frame. Lotz of places to write!

Thanks Barry

Friday, June 24, 2011

What's Cookin'

Good morning!  Well it's Friday, and the end to another glorious week, which means it's my turn to share a card with you.  I made this card with the Antique Stove Cottage Cutz die from the In The Kitchen release.  Don't you just love the charm of this adorable piece?
I found this pretty October Afternoon paper from their Modern Homemaker Cherry Pie collection, and I thought it went perfect with this entire In The Kitchen release.  I colored the stove with my Copic markers, and added a little shading around the edges with some Tim Holtz distress ink in Vintage Photo.  Thanks so much for stopping by today!  Have a wonderful day and a fabulous weekend!  Happy Stamping!!!


Thursday, June 23, 2011

I love you beyond measure

Welcome and happy Thursday! You know what that means....it means it's my turn to share. :) In case you may have missed it, I'm in L - O - V - E with the kitchen release! So this week, I'm sharing another project with dies from this set. 
This is the measuring cup with comes with a stamp for the measurements! Adorable beyond measure, isn't it....hahahaha!!!!  I'm so punny! :)

And for the bowl full of love and kisses, I used the largest of the stacking bowls. I love those bowls, and they are fun to fill with stuff!


Thank you for visiting the blog today. I hope I've inspired you to use your dies in a way you hadn't thought of before. :) Have a crafty weekend!