Friday, October 13, 2023

Fall Pumpkin Trio

Hi Friends,

Welcome to this Friday edition of our blog ☺  It's Kris here, sharing a Fall card with watercolored pumpkins using the Harvest Pumpkins and Fall Leaves from the NEW FALL RELEASE!  The individual dies in this release are 30% OFF for a limited time!


I followed the color challenge at SplitcoastStampers this week which was

Pebbled Path
Lost Lagoon
Wild Wheat
*I substituted Pretty Peacock for Lost Lagoon

Dessert Option is to Add a Border! I added a top and bottom border to the Plaid paper with the Wild Wheat cardstock... and I also added a Wacky Stitched Die border to the smaller white focal piece.
 
 DESIGN STEPS:


I cut the following from Stampin' Up! colors:

• Pretty Peacock = 5-1/2" x 8-1/2" scored at 4-1/4"
• White = 5-1/2" x 4-1/4" 
• Wild Wheat = 3-1/4" x 5-1/2"
• Plaid paper = 3-1/8" x 5-1/2"

I stamped a sentiment in bottom right corner of my white panel and then I dry embossed it.  


I die cut the Harvest Pumpkins from a watercolor cardstock, and the Fall Leaves from the 3 challenge colors.  I then watercolored my pumpkins with Pretty Peacock classic ink and Peacock Feathers Distress Oxide Inks, and the leaves in Vintage Photo D.O. ink.  


I cut my main focal piece from white cardstock at 2-1/2" x 4-1/2" then I dry embossed it with the same folder as the larger white panel.  I then decided I wanted to create a border and flatten out the leaves a bit for a more subtle texture, so I used the largest Nested Wacky Stitched Rectangle and cut it as shown, then cut just the other long edge.


I glued my largest white embossed panel to my card front.  Then I centered the Wheat and Plaid papers  and then the smaller white die cut panel on top.  

I then cut the stems off of my leaves and glued them to the bottom half of my card center, then added my pumpkins and sunflower.  Done!


I hope you are inspired today to get crafty with your favorite CottageCutz dies!

There's more inspiration and giveaways on our YouTube Channel!

~Kris


Thursday, October 12, 2023

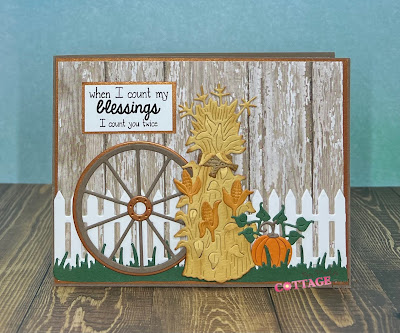
Count Your Blessings

Hello Friends 

It is time to show off our new RELEASE!  It is our Fall Designs for 2023.  Perfect for those Thanksgiving cards and fall birthdays. The new dies are in the online store.  There are 15 designs.  

I am sharing a card using the Fall Wagon Wheel and the Harvest Cornstalk.

 
Design Steps:
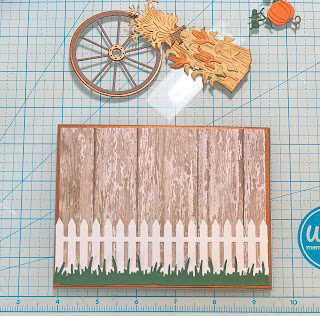
1.  Using the Harvest CornstalkPicket Fence Border, Spring Grass and the Fall Wagon Wheel cut out the following colors of card stock:  white, brown, yellow, orange yellow, orange, green and copper.  Shade the cornstalk with TH vintage ink.  Then assemble the pieces with a fine tip glue
2.  For the card base use an A2 brown piece of card stock, 4 1/8 x 5 3/8 piece of copper card stock and a 4 x 5 1/4 piece of wood DP
3.  Glue the copper piece to the brown card base and then add the wood DP.  Glue the fence down and then add the grass
4.  Place the wagon wheel to the left and then add dimension dots to the back of the cornstalk and pop it on next to the wheel
5.  Last add the pumpkin, vine and then the sentiment.  Your card is complete


We have more inspiration on our YouTube Channel check it out HERE

Thanks so much for stopping by!  And I will see you next Thursday.

Blessings and Take Care


Wednesday, October 11, 2023

Keeping Your Design Simple


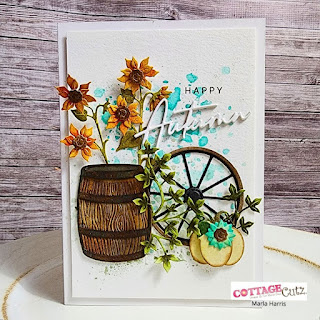
Hi, Marla here today with another CottageCutz YouTube video tutorial.  Fall is finally here, and the new CottageCutz Fall Release is in the shop.  I have already posted a few cards on my Instagram using many of these beautiful products.  I am completely smitten with all of the products in this release.  Do you love it as much as I do?  

My card today is a 5x7 design, with a simple layout.  What makes it simple?  Well, for me it means leaving white space on my card that allows the dies or stamps to take center stage without any distractions.  

You can head on over to watch the video and see how you can enter to win one of these beautiful dies.  I hope to see your there.  Until next time...... Marla


Tuesday, October 10, 2023

Candle Christmas Slimline Card

Happy Tuesday crafty friends!
I hope your day and week are going well. Today I am sharing a pretty in pink Slimline Christmas card I created with some of the new beautiful dies from Cottage Cutz. Here is what I created.

I created a slimline card. It is a top folding card with a white cardstock base.


I started by cutting out my pieces in white cardstock. I then began to color them with my various markers. 

I then cut out my mats. I decided to used the scallop stitched slimline dies in two sizes. I also cut out some corresponding mats using some patterned paper and some kraft cardstock. I then went ahead and assembled them and used some foam tape to give them some lift.

After coloring my base leaves from the Fall branch die, I adhered them to the base of the top of my mat base. The fall branch die is part of the new fall release from CottageCutz.com.


Here is a side view of my completed card. After I assembled all the various pieces. I like to give them the feeling of dimension by layering them. I also glue the bases of the pieces but leave the tops and sides free so that I can curl, lift and shape the pieces.


Here's a closer look at the candle. i know it is really hard to tell in the photo but I used some glossy accents on the top, the drip and the flame. This gives it a nice shiny finish.

Here is another close up of the candle. You can see, after I colored it pink, I used some fine glitter to cover it. I love the sparkle of glitter and Christmas cards are the perfect time to pull out all the stops and glitter and glitz up your projects!


Here is one last look at my finished card. I do love using pink in just about everything I do, including any holiday or seasons...lol!


Dies I Used For This Project


Holiday Candle Center Piece

Holiday Deer

Fall Branch


Scalloped Stitched Rectangle Slimline

Be sure to head over to CottageCutz.com and pick up some of these amazing dies! Both new collections are just too good to pass up! It is never too early to start on Christmas Cards! Especially if you have several people on your list!

That about covers it for today. Be sure to come back by as I will be sharing more Christmas related stuff! Until the next time, have a wonderfully crafty day!

-Melinda

Saturday, October 07, 2023

Fall Centerpiece (new die)

Hello CottageCutz friends! Thanks for taking the time to stop and visit with us today. It's Mary Marsh here bringing you the Saturday edition of the Blog.

It's new release time!!! We have our Christmas 2023 release in the online store that has 40 designs. It's an old-fashioned Christmas theme. You can pick up the individual dies at 30% off for a limited time.

We also have a new Fall 2023 release in the online store with 15 designs. You can also pick up these  individual dies at 30% off for a limited time.

Today for your viewing pleasure, I am featuring the new Fall Centerpiece die and I created a Thanksgiving card. So let's get started with some details of how I created my card. 

Design Steps:

I started by choosing my card colors.  I decided to use some rich jewel colors for the card base, layering panel and the designer paper. These are Stampin' Up colors of rich razzleberry, purple posy and the designer paper is a rich razzleberry shade. 
I embossed the purple posy layer with a diamond folder for some background texture. I used rich razzleberry ribbon to join the two panels. 

Rich Razzleberry Card Base: 4 1/2" x 5 3/4"
Purple Posy embossed layer: 4 1/4" x 3 1/2" 
Designer Paper Layer: 4 1/4" x 2"
I assembled the Fall centerpiece using the packaging colors. I also used the packaging for placement of the die cut pieces since I assembled this on the embossed panel. 
For my sentiment I decided to use the Thanks w/Shadow die.   I cut the shadow in a chocolate cardstock and the thanks word in purple posy cardstock.
To finish off my card I stamped the "let us give" phrase in rich razzleberry ink on purple posy cardstock and added a chocolate layer. I attached it with double sided tape and the Thanks phrase with clear drying glue. 
That's it for this week. I hope I have given you an idea for a way to use this new die. See you next Saturday. 

Reminder: Marla has inspiration on the CottageCutz YouTube channel. Click here.