Sunday, March 19, 2023

Thanks Accordion Fold Card

Hello Cottage Cutz Friends!
Melinda here with you, on this wonderful day! For today's project, I am sharing a simple and pretty card I created with dies from the amazing Flowers & More release from Cottage Cutz!

Here's a look at my card. It is an accordion top fold card. The base of the card is 4.25 x 11.
I scored it at 5.5 inch. I then scored it at 2.75" and did a mountain fold. I then added some mats to the two halves on the inside or with the base open. I then also put a patterned paper mat on the right side as well. Each mat was a quarter inch smaller than the base dimensions. 2 at 2.5 x 4 and one at 4 x 5.25.

Here is a shot of what the base will look like when folded.


Here is another view with the card slightly open. I did add a rectangle double-stitched mat with a couple of mats. I then also used the Thanks die and cut the sentiment out. I colored the sentiment with a blue marker to match the patterned paper.

Here is another view of the card opened up to show the inside. I added a white rectangle stitched scallop mat so I could write a sentiment.


Here is a closer look at the beautiful flower die cut. I colored them and then put them on a patterned paper mat that went onto the double stitched circle mat. I put adhesive on only half of the mat so that it could open. I did also add some sequins to dress it up a little. I also added some perfect pearls to the centers of the large flowers.

Flowers & More Collection!
Here's a look at the entire collection of dies in this fabulous release.


Dies I Used


Don't forget to head over to the Cottage Cutz You-Tube Channel where you can see some of our amazing design team members create some beautiful projects!

PLUS Check OUT  The new release from Cottage Cutz!
On sale for a limited time! Go grab it today at this fantastic price!!!


Well that about covers it for today! May you have a wonderful day! Until the next time, have a wonderfully craft-die day!
Melinda Beltran

Saturday, March 18, 2023

Cross with Spring Lilies


Hello Scrapping Cottage friends! Thanks for taking the time to stop and visit with us today. It's Mary Marsh here bringing you the Saturday edition of the Blog.

Our Flowers & More release is still available in the online store at 30% off the individual dies. This release has what we are calling "simple cuts". Meaning not as many pieces to put together so they assemble quickly.

They are so perfect for the many card making occasions that we all have. Easter, Birthdays, Thank You, Sympathy, Mother's Day, Thinking of You or even a scrapbook layout just to name a few. 

Today for your viewing pleasure I am revisiting an older die -  Cross with Spring Lilies die (2019 release). This is a perfect die to reflect on why we celebrate Easter. It's retired but still available and on sale right now. Let's get started on some details of how I created this card.  

Step 1: I started my card this week with the layout. I am using a sketch that I had saved on one of my Pinterest boards. I thought it would work great to show off the cross and allow me also to use some background designer paper. This particular sketch gave all the dimensions for the layers so it made creating the card a bit easier.
I just had to select my card colors and I decided on shades of purples since purple is the color of royalty.
For the center panel I used a white dotted tulle and an olive satin ribbon. The olive picks up the stem of the lilies.  For the oval panel, I used the 3rd largest oval and stitched oval dies.
I cut my cross using 2 shades of purple cardstock. The lilies are cut in a paler shade of purple with olive for the stem. I thought that color would look better against the white background. 
Next, I stamped my sentiment in the heather shade of ink. It's the top layer of the cross color. Attached to the ovals with dimensional adhesive. 
Now that all the panels, card base and cross are cut, I am ready to start card assembly. I used double sided tape for all the panels. I secured the ribbons with glue dots.
To complete my card, I secured the oval image panel with dimensional adhesive and attached to the card base with double sided tape. 
Well, that's it for me for this week. See you next Saturday. 

Reminder: Our YouTube Channel has a new video from Jen Hartsgrove. There is a giveaway for being a subscriber, liking the video and leaving a comment. Click here.

dies I used to create card:


Thursday, March 16, 2023

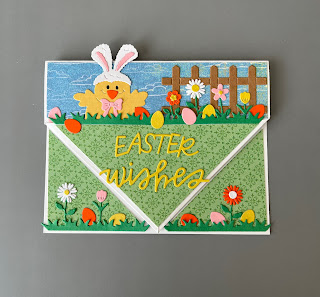
Easter Wishes

 Hello Scrapping Cottage Friends

I hope you are all doing well.  I am in Arizona and the temperature is starting to heat up!  We will be close to 80 this week.  So I am in the mood to start my spring card which includes Easter.  I am doing a card with a fun fold for this weeks demo.  I used two of the new release dies Little Flowers and Fence & Grass.  I also added some older dies to create the Easter Theme.


Design Steps:

1.  Using the following dies Fence & Grass, Little FlowersHatching Bunny ChickMr. Peter Rabbit (for the eggs) cut them out in these card stock colors: pink, yellow, orange, green. white, and brown.  Assemble the chick ad flowers 
2.  Here is a link for the video I used to create the white card base by Dini at SplitCoast Stampers  
  • Cut a 3 1/2 square out of green DP then cut it on the diagonal one of the pieces will be for the center flap 
  • The other piece of left over DP you will cut in half for the sides of the flap
  • Cut a strip of cloud DP 5 1/4 x 1 3/8
3.  Tape the two center flaps pieces together and then glue on the green triangle.  This creates a little pocket.  Glue the side green triangles and the blue strip across the top
4.  Start to decorate the top of the card sliding the pieces down into the pocket.  Cut the Easter Wishes on yellow card stock and glue to the flap.  After you have decorated the card front you can either leave the little pocket at the top open to slide in a gift card or glue it shut which is what I did
5.  Stamp the inside of the card and decorate with additional flowers.  Add a small velcro dot to the tip of the flap and your card is complete

CottageCutz Products


We have more inspiration on our YouTube Channel check it out HERE

Thanks so much for stopping by!  And I will see you next Thursday.

Blessings and Take Care


Wednesday, March 15, 2023

Bunny Tree Cottage Happy Easter Card - Giveaway


Hey Krafty Friends, Jen from Katahin Krafts, back with another CottageCutz YouTube video on the CottageCutz Channel.  I crafted my fun Easter scene using "Bunny Tree Cottage", "Spring Sentiments", "Spring Chicken", "Little Flowers" and "Bunny Express Carrot Cars" dies.  


I love creating scenes using elements from several different die sets, even if it's just a small element like the Easter eggs from the "Bunny Express Carrot Cars."  I was excited to add the vine from the "Spring Chicken" sign to the Bunny Tree, I loved how well they fit together!

You can find all my card instructions over on the  YouTube Channel!

While over on the channel, make sure you like and comment for a chance to win the "Bunny Tree Cottage" die!

The winner of the "Playful Piggies" die from my last video is Katherine Lavender, the details for collecting your giveaway prize are over on YouTube!  

Thanks for stopping in, and happy krafting!


Tuesday, March 14, 2023

Some Bunny Loves You

Hello CottageCutz friends! Thanks for taking the time to stop and visit with us today. It's Mary Marsh here bringing you the Tuesday edition of the Blog. I am filling in for Melinda for a couple of weeks while she recovers from some recent surgery. 

We have a brand-new release of dies in the online store. It's our Flowers & More release. The individual dies are currently on sale for 30% off. This release has what we are calling "simple cuts". Meaning not as many pieces to put together so they assemble quickly.

They are so perfect for the many card making occasions that we all have. Birthdays, Thank You, Sympathy, Mother's Day, Easter or even a scrapbook layout just to name a few. Today for your viewing pleasure, I am revisiting an older die from our Spring 2020 release. It's the Double Trouble Bunnies die.

I used the colors from this week's Splitcoaststampers color challenge #939. We are to use polished pink, garden green and tahitian tide for our color trio. Optional is to use layers. 
polished pink, garden green, tahitian tide

I decided to make an Easter card with these bold and bright colors. I had the white card base and the tahitian tide tag in my stash.  The top of the tag is partially covered by my circle images, but it has a tahitian tide color gradient.

My first circle is cut in tahitian tide color. I used the largest die from the Sweetheart Doilies set. Looks like that one is out of stock but you could use the Nested Stitched Scallop Circle die.  The image circle is the 4th largest Stitched Circle die.

I cut the Double Trouble Bunnies in an allowed neutral and the egg and grass in the challenge colors. Stamped my sentiment and added a few polished pink opal rounds to complete my card.

See you on Saturday!

dies I used to create card:


Monday, March 13, 2023

Sweet Easter Wishes

Hello Scrapping Cottage peeps! 🐤

Kris here, sharing an Easter card featuring the CottageCutz Spring Bowl w/ Eggs.  


Design Steps:

I cut and layered the following, bottom to top:

• White card base = 4-1/2" x 11" and score at 5-1/2" for a top folding card
• Patterned paper (gingham) 4-1/2" x 5-1/2"
• Die cut largest from the Nested Scalloped Rectangles set (attach with foam tape)
• Patterned paper (scripty) 4-1/4" x 5-1/4" 
• Die cut largest of the Nested Stitched Scalloped Circles set
• Die cut Spring Bowl w/ Eggs, the Sweet w/ Shadow, and Wishes w/ Shadow from white cardstock and apply distress ink and/or markers.  Assemble. 
• Adhere bowl to lower part of scalloped circle with a thin piece of foam strip.  Adhere eggs behind the bowl with glue.
• Stamp "Easter" and trim.
• Run ribbon around the Scalloped Rectangle (between foam strips) and tie a knot on front right side.
• Add foam strips to each of the sentiments and adhere as shown.

Kept it fairly simple this week.  I hope you all have a funtastic week!
~Kristine

Products I used: