Thursday, January 31, 2019

Ladybug Love!

Good Morning Scrapping Cottage Friends!

It is Pam on the blog this morning.  I am continuing to make my Valentine Cards and having so much fun with the new Valentine and St. Patrick's Day release dies.  They are still on sale for 25% off so don't miss your opportunity to check out this cuter then cute release!   Today I am using the Lovebug Bee & Ladybug die with the traditional Valentine's colors.


Design Steps:
 1.  I used the Ladybug die and cut it out three times in red, black and pink
 2.  I did a little shading on the red and pink then assembled the Ladybug.  I also made the other bug a little Manbug using the black shell and red under layer plus I used the bow for a bow tie!  You can see it below
 3.  Use an A2 white card base, cut a piece of red slightly smaller then the base and then a piece of black polka dot DP slightly smaller then the red.  Also cut a 1 1/4 x 4 inch red polka dot band.  Then using the Fancy Floral Lace Border cut out to lacy strips and then cut them down to 4 inches long
 4.  Glue the Lace border to the top and bottom of the red polka dot strip
 5.  Using the Pierced Rectangle die third from the largest cut out a white rectangle
6.  Wrap your ribbon around the rectangle and tie a square knot.  Pop up you two bugs just about the ribbon.  Stamp your sentiment just below the ribbon

7.  Pop the rectangle panel to the center of the card and add some small red hearts

CottageCutz Products


Please stop by and visit us in the store we have some wonderful items on Sale!
Blessings
Pam

Wednesday, January 30, 2019

You Make My Heart Flutter

Hello!  This is Sukie and today I have another Valentine's Day card to share for my guest designer post.  Valentine's Day is one of my favorite holidays and these new Valentine's dies makes it so easy to create some adorable cards.
I used the Lovebug Butterfly and the Lovebug Bee & Ladybug dies to cut out these sweet die cuts. The squares were cut from the Stitched Rounded Square Set.  I went with a pink and red theme and inked everything on the edges.  A bit of chalk was added to the cheeks along with a tiny dot with a white gel pen.
Each of the die cuts were adhered to the squares.  I found the perfect papers in my stash from an older Martha Stewart paper pad.  The pink, red and white papers complimented my die cuts perfectly.
I hand cut a small rectangle tag and heat embossed it with a sentiment from the Scrappy Moms (retired) Crazy for you stamp set. I hole punched the tag on each of the ends.  The hole reinforcements were punched with the We R Memory Keepers Hole Reinforcer Punch.  The tag was adhered to the bottom of my card and tied with some Cherry Cupcake Trendy Twine.
The adorable die cuts were aligned in a row above the sentiment tag. I absolutely love these cute die cuts.
Here are the dies I used on my card which are currently on sale here

Sunday, January 27, 2019

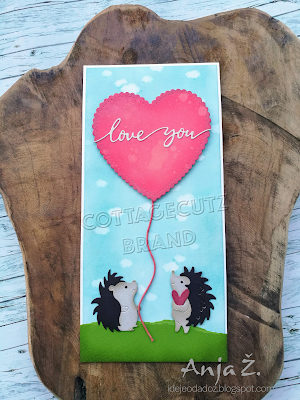
Balloon Heart

Hi!

It's Anja here. My package of new dies arrived this week and I couldn't wait to try it out. First I made a Valentine's card with this cute hedgehogs.


For this project I used:
- Cottage Cutz (Be My Valentine Puppies, Hedgehogs In Love, Love You Mom Phrase),
- Distress Inks (Fired Brick, Peeled Paint, Vintage Photo, Pumice Stone) and Oxides (Broken China, Aged Mahogany, Fired Brick, Abandoned Coral, Candied Apple),
- grey, brown and green card stock,
- white card base (15x10,5 cm),
- water color paper for background (14,5x10 cm),
- red cotton string,
- cloud plastic stencil,
- baby wipes,
- heat gun,
- adhesive foam pads,
- water spritzer,
- paper glue.

First I cut the heart and colored it with Distress Oxides. I used lighter shades in the inside and darker shades on the edges.


Then I sprinkled it with drops of water. I dried it withe the heat gun.


Then I cut and colored the background.


I used plastic stencil and wiped the clouds with a baby wipe. I dried it withe the heat gun.


I cut parts for the hedgehogs from the colored paper. I used Distress Inks to color the edges and add some dimension.


Then I cut the sentiment and a little heart. I used grey card stock for the sentiment.


I cut a piece of green card stock for grass. I tore one side of it. I used Distress Ink around the edges.


When I had everything cut and colored I started gluing the bits on the card base. I used adhesive foam pads for the hedgehogs ...


and the heart. I used double here. In between bottom two I put the string.


And then I glued everything together and here is m finished card.


This is all from me for today. You can get the dies from the Valentine's release in the store for a 25 % discount.

Have a great Sunday and see you again next week.

Anja Z.


Cottage Cut dies I used:


Saturday, January 26, 2019

We Go Together


Hello Scrapping Cottage friends! Thanks for taking the time to stop and visit with us today. It's Mary Marsh here bringing you the Saturday edition of the Blog. We have a new release of Valentine & St Patrick Day dies in the online store. Each one is cuter than the next and they are on sale for a limited time at 25% off.

Today for your viewing pleasure I have a Valentine card using the Love Latte & Donut + the Valentine Phrase & More dies. So let's get started with some details and a tutorial on how I created my card.

Step 1: I started my card with the idea of using the weekly sketch #733 from Splitcoaststampers. I liked the layout and thought it would work well for the dies I had in mind.
I wanted to stick with the traditional Valentine colors of red and white with some black, pink & blue accent colors for the images. I found several patterned papers that I liked but eventually settled on this one. It is part of a Valentine collection of papers. I thought I should stick with paper that is a bit more playful because of the images and sentiment I am using.
Started cutting the card images using a medium brown and pink for the donut, a darker brown for coffee in cup and a caribbean blue for the coffee cup.
I cut the images to go across the top panel (element 6 of the sketch). I cut these in black and red cardstock. Wanted a contrast across the top. I only cut 4 because I thought the "xoxo" image would count as 2. The sketch has 5 images across.
I used the 2nd largest Stitched Circle dies to cut my circle for element 4 of the sketch.That size was large enough for my coffee cup image and also my sentiment. Before I stamped the sentiment I placed my coffee cup at the bottom left and then used the Stamp-a-ma-jig for the placement of my image.
Step 2: Now that all the card elements are cut, I am ready to start card assembly. I attached the designer paper to the red layer with double sided tape. My top rectangle panel is embossed with a heart embossing folder. This panel is 1" x 5 3/8".

I attached my sentiment circle with double sided tape. I cut the top portion of it off and slid the circle under the red embossed layer. 
To secure the images across the embossed panel, I used glue dots and Ranger multi medium matte. 
Attached the coffee cup and donut to the image panel. 

And then, to finish off my card I attached to the white card base and scattered a few hearts to the image panel. 
Well that's it for me for this week. I hope I have given you another idea for using these 2 sweet Valentine dies. See you next Saturday.

Dies I used to create card: