Thursday, July 13, 2023

Just Because

 Hello Friends

It is Pam crafting with you today!

Today, I am making a few Just Because cards.  I love sending cards to friends and family for no reason at all!  Many times people tell me when they received the surprise in the mail it was perfect timing.  Because their day wasn't going very well! So with that in mind I made this card with the folksy art look and bright colors to brighten someone's day!

I am using the Folk Art Bird and the Folk Art Flowers Mixed.  These dies are from our Folk Art release!  There are 19 wonderfully detailed dies in this collection.  Each die can be used together or separately.  They are perfect for multiple occasions.  


Design Steps:

1.  Using the Folk Art Bird and the Folk Art Flowers Mixed cut out the following colors of card stock: red, orange, green, yellow and brown

2.  Use a fine tip, clear drying glue to assemble the pieces


3.  Cut a 5 inch kraft circle card base and then run it through the embossing folder of your choice
4.  Begin to arrange your piece onto the circle.  You will notice that I changed up my design a little on the final card


5.  Once you have decided on your design glue the pieces in place add your sentiment.  I used vellum and embossed in gold for my sentiment. Your card is complete


We have more inspiration on our YouTube Channel check it out HERE

Thanks so much for stopping by!  And I will see you next Thursday.

Blessings and Take Care


Wednesday, July 12, 2023

Christmas in July


Marla here with another CottageCutz YouTube video tutorial.  On my personal YouTube Channel, I am celebrating Christmas in July.  I noticed that several of the dies in the "Folk Art" release translate well for use into the fall and Christmas seasons, so I rolled the theme into my design team post for The Scrapping Cottage.  

I would love for you to join me to watch the video, but in case you can't, I will share the two dies I used on my project today.  I paired the "Folk Art Deer" with an older Christmas die "Christmas Farmhouse Floral".  I used non-traditional Christmas colors, paired with kraft cardstock for a delightful folk art Christmas card.  

Thanks for stopping by.   Until next time.... Marla


Tuesday, July 11, 2023

Folk Art Mixed Flowers Birthday Card

Happy Tuesday crafty friends,
I hope your day is going well and you are beating the heat wherever you're at. It has been sizzling here in Florida.

One of the best ways to beat the heat, is to stay inside and do a little crafting. I had the chance to work with some of the wonderful dies from Cottage Cutz's rescent Folk Art dies release. Here is what I created.
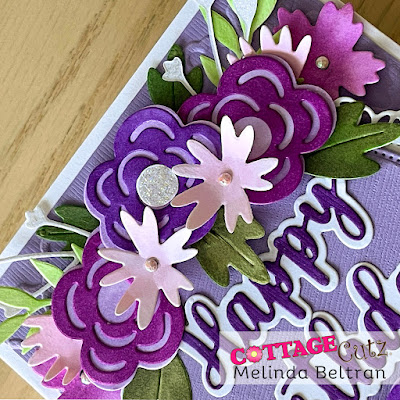
I created this birthday card for my future sister in law's 30th birthday. My card is a side folding A4 card. I used the pretty flower dies from the Folk Art Mixed Flowers Die Set available from their website:  CottageCutz.com

I started by cutting out the various flowers from the die. I cut them all out from White cardstock. I then proceeded to color them with my markers. Some I did leave white. I added some foam to the back of some of them so I could give them some lift.

I used some lavendar paper for a mat. Here you can see that I ran it through my die cut machine with an embossing folder. Towards the top you can see where I used the nested stitched circle doily die. I used one of the smaller pierced circle dies for a mat. I then added the Happy Birthday Shadow die for the top and main sentiment.

Here is a closeup of some of the flowers I assembled on the top. I added some stickles to some of the centers and the various flowers. I also used some diamond dots for the centers of some of the others.

Here's another photo and it also shows the happy birthday on top of the circle pierced mat on top of the doily die cut. You can see I used some foam tape to give it some lift. I also used a tiny diamond dot to dot the "i" in birthday.

Here is one last look at my finished card. I think it turned out very cute and I think she liked it. I used various shades of purple as that is her favorite color.


Happy Birthday w Shadow
Out of Stock


Don't forget to check out the Cottage Cutz You Tube channel to see all the wonderful project on there as well. It will really get your creative juices going!

Well that about covers it for today. Be sure to keep coming by each day to see what else the super creative designers are up to! Until the next time, have a wonderfully crafty day.

Monday, July 10, 2023

Just CHICKEN in ♡ I Miss You

Happy Monday everyone!

It's Kris sharing with you today some inspiration using our Folk Art collection!  I've used the Folk Art Hen to let someone know I'm just CHICKEN in ... cuz I miss them ☺


For this card, I used very few supplies and colors and let the cute dies and papers do the work!  I've used  the Folk Art Hen, Pierced Ovals, Scalloped Ovals, Stitched Sun, and some papers from 'On the Farm' pack by Doodlebug Designs.

Design Steps:


1)  I started with a 5-1/2" square top-folding card base and layered a grey square that was cut at 5-1/4". 

2)  I already had a left-over piece of this cute chicken paper that had an oval already die cut from it so I cut it down to 5".  (The oval size is the 2nd largest from the Pierced Oval dies) I cut a piece of red bandana paper just a li'l bit larger than my oval opening and attached it to the back of my chicken paper.  

3)  I used a strip of the chicken paper that was cut off  when I trimmed that paper to 5" and used the backside -- which has a chicken wire pattern -- and attached that to the lower part of my card. I then wrapped some natural colored twine around that strip of chicken wire paper, and tied in a somewhat of a bow.  Then added a cute red/white gingham brad and attached on top of the grey layer. 

4)  Next, I die cut a white oval frame by layering the 2 largest of the Pierced Oval dies together, taped them in place with a low-tac tape and ran it thru my machine.  Then I glued on top of the oval opening on card.


5)  I die cut my Hen from light grey, white, and red cardstock (to match the cute chickens on my paper!) and assembled.


6)  I noticed the red comb & wattle of my chicken were lost again the red bandana paper, so I die cut a Stitched Sun and placed behind her head ☺  I also added some white gel pen detail on all the red pieces.


7)  And lastly... I added some Scattered Straw (Distress Oxide Ink) onto a piece of white cardstock since that was the closest I thought would match my paper, and then ran it through my computer printer to get the sentiment on it.  Then I backed it with a Scalloped Oval and popped it onto card with foam dots.

****TIP:  I did try printing my sentiment first, then ink blended over it, but the opacity of this pigment ink just covered up my sentiment!  Lesson learned!  LoL.


Thanks so much for taking a look today!  I hope you are inspired to get crafty with your favorite CottageCutz dies!  These Folk Art ones are so cute and different - We'd LOVE to see what you are creating too!  Please use hashtag #cottagecutz when posting so we can find your projects!

~Kristine


Saturday, July 08, 2023

Folk Art Bear at Christmas.

Hello CottageCutz friends! Thanks for taking the time to stop and visit with us today. It's Mary Marsh here bringing you the Saturday edition of the Blog.

Our new Folk Art release is still available in the online store at 35% off individual dies. There are 19 new designs that are so perfect for cardmaking, journaling, and scrapbooking. 

They allow you to add a beautiful touch of folk art to whatever you may be creating - birthday, thank-you, new home, thinking of you and even Christmas. The design team has featured many creative ideas using these dies so take a look back at our posts for inspiration. 

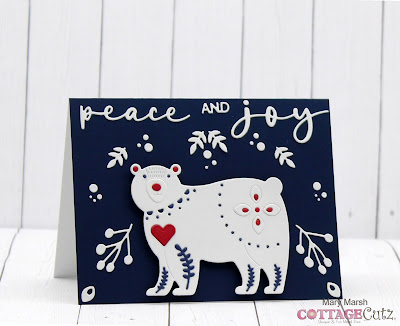
Today, I am featuring the new Folk Art Bear die on a Christmas card. I think my completed card has a bit of a Nordic appeal. So, let's get started with some details of how I created my card. 

Design Steps:

I wanted my bear mostly white with a few touches of color. For that color I used red and navy blue, and I did the die inlay technique. 
Next, I cut my phrase in white cardstock from the Peace and Joy Wreath (Christmas 2022).  
I started assembling my card. I attached the bear with repositionable tape to get an idea of where I would place my peace and joy phrase. 
I cut some greenery from the Folk Art Flowers Mixed die to layer on the card front. I also realized I forgot to inlay the red heart for the bear. I also added dimensional adhesive to have the lifted slightly off the background. 
To finish off my card, I added more greenery. This time it's cut from the Folk Art Fox die. I also scattered some circles around for added interest. They were cut from the dies I mentioned above. 
That's it for me for this post. See you next Saturday!


Friday, July 07, 2023

Christmas Poinsettia

Hello CottageCutz friends! Thanks for taking the time to stop and visit with us today. It's Mary Marsh here bringing you the Friday edition of the Blog.

We have a 4th of July sale going on right now in the online store. It runs through today (Friday) at 9:00 pm (PDT) with savings of up to 70%. There are so many great dies on sale right now. 

My card for today is showing one of the Christmas dies from last year's collection. It is currently on sale at 30% off. The die is the Poinsettia Floral

For my card I used the colors from this week's color challenge #955 on Splitcoaststampers. It is also a Christmas in July theme. The colors we were to use are poppy parade, petal pink and soft succulent. 

petal pink, poppy parade and soft succulent

I don't have petal pink cardstock, so I used powder pink for my poinsettia. Since there are no veins in this die, I added them with powder pink ink and a brush and for the top layer I used a R20 Copic marker. The top layer idea came from my teamie Kristine. 

The leaves are cut in soft succulent cardstock and then shaded with the same ink for a deeper hue. After I finished this card, I found some soft succulent glimmer paper, so I cut the holly leaves in that paper for a little shine. I decided not to remove the other piece of cardstock but kept it for a darker border.

Stamped my Merry Christmas sentiment in poppy parade. To complete my card I added a few poppy parade enamel dots and the card base is also poppy parade cardstock. My card is a bit larger than I usually make - it measures 5" x 6". 

Well, that's it for me for this post. I will be back tomorrow with a card from our new Folk Art collection.