Showing posts with label shaker card. Show all posts

Monday, December 12, 2022

Peppermint Shaker

Happy Monday Scrapping Cottage Friends!

Kris here to share a tutorial with you on this cute shaker card featuring some dies from the Christmas Release #2 and more! 


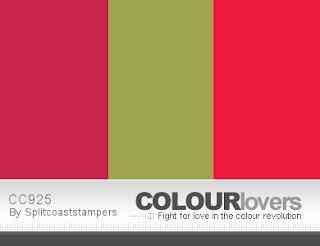
I am a Guest Designer this month for the Color Challenge  at SplitcoastStampers and the colors this week are Real Red, Old Olive and Poppy Parade (CC925).  The dessert option is to use a 4th color.  I added in some Cinnamon Spice for the gingerbread girl. 


DESIGN STEPS:

CUTTING:
Red Cardstock =  Cut a 5-1/2" x 11" - score at 5-1/2"

Gold Cardstock  = Cut a 5-3/16" square
Die cut the bow from the Halloween Wreath 
Die cut the Joy from the Peace & Joy Wreath

White Cardstock = Cut a 5" square
Die cut largest die from the Pierced Wide Circle Frame set 

Crumb Cake (or Kraft) Cardstock =

Peppermint Patterned Paper = 4-3/8" square
Acetate or Window Sheet = 4-3/8" square
Candy Cane Striped Paper = 4-3/4" square


ASSEMBLING:
• Fold and burnish red card base
• Attach gold square in center of card front
• Attach white square "
• Attach peppermint square "


• Using the 3rd largest die from the Pierced Circle Set, cut a circle from the center of your 4-3/4" square patterned paper (Candy cane striped paper).

• Add glue close to the circle opening of that patterned paper, and attach the white circle frame.

• Attach acetate/window sheet to the back of that paper.


• On the back side of your striped paper, add foam strips around the circle opening and around the straight edges, then remove the backing (from the foam strips).


• Add shaker elements to the center of your card front.  I used some of the cookies from the Cookies & Cocoa die, as well as some white and red sequins.


• Optional - use a used dryer sheet on front and back of your window sheet to reduce static and prevent sequins from "sticking" to it!  This really does work!!  :) 


• Carefully center your window layer on top of your card front so that there's equal amount of white border and press down.


• Ink blend Rusty Hinge Distress Ink to your ginger girl.

• Color her bow red, scarf and earmuffs Olive green, and buttons dark brown.  Add white gel pen polka-dots to the scarf and highlights to the bow and buttons.


• Glue "Joy" to the center of your shaker.

• Attach Ginger girl and cup of cocoa with foam dots.


Thanks so much for looking today!  
I hope you are inspired to create something fabby with your favorite CottageCutz dies! 

~Kristine 

PRODUCTS I USED:


Wednesday, September 28, 2022

Faux Snow Globe


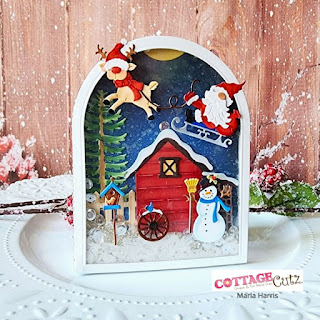
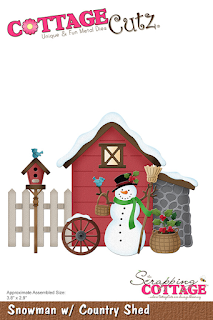
Hi, Marla here today with a fun and festive card featuring the "Nordic Santa and Reindeer" from the Christmas Part 1 release.  When I saw this die, I knew I needed to create a scene card.   I had several CottageCutz dies from last year's Christmas release that I thought would complement this darling die.  After much consideration I settle on using the Snowman w/Country Shed.

I wanted to create a faux snow globe shaped card with of course falling snow.  What I really like about this card is that the snow is on the ground when the card is upright; but when shaken, it appears to be a blustery night.   I share all of the details for creating this faux snow globe in my video on the CottageCutz YouTube Channel.  


In my last video, I was giving away the "Christmas Tree Peekers."  If you entered that giveaway head over to see if you were the lucky winner and don't forget to enter for a chance to win the "Nordic Santa and Reindeer" die.

I have linked the CottageCutz products I used in my card below for easy shopping.  Until next time... Marla


Monday, September 05, 2022

Peeking Reindeer Window Shaker


Happy Monday CottageCutz peeps!  
 
Kris here with a card featuring the cute Peeking Reindeer Window die from the NEW CHRISTMAS RELEASE!  I thought with all the open spaces, it would be perfect for making into a shaker ~ and I even had some snowflakes and star sequins to put inside! 

Great News for YOU!!

This whole Christmas Release 1 bundle is 50% OFF for a limited time! And the individual dies are 30% OFF!!

And don't miss our BIG LABOR DAY SALE!! Up to 65% OFF so many dies -  Sale ends Thursday, September 8, 2022 at 9:00 PM Pacific Time sHURRY OVER and save!!!  

~ DESIGN STEPS ~

Creating the Card Base:

The design papers I used are from the Christmas 2019 collection at Divinity Designs.  The glittered cardstock is from the Park Lane collection at Joanne's.

From the following, I cut and attached in this order:

Thick White Card Base:  5-1/4" square 
Purple Cardstock:  5-1/4" square
Large Snowflake Layer:  5" square
White Glittered Cardstock:  5" x 2" - cut the top off with a die from the  Hills Slimline set

Creating My Shaker:

1.  I die cut my Peeking Reindeer Window 3x:  white glittered cardstock, tan, and black.

Since this die is all one piece, you COULD cut it from white cardstock and color the different parts, but since I wanted the icicles to be sparkly, I went ahead and pieced my die cuts.  

2. From the glittered white die cut, I carefully cut away the images of Santa's sled and flying reindeer, leaving a nice straight edge for the window pane.   


3.  From the black die cut, I did the same, except I cut away the window pane and left the Santa & reindeer all in one piece.  I then glued it behind the window as shown.


4.  From the tan die cut, I carefully cut the reindeer out.  I then added some Vintage Photo Distress Oxide ink over his head and feet, and just a tiny bit of the antlers to give him more dimension.  I cut out the eyeballs.  (Sorry!  but they were brown after I sponged ink and wanted to color them green, so with scissors, I simply cut those away.)  I colored the eyeballs and nose with Copic markers.


5.  I added some 1/8" Score Tape around the outside edges of the window on the backside.  

6.  I cut a piece of acetate to 3-1/2" and attached it to the back of my window. 


7.  I then added 1/8" foam strips on top of the acetate, just around the outer edges.  Then added my shaker elements in the middle.  Removed the backing from the foam strips. 

8.  I cut a 3-1/2" square from the light purple with snowflakes paper from the design pack and placed it upside down on my foam strips to cover the back of shaker. 

9. Then I glued the shaker to my card front.


10.  I thought it needed a sentiment, so I cut a pennant from the Windows Slimline set.  Then I stamped "Ho Ho Ho" (from a Stampin' Up! stamp set) in light blue, medium blue and purple, fussy cut them out and glued onto the pennant.  Then I attached with thick foam strips to my card front, and done!


Thanks so much for PEEKING!  :)  

Products I used:


We'd LOVE to see what you do with this fabby Christmas Release!

~Kristine

Sunday, June 19, 2022

You Sweet Thing - Gumball Shaker


Happy Sunday ~ it's Kris here with a "sweet" gumball shaker card!  I set out to make simpler card this week but I just couldn't help myself when I pulled out this Candy & Gumballs die - I just HAD to make it into a shaker card, so I hope you'll shake it up with me! ☺   

Products used on my card:
Other:
acetate
patterned paper
shaker elements
foam Tape
glue

*NOTE:  You can swap out some of the circle or cloud dies for other CottageCutz dies you have on hand!  I just used what I had. 

Design Steps:

1.  Cut a card base from thick white cardstock at 4-1/4 x 11"
      -  score at 5-1/2"
      -  round bottom corners (I used envelope punch board)

2.  Cut a patterned paper at 4" x 5-1/4" (I used some from Queen & Co. called Candy Land)
      -  round bottom corners
      -  attach to card front

3.  Cut (2) coordinating pieces of patterned paper at 2" x 4"
      -  cut each piece with one of the Clouds Slimline dies.
      -  attach to card front so that one is slightly longer than the other.


4.  Die-cut pieces of your gumball machine.  (I originally cut mine from pink foiled cardstock, then switched it out for a solid pink.)

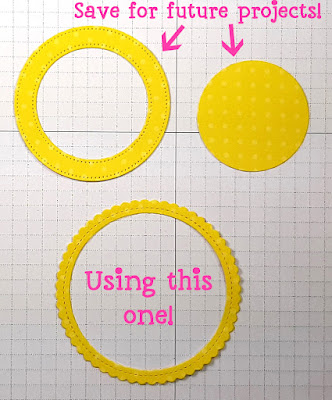
5.  Lay out your dies onto a piece of white cardstock as shown below with the smallest of the Pierced Wide Circle Frame Set, and the 2nd from the largest of the Nested Wacky Stitched Circle Set so that the gumball machine is centered (not the circle!)


6.  Tape the dies in place with a low-tac tape and remove the gumball machine pieces.
      -  run through die-cut machine


7.  I used that first doughnut as a template to create 6 or 7 more (can do less if you're using a thicker cardstock) by placing that doughnut onto another white cardstock and lightly trace inside of smaller circle with pencil and place a dot in the middle.  
      -  remove that doughnut and place your small circle in place & tape with low-tac tape. 

8.  Set aside ONE of your doughnuts.  

9.  Working with 2 doughnuts at a time, place one on top of the other and move them around in a circle motion using your thumbs to feel when the small holes are lined up exactly.  
      -  tape the 2 together with low-tac tape in just one spot  
      -  lift up the open end and glue together.  Remove tape and and add glue so it's all adhered
      -  repeat using all doughnuts except the one you put aside.
      -  run your bone folder over it to flatten any glue bumps after adding each doughnut


9.  Cut a small piece of acetate a li'l larger than the small circle opening and glue it to the top of your doughnut stack.

10.  Glue your last doughnut to the top of your stack to cover up the edges of acetate
      -  be sure to line up the small circles!
      -  be sure to not get glue on your acetate! 

11.  Turn your stack upside down and add your shaker elements in the center.  If your stack isn't tall enough to let your elements "shake", you can cut more doughnuts and add to the bottom of your stack.

12.  Die-cut a white circle using the same size (2nd from largest) of the Nested Wacky Stitched Circles set ---- but don't cut the smaller circle from the middle!

13.  With your stack still upside-down. add glue to all the white area and add your solid circle centered to the top and set aside to dry a little. 


14.  Next, cut a scalloped frame for the front by placing the 2nd from the largest of the Nested Stitched Scalloped Circle set  on a piece of patterned and place the middle die from the Pierced Wide Circle Frame set evenly in the middle and taped both with low-tac tape.
      - run through die-cut machine


15.  Glue frame onto the front of your doughnut.

16.  Glue your gumball machine die-cut pieces to the front as shown:


17.  Attach your shaker to card front and finish off with a sentiment and embellies!  
      *Note:  the bow in top corner is from this Candy & Gumballs die!


Here are the products I used on my card today:


Thanks so much for taking a peek!  
I hope you'll SHAKE IT UP with your next card!  

Have a Blessed Sunday!
~Kristine