Showing posts with label Windows Slimline. Show all posts

Sunday, June 26, 2022

Sweet Slimline Birthday

Hello and welcome back ~ it's Kris here on this sweet Sunday... or shall I say sundae? ☺  This week I'm sharing a yummy slimline birthday card using the Ice Cream Sundae die from the new Sweet Treats release, along with some other funtastic CottageCutz dies! 


Design Steps

I cut a piece of pink cardstock to 8-1/2" x 7" & scored at 3-1/2" along the 7" side.

Next, I die-cut a white frame (I used glittery white cardstock) from the Windows Slimline die.

And then I cut 3 pieces of coordinating patterned papers at 2-1/2" x 2-3/4".  


I glued the patterned papers to the back of window frames, and then glued the frame to card base.


Next, I cut all my pieces with the Ice Cream Sundae and sentiment dies and glued together.  
  • The cupcake liners were cut from patterned papers in the same paper pad as my 3 rectangle frame pieces so they coordinate.  I cut the rest of the die out of pink, brown and white cardstock. 
  •  I gave some shadows to the strawberry & chocolate ice cream and colored all other pieces with Copic markers.  
  • The top layers of the sentiments were cut from glittery white cardstock, like the frame.
  • I added some shaker elements to the ice cream for some sparkly "sprinkles"

And to finish the card, I attached all the die-cut elements to my card front using foam dots.  Easy peasy!


Thanks for taking a peek!  Hope your Sunday is extra sweet!

~Kristine


Here are the products I used:


Saturday, June 04, 2022

Father's Day Cupcakes

Hello CottageCutz friends! Thanks for taking the time to stop and visit with us today. It's Mary Marsh here bringing you the Saturday edition of the Blog.

It's new release time!!! We have new dies in the online store. It's our Sweet Treats release with 13 new designs. They are so perfect for any card making occasion you may have. The individual dies are currently 30% off.

Today for your viewing pleasure, I have created a slimline card for Father's Day card using the new Cupcake w/Cherry die and the Cupcake w/Twists die. I am giving this one to my next-door neighbor. He loves sweets of all kinds. I am going to pick him up a cupcake from our local bakery and give it to him along with this card. So, let's get started with some details of how I created my card. 

Design Steps:

I decided to use the Circle Windows Slimline die to display the cupcake images. I cut it in a designer paper that I thought would work for a masculine card. The card base is white, and I rounded the corners of the base with the envelope punch board. It has a corner rounder.

White card Base: 3 1/2" x 8 1/2"
Designer Paper Layer: 3 1/2" x 8 1/2"
Next, I cut the cupcakes in colors I thought are complementing the designer paper. I used chocolate for the swirls and icing because my neighbor is a big chocolate lover. So his "real" cupcake will be a chocolate one. 
I stamped the Father's Day sentiment in the center circle with grape ink. Then I cut a label shape from the Windows Slimline die set and stamped the "sweet treat" sentiment inside that with grape ink. 
Now that all elements are prepared, I am ready to finish up the card assembly. I attached the designer paper window panel to the card base with double sided tape. 
The Cupcakes & sentiment label are attached with dimensional adhesive. I scattered a few grape enamel dots to complete my card.
Well, that's it for me for this week. If you have a father in your life that loves cupcakes this die is just for you. See you next Saturday.

Reminder:  Our YouTube Channel has a new video from Jen Hartsgrove. There is a giveaway for being a subscriber, liking the video and leaving a comment. Click here.

dies I used to create card:


Saturday, July 17, 2021

Toucan Celebrate Your Birthday!

Hello Scrapping Cottage friends! Thanks for taking the time to stop and visit with us today. It's Mary Marsh here bringing you the Saturday edition of the Blog.

IT'S NEW RELEASE TIME! We have a new collection of Slimline Designs. Your slimline cardmaking is going to get a lot easier. We have 20 new designs and they are on sale. You can get each individual die for a limited time 25% off. The dies have appeal for all styles of cardmaking. So check them out and make your selections.

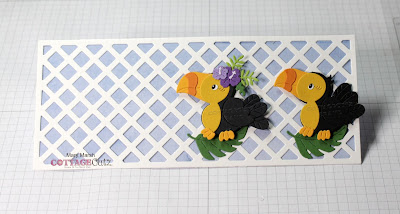
Today for your viewing pleasure, I am featuring the new Lattice Slimline die and paired that with the Toucan from our 2020 Beach & Tropical release. I created a birthday card for my daughter-in-law who celebrates in August.  I have plenty of time to make sure it arrives on time (LOL)! I am notorious for getting cards in the mail at the last minute! So let's get started with some details on how I created my card.

Design Steps:

I started my card by cutting the lattice in white cardstock. For the background I used sky blue designer paper. I am also using a white card base.

Card Base: 3 3/4" x 8 3/4""
Lattice: 3 1/2" x 8 1/2"
Blue Designer Paper: 3 3/8" x 8 3/8"

Next, I started building my outdoor scene. I cut the toucan with cardstock following the packaging colors. I also cut some extra greenery using the Tropical Bouquet die.
For my sentiment I used 3 different stamps and by masking and the help of my MISTI, I stamped on 3 lines in a grape ink. The banner is one of the extra dies that was included in the Windows Slimline die set. 
Now that all my elements are cut I am ready to start the card assembly. I attached the blue designer paper to the lattice with double sided tape. Then the toucans were attached with dimensional adhesive. I have them standing on a green tropical leaf.  
Next, I attached the banner sentiment and the two tropical leaves. 
The Birthday phrase is from the Fairytale Birthday die. I cut two for more dimension in a grape cardstock.
To finish off my card I attached the image panel to the white card base. I added some additional tropical greenery in the corner. I hope I have given you an idea for a way to use this new slimline lattice die with dies you already have in your collection. See you next Saturday. 

Dies I used to create card:


Friday, June 11, 2021

Tickled Pink

Happy Friday!  It's Jeanne posting today.  I am in love with all the little pigs from the new Country Farm release.  This release features the most delightful dies.  Everything from Tractors to Chicks to Cows!  Each die is just full of awesome details and can be used for so many different occasions. 

I started this card by cutting out the Piggy w/ Crate from white cardstock and used Distress Oxide inks to color.

I colored the pig using the Tattered Rose and then used a sponge dauber to add some shading with the Vintage Photo.

I cut a panel 4 1/4 x 5 1/2 inches from floral designer paper.  Using the largest of the Nested Stitched Scallop Squares and Stitched Squares I cut out two white squares.  I used the banner from the Windows Slimline die to cut the striped banner.

I stamped my sentiment centered on the bottom of the plain stitched square and then ran it through an embossing folder to add texture and contrast with the scallops.

I mounted the floral paper on a card base and added the squares.  I tied a coordinating ribbon around the center.

My last step was to add the banner and pop up the pig using foam dots.

This little pig is super cute and can be used for many occasions.  I picked this sentiment since I could used it as a congratulatory or birthday card.

Be sure to visit the online store where the new release is on sale for a limited time.

Dies used:


Thanks for visiting today. I hope you have a fun and creative weekend!


Saturday, May 29, 2021

Patriotic Gnomes

Hello Scrapping Cottage friends! Thanks for taking the time to stop and visit with us today. It's Mary Marsh here bringing you the Saturday edition of the Blog.

We have a brand new release of Country Farm dies. They are on a great limited time sale. You can get the entire release of 16 new designs for under $120. That's a savings of 60%. The individual dies are on sale at 25% off. The DT will begin showing samples with these dies next week. 
 
We are also having a Memorial Day sale. You can get some great savings of up to 70% until June 2. So now is the time to get your wish list out and pick up some new dies. The release of Slimline dies are still on sale at the online store. They just make your slimline cardmaking so much easier. There are  9 Slimline designs and they are on a 25% off sale. 

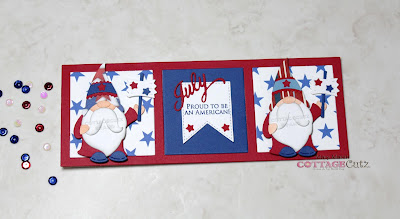
Since this is a holiday weekend,  I am featuring a patriotic card in the slimline design. I focused on a July 4th theme since that's a big celebration for the US. I used the Flower Power Tomte dies from our 2020 Gardening release collection and dressed them in patriotic colors. I also used the Windows Slimline die.  

I decorate my home in a patriotic theme that I leave in place until mid-August. So this card will be part of my decorations. So let's get started with some details on how I created my card. 

Design Steps: 
I started the card off by selecting my designer paper. I wanted a patriotic theme but nothing that would overpower the gnome images. My patriotic paper is limited and I didn't want to make a run to my local Michael's store so I looked online for something that I could download for free. Yay- I found some on Pinterest. And it printed out nicely as well.
 
So I cut the windows slimline once from the designer paper and then again in a red and blue cardstock. My card base is white and measures 6" x 8" and scored at 3". It's the same size as the window frame. 
Next, I cut the gnome images in red, white and blue cardstock. I didn't want them both to be exactly alike so I cut their hats in different designer papers and cut the hat bands in two shades of blue cardstock.
For the center panel, I decided to make that a solid color. I used the banner that comes with this slimline die and stamped my sentiment in blue ink. The July phrase is part of the Calendar Months die from our Valentine 2017 release, but is currently out of stock. The stars are from the Circus Ringmaster die. 
Now that all my elements are cut I am ready to start card assembly. I attached the red window frame to the white card base with glue dots. Then I attached the inlaid panels with double sided tape.
To finish off my card, I added my patriotic gnomes and secured them with dimensional adhesive. I decided to use the garden flags that come with the die. In the red, white and blue I think they look like flags that you would wave at a parade. 
Well, that's it for me for this post. See you next Saturday. Have a great holiday weekend.

dies I used to create card: