Showing posts with label Valentine. Show all posts

Saturday, January 12, 2019

Love Cupcake (new die)

Hello Scrapping Cottage friends! Thanks for taking the time to stop and visit with us today. It's Mary Marsh here bringing you the Saturday edition of the Blog. Not sure what's happening where you are but it's cold and snowy here in Pittsburgh. One of those perfect days to enjoy some hot chocolate and do some crafting. 

We have a new release of Valentine & St Patrick Day dies in the online store. Each one is cuter than the next and they are on sale for a limited time at 25% off. There will be a group post next week and the team will showcase all of the Valentine dies. Today, I have for your viewing pleasure a Valentine card using the Love Cupcake die.

So let's get started with some details and a tutorial on how I created my card.

Step 1: I wanted to stick with the traditional Valentine colors of red & pink with black accents for my card. I chose some heart themed designer paper for my background layer.
Black card base: 5 1/2" x 4 1/4"
Red Layering Panel: 5 3/8" x 4 1/8"
Designer Paper: 5 1/8" x 3 7/8"

Image Panel: 3rd largest stitched square die
Black Layering Panel: 2nd largest square set die

I cut the cupcake from red and pink cardstocks. Love all the detail on the cupcake base as well as the icing. I adhered this with Ranger multi medium matte.
Step 2: Now that all the panels and image are cut, I am ready to start card assembly. I stamped the sentiment in black ink on the image panel before I attached my cupcake. Used my MISTI for placement.
Secured the cupcake to the image panel with double sided tape. I attached the love word after the cupcake was down because I didn't want it to cover the sentiment. I cut a few extra red hearts and added them to the panel just to balance out the layout. 
I attached the designer paper panel to the red base. I wanted something else so I decided to use some black velvet ribbon. I thought it balanced off that side of the card. 
I decided to angle the image panel for added interest. It's attached with double sided tape. 
Completed my card by attaching the black card base. And that completes my card and post for this week. I hope I have given you an idea for a way to use this new die. See you next Saturday!

dies I used to create card:
http://www.scrappingcottage.com/cottagecutzlovecupcake.aspx
http://www.scrappingcottage.com/cottagecutzstitchedsquaresetbasics.aspx
http://www.scrappingcottage.com/cottagecutzsquaresetbasics.aspx


Saturday, January 13, 2018

Valentine Cups of Love

Hello Scrapping Cottage friends! Thanks for taking the time to stop and visit today. It's Mary Marsh here bringing you the Saturday edition of the Blog. Hope you are staying warm during this cold snap that is currently with us.

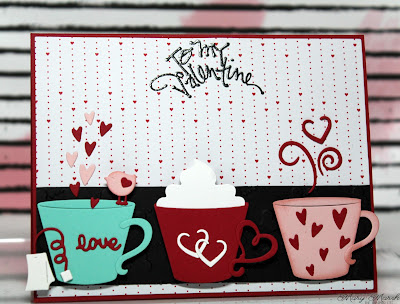
The winter months are so perfect for enjoying a hot cuppa and doing some crafting. Don't you agree? And that's what I have been doing this past week. Today my card is featuring some older Valentine dies. I used the cups of love dies to make this card. So let's get started with the details of how I created my card.

Step 1: I started my card this week with my layout. That's always a good starting point for me. It gives my Mojo a jump start. Splitcoaststampers had this sketch that worked really well for the card I had in mind.
Step 2: Once my layout was decided upon, I chose my card colors. I kept with the traditional red and white with a black accent for the card base and layers. For the cups I decided to add some pink and a Caribbean blue cardstock.
I had a pack of older Valentine themed papers and chose one of the patterns for my card. I used a hearts embossing folder on the black panel for interest.
Red Card Base: 5 1/2" x 4 1/4"
Patterned Paper Layer: 5 3/8" x 4 1/8"
Black embossed layer: 5 3/8" x 1 1/2"
 
Step 3: On this step I cut the cups and the various embellies to decorate them. I assembled them and then took my photo. I attached everything with Ranger multi medium matte.
Step 4: Started my card assembly. Adhered the card base panels with double sided tape.
I attached the cups to the black embossed panel with dimensional adhesive.
Then I added the steam and the ascending hearts. On the blue cup, I added the love word from the Love Bow & Arrow die. Did you catch the cute little perched birdie?
Step 5: Since I was stamping my sentiment directly on the patterned paper, I heat embossed. Used pigment ink and black embossing powder. I wanted the sentiment to stand out.
That completes my card for this week. I hope I have given you some inspiration for the Valentine cards you may be creating. All the dies I used on today's card are available in the online store.
 
Have a great week and I will be back again next Saturday.
 
 
Dies I used to create card:
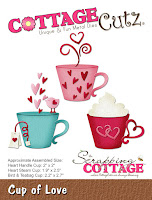
http://www.scrappingcottage.com/cottagecutzcupoflove.aspx
 
http://www.scrappingcottage.com/cottagecutzlovebowandarrow.aspx


Thursday, December 28, 2017

Valentine's Day!!

Hello Everyone!

It is Pam creating with you today! I hope you had a wonderful Christmas celebration!  I can't believe I am saying this but I am starting on my Valentine's!!! The little bear I am using is actually from our Get Well release.  But she is very versatile and so is the sentiment. They are perfect for Valentine's Day cards!


Design Steps:

 1.  Cut an A2 white card base then on the front flap cut off a 2 inch strip.  Cover the inside first with a red piece of card stock then a piece of DP.  Next on the left side of the inside cut a 2 x 5 1/8 piece of white card stock and glue inside to the left

2.  Using the Stitched Cupcake die set cut out 4 stitched red hearts and glue 3 of them next to the white panel on the inside of the card.  Then glue the remaining heart to the white panel as shown below
 3.  Next cut a piece of red card stock for the front flap at 2 1/8 x 5 3/8 then layer on a piece of DP at 2 x 5 1/8. Glue to the front
4.  Use the Sweetheart Doilies die and cut out the largest circle in white and then the next largest in red glue together
 5.  Cut the sentiment Sending Hugs in red using the Sending Hugs Bear die
5.  Glue the sentiment to the front flap of the card and also attach the heart doily

6.  Using the Sending Hugs Bear die cut out the bear in brown, the flower and bow in red, the stem in green and the tummy in tan.  Shade all the pieces and assemble them add black rhinestones for the eyes


 7. Place pop dots on the back of the bear and place the bear onto the heart doily


Cottage Cutz Products!


I love how the cute bear made this Valentine extra special!! Hope you give it a try!

Blessings
Pam

Thursday, July 27, 2017

Love You Forever!

Hi Scrapping Cottage Fans! It is Pam sharing with you today.

There is another great release of new dies over in the online store. The Nested Shapes with 17 designs as well as a Wedding Release with 20 designs. Janet (our video artist) has put together a video showcasing all the new nested shapes dies. Just click on the photo below to be taken to the CottageCutz YouTube channel.
https://youtu.be/2LOQcFflcIE

Now onto my card. I am featuring two different new release dies that make beautiful wedding, anniversary or Valentine cards.  I love the vintage feel to this wonderful bird die.  All the swirls and gorgeous detail is so pretty.


Designer Steps:
 1.  Start with a A2 Vanilla card base cut a slightly smaller piece of deep red card stock and glue to front.  Cut a piece of 4 x 5 1/4 piece of designer paper and glue to the red
 2.  Using the Nested Stitched Scallop Circle set place the largest circle onto the cutting platform and then the second to the largest inside the largest and cut a open scalloped circle
 3.  Cut the vine on dark green card stock using the Fancy Doves with Vine and then cut the flowers in the deep red
 4.  Glue the red flowers to the tips of the vine
 5.  Glue the open scallop circle to the card as shown just slightly of center.  The glue the vine down as shown
 6. Using the Fancy Doves with Vine cut out the two doves on designer paper then ink the edges with a distress ink

7.  Use a sharping tool to give the doves some dimension then pop them onto the vine add pearls and your card is complete
Cottage Cutz Products


I hope you give these new dies a try.  They both are so versatile! 

Blessings and thanks for stopping by!


Pam