Showing posts with label Stitched Rectangle Set. Show all posts

Wednesday, February 19, 2020

Happy Birthday

Hello!  This is Sukie and today I'm sharing a birthday card created with the new Spring dies.  In my family we have several birthdays over the next few months so I converted the sweet Carrot Farmer Truck to a farm truck loaded with flowers from the new Spring Blooms die set.
I found some bright and cheery papers in my stash and used them to create my card base that coordinated perfectly.
Next, I cut out the truck and added the flowers to the back.  I used the Route 66 sign pieces for the sentiment and for an embellishment. The card panel is from the Stitched Rectangle set and the circle is from the Circle set.
The card panel and circle were adhered on top of my card base.  The truck was nestled inside the circle.
My first embellishment was placed at the top of the panel leaving enough room for the sentiment arrow.
Once I added the arrow, a set of coordinating enamel dots were placed vertically along the edge of the card panel.  The embellishments were the perfect finishing accents on this fun and festive card.
Here are the dies used on my card, available in the store:

Wednesday, January 08, 2020

Holiday Wishes & Gingerbread Kisses

Hello!  This is Sukie and today I'm sharing this sweet card. I have one last card to share from the Christmas holiday created with the adorable gingerbread couple from the Gingerbread Baking Set.
The couple was die cut in card stock along with 4 frames: Stitched Wide Rectangle, Nested Stitched Scallop Rectangle, Stitched Rectangle and the Rectangle set.
The sentiment is from the Scrappy Moms (retired) Winter Wishes stamp set.  I punched holes on each side of the sentiment tag and tied it some Candy Cane Trendy Twine.
The frames were layered together and adhered to the card base. The different sized frames nested inside one another perfectly.
The first gingerbread was angled a bit and placed in the left hand corner of my card directly under the sentiment.
The second gingerbread was adhered directly opposite of the first which completed this festive card.
Here are the die sets used on my card available in the store:


Saturday, August 10, 2019

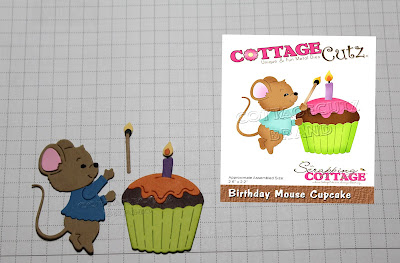
Birthday Mouse & Cupcake

Hello Scrapping Cottage friends! Thanks for taking the time to stop and visit with us today. It's Mary Marsh here bringing you the Saturday edition of the Blog. 

We have a brand new release of Birthday dies in the online store. There are 25 new designs and they are currently on sale at 25% off. This release is filled with cute little whimsical animals, birthday cakes, cupcakes and birthday phrases. Everything you need to create some outstanding birthday cards.

Today, I am featuring the Birthday Mouse Cupcake die. I needed a birthday card for a 4 year old boy and these new images are perfect for kids as well as adults. So let's get started on some details on how I created my card. 

Step 1: I selected my designer paper first this time around. I wanted something festive with balloons and presents, and I found the perfect pattern in my collection. The card base is an 1/8" longer and wider than an A2 card. I wanted more of the card base to show around the designer paper.
Pacific Point (royal blue) Card Base:  4 3/8" x 5 5/8"
Designer Paper Layer: 4 1/8" x 5 3/8"
Pumpkin Layer: 2 11/16" x 3 11/16" (2nd largest rectangle die)
White Image Panel: 2 1/2" x 3 1/2" (3rd largest stitched rectangle die)

Step 2: Next, I cut the mouse and cupcake image. I used the colors from the designer paper and then added a couple. I wanted to keep it more on the boy side with the colors. I used pacific point for his shirt, lemon-lime twist for cupcake holder, pumpkin for icing and choc chip for cupcake.
I stamped my first sentiment at the top of the image panel. It was a bit too long for the panel so with the help of my MISTI, I stamped on 2 lines. The first stamping was a bit light so without moving the stamp I reinked and stamped again. That's the great thing about a MISTI, it allows you to stamp an image multiple times.
Since I didn't want the images "floating in air",  I decided to cut a flag in pacific point cardstock and stamp another sentiment. I used the MISTI again just in case I needed a 2nd stamping and it turns out I did.
Step 3: Now that all the card parts and cut and stamped, it's time to start assembling. First, I attached the designer paper to the card base with double sided tape. 
Next, I attached the image panel to the pumpkin layer. 
For the images, I used dimensional adhesive. I wanted them lifted off the panel for added interest and dimension. 
To finish up my card, I attached the image panel to the card base and again I used dimensional adhesive. I cut a few streamers with the Festive Birthday Greeting die in pumpkin and red cardstock and scattered them on the designer paper. 

Well that's it for me for this post. I hope I have given you an idea for this cute little mouse with his cupcake. See you next Saturday!

dies I used to create card:


Saturday, August 03, 2019

Hedgehogs Selfie Card

Hi, Janja here with you.
This week I have a cute birthday card for you with a hedgehog's selfie.


- CottageCutz dies: Birthday Hedgehog, Stitched Rectangle Set, Stitched Square SetSending Hugs Bear
- card base: 4.25 x 5.5" (10,8 x 14 cm), folded
- patterned paper: 4 x 5.20" (10,2 x 13,2 cm)
- colored cardstock
- colored ink pads
- self-adhesive foam pads, glue

First, double cut out the hedgehog with a balloon.
My hedgehogs are cut out of colored cardstock and the edges are colored with colored ink pads.


For a polaroid frame, use a rectangle and a square die. Cut out four frames.


Attach the hedgehog on the back of the white frame. Use scissors to trim the hedgehog around the frame. Paste the remaining frames together.


Insert a blue background at the back of the frame. Attach the other hedgehog and balloons to the background with self-adhesive foam pads.


Cut the sentiment out of white cardstock. Prepare a card base and a piece of pattern paper.


When the card was completed, I drew white lines to the balloons.


Thanks for stopping here and happy crafting.
Janja


Tuesday, May 07, 2019

Somewhere over the rainbow

Hi, Janja is here with you.
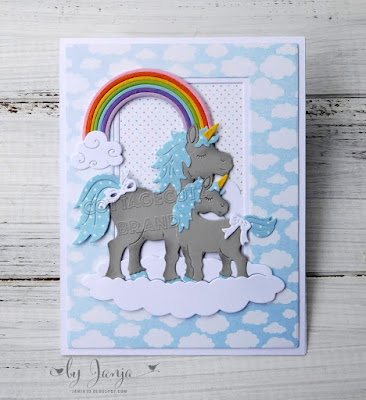
I found an inspiration for today's card in a lullaby for babies. I made a baby boy card with sweet unicorns.


- CottageCutz dies: Rainbow With Clouds, Sweet Unicorns, Fairytale Castle (cloud), Clouds & Sun, Rectangle Set, Stitched Rectangle Set
- white card base: 4.25 x 5.5" (10,8 x 14 cm), folded
- patterned paper: 4 x 5.2" (10,2 x 13,2 cm)
- white and colored cardstock
- gray ink pad
- glue, double-sided adhesive tape, self-adhesive foam pads

From colored cardstock die-cut both unicorn. Add the shading on the edges with ink pad and brush. Put all the pieces together with a glue.


Die-cut the rainbow and clouds.


Trim selected patterned papers and a white cardstock.
With two differently large dies, first die-cut the rectangle into the patterned paper. Place it on a white cardstock and die-cut a smaller rectangle.
Paste the clouds into the background and attach the frame.


Now we have everything ready to finish the card.


Have a nice day. 
Janja