Showing posts with label Stitched Oval Set. Show all posts

Wednesday, May 13, 2020

Good day, Sunshine!

Hello!  This is Sukie and today I have a project to share for my design team post.  I'm showcasing a couple of dies from the fabulous new Gardening release.
I cut out all of my pieces from the Puppy in Garden Cart and the Planter Box & Seeds die sets.  The oval is from the Stitched Oval Set.
I selected a whimsical floral pattern for my card panel and drew out the different colors for my die cuts.  A small strip of paper was punched with the Fiskars Scalloped Sentiment punch.
I created my card base by layering the pieces together and adding a stamped sentiment to the punched border.  The garden cart was centered inside the oval and adhered on my card.
Next, I tucked in the greenery along the punched border.  The seed packets and garden sign were nestled in between the greenery.
The fussy cut flag was adhered along the top edge of my card adding an extra pop of color to the gardening scene!
Here are the dies used on my card, available in the store:

Tuesday, February 25, 2020

DT Samples - Spring Day 2

Hello Scrapping Cottage friends! Happy Tuesday to you! Thanks for taking the time to stop and visit today. We are sampling DT cards using dies from the new Spring dies release.

They are in the online store and 25% off for a limited time. There are 27 new dies in the release and each one is cuter than the next. They will be perfect for your Easter and Spring card making. We thought you might like to have some new and creative ideas for your Easter or Spring cards using these new dies. Our cards today are all about the florals. So let's get started with the cards for today.

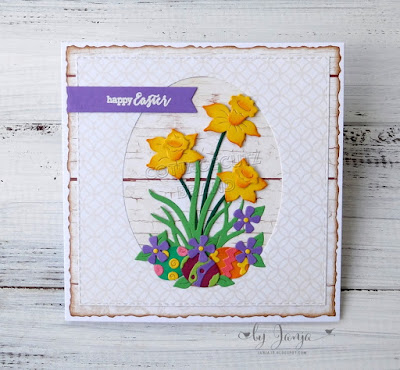
Card 1: Our first card today is from Janja Albreht. She used the new Spring Daffodils & Eggs die to create a beautiful Easter card. What could be more perfect for an Easter card than daffodils and colored eggs?  

The background designer paper presents the illusion of these daffodils growing against a worn fence. And, the use of the oval is giving us a peek into this idyllic scene. She added a purple flag and a white embossed sentiment to complete this lovely card. 

Card 2:  Our next sample for today is from Pam MacKay.  She is featuring the new Hello Spring Bloom die and created a cheerful birthday card. Take notice of the cute little snail on the card. 

Her choice of flower colors, designer paper and ribbon definitely have a spring vibe going on. She cut her happy phrase in white cardstock to make it stand out against the green background.  

She completed her card with the addition of some yellow satin ribbon and bow. The recipient of this card will definitely have a keepsake.  


Well, that's our samples for today. I hope the team has given you some fresh ideas on ways to use these new Spring dies. We will be back again tomorrow with more samples from the team. And, if you are thinking of getting any of these new dies, they are on sale for a limited time in the online store

dies used to create cards:


Saturday, October 05, 2019

Santa & The Red Nose Reindeer

Hello Scrapping Cottage friends! Thanks for taking the time to stop and visit with us today. It's Mary Marsh here bringing you the Saturday edition of the Blog. 

We have the new release of Christmas Part 2 in the online store and they are all in stock and available for delivery. There are 34 new designs in this release. 

This release has something for everyone. So if you prefer a more religious tone to your cards- we have you covered. If you like a more whimsical design featuring Santa, reindeer, gnomes, moose or even a hot chocolate theme you will find some really cute dies. The DT will begin showing card samples using these dies shortly.

I actually do a combo of religious and whimsical for my Christmas cards. Today, for your viewing pleasure, I am going whimsical with the new Santa & Reindeer w/Sleigh. It's from the Christmas Part 1 release. So let's get started with some details on how I created my card.

Step 1: I started the card with a layout this week. I had this sketch saved on Pinterest and thought it would work well to showcase Santa, some designer paper and ribbon. I like using ribbon on my Christmas cards. I think it adds a nice touch. 
I changed the dimensions on my card panels from what they are using in this sketch. I needed a larger oval die to accommodate the Santa image so I made all the panels larger. 
Red Card Base: 5 3/4" x 4 1/2"
Coastal Cabana Layer: 5 1/2" x 4 1/4"
Designer Paper Layer: 5 3/8" x 4 1/8" 

For the oval, I used the 2nd  largest stitched oval die. It's approximately 4" x 3 1/8". I embossed it with a snowfall embossing folder.
  

Next, I cut the images in a variety of cardstocks. 
Step 2: I am ready to start card assembly. I attached Santa to the white oval embossed piece with a combination of double sided tape and Ranger multi medium matte. 
My designer paper is attached to the cardstock layer with double sided tape. 
For the center long panel, I used a red ruched ribbon. I attached the ribbon with glue dots. 
Next up I added the oval image panel to the designer layer panel.I did use dimensional adhesive on the oval to lift it slightly off the ribbon.  I scattered a few red enamel dots for added interest.
I wanted a sentiment on the front of the card but I didn't want to stamp directly on the cardstock. So I decided to use this Merry Christmas sentiment from an older CottageCutz die. It's the Merry Christmas w/Deer Family.

I added the image panel to the card base and that completed my card.

I hope I have given you a bit of inspiration for a way to use this new die. I know it's been a popular one in this release. 
I will be posting a card on Monday using another of the dies from the Part 1 release.

Dies I used to create card:


Saturday, February 16, 2019

Cross with Spring Lilies (new die)

Hello Scrapping Cottage friends! Thanks for taking the time to stop and visit with us today. It's Mary Marsh here bringing you the Saturday edition of the Blog. 


We have a new release of 36 Spring dies in the online store. There are a variety of designs so perfect for Easter or Spring cardmaking. Take a look in the store you definitely won't be disappointed. 

For my card today I am using the new Cross with Spring Lilies die. This is a perfect die to reflect on why we celebrate Easter. 

Step 1: I started my card this week with the layout. I am using a sketch that I had saved on one of my Pinterest boards. I thought it would work great to show off the cross and allow me also to use some background designer paper. This particular sketch gave all the dimensions for the layers so it made creating the card a bit easier.
I just had to select my card colors and I decided on shades of purples and greens. 
For the center panel I used beige mesh ribbon and a light green seam binding. For the oval panel, I used the 3rd largest oval and stitched oval dies. 
I cut my cross using 2 shades of purple cardstock. I cut the lilies in white and then sponged the edges with a medium purple ink. Used Ranger multi medium matte for the cross and the lilies. 
I decided to put a single word sentiment on the image panel. I stamped it in the purple ink that matches my cardstock. 
Step 2: Now that all the panels, card base and cross are cut, I am ready to start card assembly. I used double sided tape for all the panels. I secured the ribbons with glue dots. To finish off the card I added a few sequins to the corner and the image panel.
Well, that's it for me for this week. See you next Saturday! This is also President's Day weekend and there is a sale on selected CottageCutz dies. Check it out here

dies I used to create card:


Wednesday, November 07, 2018

Fall Pumpkins

Hello, this is Sukie sharing a card for my guest designer post today.  I adore Cottage Cutz dies and the Autumn release is one of my favorites with so many inspiring products!
I found the perfect fall themed papers in my stash from the Recollections Harvest Delight 6x6 paper pack. I wanted to break up the background pattern so I cut a couple of strips of paper from the same paper pack in the solid colors. All of the pieces were adhered with Glue Dots Adhesive Gluetape to the kraft card base.
Next I cut out the pumpkins and leaves from colored card stock using the Pumpkins & Vines dies. The pumpkins were inked on the edges for added dimension.  I cut out the oval using the Stitched Oval Set and also inked it on the edges.  The whimsical "fall" sentiment is from the Fall Phrases die set.
I adhered the oval to the base of my card which is a standard A2 size card (4.25 x5.5) and layered it with the set of pumpkins.  The pumpkins were overlapped a bit so they would fit perfectly on my card.
To finish off my card, the leaves were anchored around the pumpkins along with the sentiment.  The rustic look of this card is definitely the look I was trying to achieve.
The dies I used for my card are available over at Cottage Cutz: