Showing posts with label Stitched Circle Set. Show all posts

Saturday, July 16, 2022

Two Birthday Wishes Cards

Hello CottageCutz friends! Thanks for taking the time to stop and visit with us today. It's Mary Marsh here bringing you the Saturday edition of the Blog.

It's new release time!!! We have new dies in the online store. It's our Strawberries and Bees release with 16 new designs. You can pick up the individual dies are 30% off.

The new dies are perfect for all your cardmaking needs. They would work for so many occasions as our design team have been showing.

Today for your viewing pleasure I created 2 birthday cards. That seems to be the most needed card of the ones I send. So, I can never have enough of these. I have a big extended family plus the friends I send birthday greetings to. 

I am featuring the new Strawberry Treats and the Flowers die. I used the same CAS layout for both cards. Just changed up the designer papers to get a different look. A big plus is this design would be easy to re-create if you had to make multiples.  Let's get started on some details of how I created my card. 

Design Steps: 

I picked the colors for the first card and then chose my designer paper & card base. 
 
Light purple card base: 4 1/4" x 5 1/2"
White border strip: 1/4" x 5 1/2"
Designer Paper: 3 1/4" x 5 1/2"

Attached to the card base with double sided tape.
Next, I cut the cake image and the sweetest phrase in colors that complemented the base and designer. Instead of the strawberry that is part of the cake design I decided to add flowers. I didn't think a red strawberry would look good with the shades of purple I was using. 
I decided to place the images on a circle. I had this one in my supplies already cut from the Wacky Stitched Circle die. It's the 2nd largest one - approximately 3 1/8".  I attached the circle with double sided tape and the images with dimensional adhesive.  
To finish off this first card, I attached the sweetest phrase, stamped an additional greeting on a banner and added a few light purple gems. 

Now for my second card. This one is using the same layout and color scheme. My designer paper is a  different pattern but the same light purple shade. It's called fresh freesia. And I used the Stitched Circle die on this card. 

The flowers are cut in shades of purple. The Sending phrase is from an older Black Friday release. release - Sending Hugs. It looks like it's no longer in stock, but you could use the Sweet phrase that I used in my first card.  
I attached these images with a combo of double-sided tape, glue and dimensional adhesive. I also used a different sentiment on this card and scattered grape enamel dots to complete it. 
Well that's it for me for this post. See you next Saturday. 

Dies I used to create card:


Saturday, May 28, 2022

Fountain Sundae - Double Easel Fold

Hello CottageCutz friends! Thanks for taking the time to stop and visit with us today. It's Mary Marsh here bringing you the Sunday edition of the Blog.

It's new release time!!! We have new dies in the online store. It's our Sweet Treats release with 13 new designs. They are so perfect for any card making occasion you may have. The individual dies are currently 30% off.

We are also having a big Memorial Day sale with savings of up to 70% off. Check the online store

Today for your viewing pleasure, I have created a birthday fun fold card. This fold is called a double easel fold. I am using the new Fountain Sundae die for my card. This is a birthday card for a friend, so I decided to add a "gift card" holder. I am giving her a gift card to a local ice cream parlor. They make the most delicious SundaesSo, let's get started with some details of how I made this card.

Design Steps:

Since I knew the fold I was going to use for my card, I picked my designer papers and coordinating cardstock. I found this fun and festive paper that I thought was perfect for a birthday card.  The ice cream cone paper was a perfect addition to my fun fold. 

The card base is 4 1/4" x 11" and I scored it at 2 3/4" then at 5 1/2". The cardstock color is a rich blackberry shade. I am using designer paper that is the same color. 
You fold it in half at the 5 1/2" score- this makes a valley. Then fold the 2 3/4" score back- to make a mountain. See photo below
You fold it in half at the 5 1/2" score- this makes a valley fold. Then fold the 2 3/4" score back- to make a mountain fold.  I used ombre designer paper in the blackberry color. Cut it at 4" x 2 1/2". All attached with double sided tape. 
Next, I cut a piece of the blackberry cardstock at 3 1/2" x 9" and scored at 4 1/2". This is the card front and attaches to the back panel and over the ice cream paper. 
I used another ombre designer paper on this panel measuring 3 1/3" x 4 1/4". Then attached to the card base with double sided tape. 
 For this panel on the inside, I used more designer paper - 3 1/4" x 4 1/4" to create my gift card holder.  I just used a 1 1/2" circle punch to cut a notch to slip the gift card in. I attached with Art Glitter Glue on the bottom and about 3/4 of the way up the sides. 
I cut a piece of white cardstock the same size and stamped my birthday sentiment.  
Attached this panel to the card inside with double sided tape. 
Now for my fountain sundae image. I cut in cardstock that coordinated with the designer paper. I decided to attach it to a circle with dimensional adhesive. I used the 3rd largest Circle die. I stamped my sentiment in coral ink.
Now for the easel "holder". I used the Stitched Circle die and cut in blackberry cardstock. Cut a smaller one with the Circle die and added a heart. To complete my card, I scattered a few sequins.  
Here is more of a side view of this fun fold.
And then what it looks like completely open. I decided to add another piece of the ice cream designer paper.
I hope I have given you a fun idea for a way to use this new die. See you next Saturday!

Reminder: Our YouTube Channel has a new video from Marla Harris. There is a giveaway for being a subscriber, liking the video and leaving a comment. Click here.

Dies I used to create card:


Friday, February 04, 2022

Cute Bunny Peeker Bookmarks


Happy Friday Cottagecutz fans. I hope you’ve had a lovely week and are looking forward to the weekend. I shall be trying to fit in as much crafting as possible this weekend as I have a knee op on Monday 
(deep joy!)

Anyway, back to the project in hand,

I really wanted to use some of the longer nested shapes and then I thought, bookmarks! I used the 7” ‘Scalloped Stitched Rectangle Slimline’ and cut it out in 3 colours twice. I wanted to the bookmark have some heft so it lasted well so I stuck them together


Next I printed out my nieces names and popped their names on white card. Once printed I cut them using the 6 and 1/4” ‘Nested stitched Rectangles’ and then glued them onto the main tag


Next I cut from the ‘Miss Spring Bunny’ die, 3 heads and 3 sets of arms to be used shortly. I used a matching bow in the bunnies ear too


I wanted a focal point to the bookmark and something that the page of your book could link onto. So I cut out the 2nd largest ‘Nested Stitched Scalloped Circles’ twice in each of the main colours. In one of the scalloped circles I cut out the middle so that it will look like the bunny was peeking over the circle. I also cut out 3 white nested circles 

I stuck the white circle to the scalloped circle and then the rim on top of that


So the bunny was attached to the scalloped circle then attached to the end of the main bookmark. Make sure you use 3D foam pads so you have that give for the bunny to sit on the page you mark in your book

I added the little chick to each die and also a diamanté to finish on the bow


 I really hope that you like the project for today and have inspired you to make little gifts for Easter.
Have a wonderful weekend and I will see you next week
Hugs
Wendy

Dies I have used:


Don’t forget to check out our YouTube page. I know Theary has made a wonderful project this week


Saturday, May 30, 2020

Puppy Hugs


Hello Scrapping Cottage friends! Thanks for taking the time to stop and visit with us today. It's Mary Marsh here bringing you the Saturday edition of the Blog.

We have a brand new release of dies in the online store. This one is garden themed and has 19 new designs. These new dies are perfect for Mother's Day, Father's Day, birthdays, thank you, or even a thinking of you card for the person who loves to garden. 

For my card today, I am featuring the new Puppy in Garden Cart die and created a thinking of you card for one of my dog loving friends. This one could even be used for a birthday card with a birthday sentiment on the inside. So let's get started with some details on how I created my card.

Design Steps:

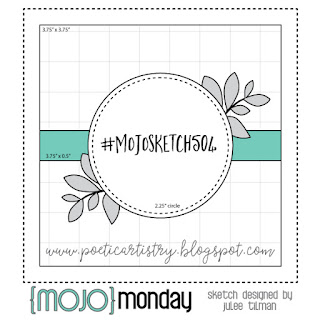
I started this card with my sketch. I had one saved on my Pinterest board that I thought would work well with this die image. It calls for a square shape that I also liked. It changes things up just a bit. 
Once the layout was decided on I chose my card colors. I decided to go with a medium blue shade and use the matching gingham designer paper. 
Card Base: 4 1/2" Square
Gingham Designer Paper: 4 1/4" Square
I cut the images in various shades of cardstock. For the garden cart I used a brown striped designer paper for added interest. 
The circle is the 2nd largest from the Stitched Circle set. I used a cloud stencil to sponge in some background clouds with tumbled glass distress ink. Sponged some mowed grass distress ink at the bottom of circle for a grassy area.
The "Big Hugs" sentiment  is stamped in a dark blue ink.
Now that everything is cut and stamped, I am ready for card assembly. Started by attaching the images to the circle using double sided tape. 
For the rectangle strip across the middle, I decided to use ribbon that matched the designer paper. 
I used dimensional adhesive to secure the image circle. I wanted it lifted slightly off the designer paper. The side leaves are cut from the Planter Box & Seeds die.
To complete my card, I attached the image panel to the card base. Scattered a few blue glitter enamel dots - just because I like using them on a card (lol)!! 

Well, that's it for me for this week. I will be back on Monday with a Father's Day card using the new Potting Shed die. 

Dies I used to create card: