Showing posts with label Stitched Alphabet. Show all posts

Thursday, August 31, 2023

Frankie's Night Out

Hello Friends,

It is Pam sharing with you today!

I am doing another Halloween card for today's crafty share.  This card is featuring the Trick or Treat Frankie die.  Frankie's balloon puts a smile on my face! I like Halloween cards with bright colors and fun sentiments.


Design Steps:  

1.  Using the Trick or Treat Frankie die cut out the pieces in the following colors of card stock: yellow, orange, green, black, white, dark gray, and purple (I colored his nose with a Copic marker to make it stand out a little more)
2.  Assemble Frankie using a fine tip fast drying glue
3.  The card base is a gate fold.  Cut a piece of black card stock 8 1/2 x 5 1/2.  Score at 2 1/8 then fllip the card over and score at 2 1/8 again
4.  Using the Double Stitched Oval die (Second from the largest) cut out a piece of spider DP.  Using the Pierced Oval die (Second from the largest) cut out a piece of black card stock.  Cut out 2 purple panels 2 x 5 3/8.  Cut out 2 DP panels 1 7/8 x 5 1/4
5.  Glue the purple panels to the front of the black card base and then add the DP panels

6.  Glue the Spider DP oval to the black oval. Glue Frankie to the lower half of the oval as shown above

7.  Place glue on the left side of the Frankie oval making sure you are only getting glue on the left front panel.  Use the Stitched Alphabet die and cut out EEK in black.  Then glue to the top of the oval again making sure you don't put glue on the part of the K that is hanging over the right panel

8. I used a piece of purple on the inside measuring 4 1/8 x 5 3/8 and glued a piece of white on top measuring 4 x 5 1/4.  I then added the Happy Halloween sentiment and your card is complete


We have more inspiration on our YouTube Channel check it out HERE

Thanks so much for stopping by!  And I will see you next Thursday.

Blessings and Take Care


Tuesday, August 08, 2023

Sorry Card With Candy Bouquet

Happy Tuesday crafty friends,
Today I am sharing a fun card I created with some terrific Cottage Cutz dies. Here is what I made.
I created this fun candy bouquet along with this super colorful and fun card.

Here is a closer look at my card. It is a bit larger than my normal size card. It is 5x7 side folding. I felt I owed one of my coworkers an apology and wanted to make a cheerful card to make the best of a potentially awkward situation. She loves chocoloate so I decided a candy bouquet of mini candies would be a great addition to the card.


Here is a close up of the sweet little daschund die cut. I set him on the wacky stitched square. I added a mat of some patterned paper. I set him on some grass. I also added a smaller wacky stitched square with some cute little flowers. I cut all my die cuts out of white paper and then used my markers to color them all in. I created a little boy daschund as my coworker has a little boy daschund.

Here is a closer look at the super cute wood sign. I was going to write something on the sign but decided to leave it plain. I added it to a larger wacky stiched square. I used a coordinating patterend paper for a mat. I also added a fence and some more of the grass. I added some lines on the fenceto make it look like a little older wood.

Here's a closer look at the word SO. The letters are all a part of the stiched alpha die. I added a sweet little lady bug to the top of the letter "O".

Here is a closer look at the word "Sorry". Like all the others, I added it to a wacky stitched square with a patterned paper mat. I added some more of the cute flowers to the letters for an extra decorative touch.

And here is a closer look at the word Very. I again added some flowers and I also added some with ink to the stitching that is already on the dies. As I mentioned before, all of these die cuts were cut from plain white cardstock. I then used my various markers to color them in. I tried coordinating the colors with the patterened papers.

Here is one last look at the candy bouquet. To make it, I went to my local dollar store and hit the candy isle. I bought a variet of candies. I  know my co-worker loves chocolate so I figured I would hit some candy that she likes...lol. To make the bouquet, I bought some wood skewers at the dollar store and then used some double sided tape to add the candies to the skewer. I bought a floral foam square from the same dollar store and then a little plastic square container from there. I added the foam square to the inside of the vase and then began poking my skewers into the foam. I added a little foil tissue to the base to cover up the foam and other mechanics and it was all done! I have to say,  she loved it!


Dapper Dachshund


Spring Chicken
For the sign, little flowers and lady bug


Fence & Grass


Wacky Stitched Square


Stitched Alphabet


Well that about covers it for today. Be sure to stop back by and see what the rest of the super creative designers have to share with you. Don't forget to head over to the Cottage Cutz You Tube channel! So much great inspiration.

Until the next time, have a wonderfully crafty day!

Sunday, July 02, 2023

July 4 - God Bless America

Hello CottageCutz friends! Thanks for taking the time to stop and visit with us today. It's Mary Marsh here bringing you the Sunday edition of the Blog.

We have a brand-new release in the online store. It's our Patriotic 4th of July release with 12 amazing patriotic designs. You can still pick up the individual dies at 30% off

If you love making patriotic cards to honor a veteran, to celebrate the 4th of July or to display your love for America, we have you covered with this new release. And don't forget about scrapbooking the photos you took at your July 4th celebrations. 

There is also a 4th of July sale going on right now in the online store. It runs through July 7th with savings of up to 70%. 

My card for today is featuring the Statue of Liberty die in a diagonal joy fold design. Here is a link to another card I made in this design with a complete tutorial. 

I looked at photos online of the Statue of Liberty to get an idea of the color. Over the years it took on a green patina with copper underneath. So, I attempted to recreate that color by using distress inks in salvaged patina and hickory smoke. 

For the background on this image panel, I used prized ribbon, salvaged patina and villainous potion distress inks for the ink blending. My buildings are cut from the City Skyline Slimline die and I added a few glittery stars to this panel. 

On the diagonal panel I used designer paper and I cut my July 4 phrase from the Stitched Alphabet and Stitched Numbers die. We have a new die in the Patriotic release - Happy 4th of July but I couldn't get it to fit on my diagonal panel. The red swirl is part of the USA Flag die that I had left over from another card. 
This is a photo of the card closed.
And here is the card inside. I used the Fireworks die.
Well, that's it for me for this post. Happy 4th of July and see you again on Saturday!


Saturday, June 10, 2023

Group Post Day 2 (Folk Art Dies)

Hello CottageCutz friends! Thanks for taking the time to stop and visit with us today. This post is day 2 of  cards using the new Folk Art release.   There are 19 new designs in this release and are so perfect for cardmaking, journaling, and scrapbooking. They allow you to add a beautiful touch of folk art to whatever you may be creating.

We have had a good response when we do a group post on a new release. It gives you the opportunity to see more card samples from the Design Team. There are 3 samples in today's post and we also showed  3 samples yesterday. See Day 1 samples here.

Also just released is our Patriotic 4th of July release with 12 amazing patriotic designs and bundle pricing at 40% off. If you love making patriotic cards to honor a veteran, to celebrate the 4th of July or to display your love for America, we have you covered with this new release. The DT will begin showing samples starting Monday and continue for the month of June.

Now onto our Folk Art Samples for today.

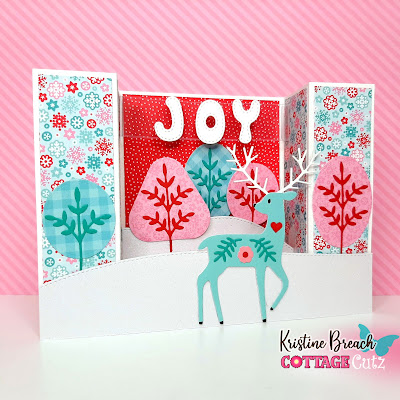
Card 1:  Our first sample today is from Kristine Breach.  She used the Folk Art Deer, Folk Art Trees, Stitched Alphabet and Hills Slimline dies to create a fun fold bridge card. It's such a beautiful Christmas card and it shows you how easily these dies can be taken into the Christmas season.
 
The use of non-traditional colors are so perfect way for a folk-art design card. This would also be a great home decor piece to display at Christmas. 

Card 2: Our next sample for today is from Marla Harris. She used the Folk Art Rooster, Folk Art Flowers Mixed, Folk Art Egg and the Fence & Grass dies to create a stunning mixed media thinking of you card. 
Her images are colored with distress inks. She splattered with water as well as white gouache to the images. She has captured the folk-art design in such a unique and beautiful way. 

Card 3: Our last sample for today is one that I (Mary Marsh) created using the Folk Art House (small and medium) and the Folk Art Trees dies to also create a Christmas card. I was inspired by Kristine's sample, so I decided to try a Christmas theme using these dies. I thought the house and trees would work well in a snow globe. 

For the globe I used the largest Circle Set die and then embossed with a snowfall folder. For the base of the globe and ribbon I used and old die -Snowglobe w/Fawn. I covered my images with a plastic window sheet. 
The Peace and Joy phrase is a die from last year's Christmas release. 


That's it for our samples for today. I hope we have given you some ideas for ways to use the new Folk Art dies.

Reminder: Marla has a new video on the CottageCutz You Tube channel and there is a giveaway. 

Dies used to create cards:


Tuesday, March 07, 2023

Happy Easter


Hello CottageCutz friends! Thanks for taking the time to stop and visit with us today. It's Mary Marsh here bringing you the Tuesday edition of the Blog.

We have a brand-new release of dies in the online store. It's our Flowers & More release. The individual dies are currently on sale for 30% off. This release has what we are calling "simple cuts". Meaning not as many pieces to put together so they assemble quickly.

They are so perfect for the many card making occasions that we all have. Birthdays, Thank You, Sympathy, Mother's Day or even a scrapbook layout just to name a few. Today for your viewing pleasure, I am featuring some of our older Spring release dies and I created an easy Easter card. 

I started my card with the colors from this week's color challenge on Splitcoaststampers #938. We were to use flirty flamingo, pear pizzazz and crushed curry for our color trio. Optional was to add any 4th color. I used gorgeous grape for my additional color. 

flirty flamingo, pear pizzazz, crushed curry
My card was inspired by an ad for an off-brand stamp company I saw on Facebook. I decided to recreate it with the challenge colors and CottageCutz dies to make it my own.

I thought the colors had a definite Spring vibe so I went with the Easter card idea. This one is a mini-slimline.
Grape Card Base: 6 1/4 "x 3 3/4"
White layer Panel: 6 1/8" x 3 5/8"
Grape Ombre Designer Paper: 6" x 3 1/2"

I used the Stitched Alphabet die for my Easter phrase. I cut the letters in the challenge colors using different dotted designer paper. 

I layered the letters on gorgeous grape ombre specialty paper. I loved all the sparkle this paper has. The Happy phrase is part of the Happy Easter Greeting die. This die also includes the bunny ears. I cut the ears in flirty flamingo and placed them above the letter A.  The happy word is cut from pear pizzazz cardstock.

The bunny feet are part of the Bottoms Up Bunny Baker die. That's it for today's sample. See you again on Saturday.

Reminder: Our YouTube Channel has a new video from Jen Hartsgrove. There is a giveaway for being a subscriber, liking the video and leaving a comment. Click here.

Dies I used to create card: