Showing posts with label Snowy Tree. Show all posts

Tuesday, December 07, 2021

Classy Christmas Card


Happy Tuesday Cottagecutz fans. It’s Wendy bringing you the blog today. We are less than 3 weeks until the big day so I wanted to create a quick and easy card, with flair and finesse. I also am so aware that I haven’t made my family cards yet so this will be my card of choice this year

I don’t have a full tutorial for this card as you will nail it in minutes but here are the instructions.

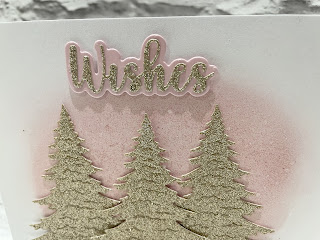
I used the Victorian Velvet Distress Ink to create a background. My choice of weapon is blending brushes as they give a beautiful background and there are no hard edges, it just blends so well. I then used a ‘Wink of Stella’ brush pen to flick some glitter on the card to give it some dazzle. It may be hard to see but the original looks to pretty. 

Next I used the Snowy Trees die and cut this out 3 times in non shed glitter card. I attached 2 of the tress to the card with glue and the middle one I used 1mm foam pads for dimension.

Finally I used the ‘Wishes’ sentiment to finish off the card in coordinating colours and we are done.

Here’s a close up, I really hope you can see how pretty the ink looks


Thank you for stopping by, It means heaps. I am going to be back on Friday with a full tutorial for you so have a wonderful week
Wendy

Ooh and don’t forget to keep logging onto our YouTube page for more inspiration. The designs are amazing


Dies I used:


Sunday, October 13, 2019

Peeking Reindeer

Hi!

It's Anja here. It's starting to get cold outside and slowly we'll be staying inside a lot more. Like this cute reindeer I did for today's card.


For this card I used:
- Cottage Cutz dies (Silly Holiday Reindeer, Springtime Window, Snowy Tree),
- Distress Inks,
- craft card base (12x18 cm),
- white card stock for die cuts and background (11,5x17,5 cm and 11x17 cm),
- pencil,
- scalpel,
- scissors,
- stone effect spray,
- heat gun, brick stencil,
- white pigment ink,
- paper glue.

First I cut and colored the reindeer.


Then the window and the tree.


Next was the background. First trimmed the paper and then sprayed it to give it stone like look. I dried it with the heat gun.


Then I used the stencil to make the background look like a brick wall.


Next I cut the hole for the window. I used brown around the edges.


Next I trimmed another a bit bigger paper for the background and a strip of white paper for the snowy ground. I used scissors for this and blue ink to color around the edges.


And then I just glued all the pieces together and my card was done.


I wish you all a nice Sunday and see you again next week.

Anja Z.


Cottage Cutz dies I used for this card:


Sunday, September 15, 2019

U Rock!

Hi!

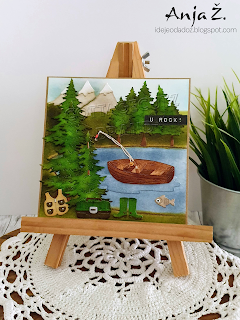
It's Anja here. I have fishing card for you today. I played with different dies to create this idyllic scene.


For this card I used:
- Cottage Cutz dies (Fishing Pole & Boat, Fishing Gear, Snowcapped Mountains, Snowy Tree, Rustic Sign & Trees, Woodland Cabin),
- Distress Inks,
- craft card stock (15x15 cm),
- white card stock for die cuts and background (14,5x14,5 cm),
- silver pigment ink,
- black pigment ink,
-  colored pencils (blue, light brown, dark brown),
-  sentiment stamp,
- scissors,
- paper glue.

First I cut and colored the boat and the fishing pole.


Next the fishing gear.


Then I cut and colored all the trees and the mountains.


And after that I started on the background. I sketched around the arranged die cuts and then colored the lake and the ground around. I used colored pencils to emphasize the edge of the lake.


Last I stamped the sentiment and cut it with the scissors.


And my card was done.


And that is all from me for today. I also invite you to The Scrapping Cottage online store to check out the new Christmas release.

Have a nice Sunday and see you again next week.

Anja Z.


Cottage Cutz dies I used for this card:


Tuesday, October 30, 2018

Husky with Christmas gifts

Hi, Janja is here!
As you probably already know, at the Scrapping Cottage blog this week is intended to present the Dakota Husky die. It's only available on their website.
Let me show you my card.


Supplies:
- CottageCutz dies: Dakota The Husky, Jolly Santa Claus (gifts), Snowy Tree
- white card base: 5,3 x 5,3" (13,5 x 13,5 cm), folded
- paterned paper: 4,5 x 4.5" (11,4 x 11,4 cm)
- white and colored card stock
- colored ink pads
- glue, double-sided adhesive tape, foam tape

First prepare a white card base, a stitched wide square frame and a hill. Cut the square from a patterned paper.


Cut out Dakota Husky, two gifts and snowy trees. 


Mark the inner part of the frame on the patterned paper with a pencil. Paste three snowy trees.
On the back side of the frame attach a hill and two snowy trees.
Fix the frame with a foam tape on the background. 


Finally, paste the Husky and gifts.


Happy Halloween! Have a lot of fun!  


Sunday, January 21, 2018

Walk in the Woods

Hi!

This is Anja again. My brother is finally doing better and we hope he'll be home in the next few days. We have a beautiful sunny Sunday here in Slovenia. Perfect for a nice walk in the woods. Like this fox I made for today's post.


For this card I used:
- Cottage Cutz dies (Fox & Bird, Birch Trees, Rustic Sign & Trees, Snowy Tree),
- Distress Inks (Wild Honey, Spiced Marmalade, Peacock Feathers, Broken China, Pumice Stone, Black Soot, Bundled Sage, Peeled Paint, Forest Moss, Pine Needles, Antique Linen, Tea Dye, Vintage Photo, Walnut Stain),
- craft card base (15x15 cm),
- craft paper for background (15x14,8 cm),
- white card stock for die cuts,
- paper cutter,
- white pigment ink,
- white pen,
- black brush pen,
- black liner pen,
- paper scissors,
- paper glue.

First I cut the card base. I cut the front for 6 cm. The inside of the card base was a little lighter, so I decided to cut another background (15x 14,8 cm) that's the same color as the outside of the card base. I used white pigment ink to add a bit of mist to the sky. I glued the background inside.


Then I used the dies and cut and colored all the pieces. I cut two sets of birch trees.


I colored the black parts with the black brush pen.


First I glued the birch trees on the card base. I cut two identical stripes of white card stock for the ground.  First is 9 cm long, the second is 14,8 cm long.


When I had the background finished, I added the remaining trees and animals. And this is the final result.


Have a nice Sunday and we'll see each other in a week.
Anja Z.

Cottage Cutz dies I used: