Showing posts with label Pierced Oval set. Show all posts

Monday, July 10, 2023

Just CHICKEN in ♡ I Miss You

Happy Monday everyone!

It's Kris sharing with you today some inspiration using our Folk Art collection!  I've used the Folk Art Hen to let someone know I'm just CHICKEN in ... cuz I miss them ☺


For this card, I used very few supplies and colors and let the cute dies and papers do the work!  I've used  the Folk Art Hen, Pierced Ovals, Scalloped Ovals, Stitched Sun, and some papers from 'On the Farm' pack by Doodlebug Designs.

Design Steps:


1)  I started with a 5-1/2" square top-folding card base and layered a grey square that was cut at 5-1/4". 

2)  I already had a left-over piece of this cute chicken paper that had an oval already die cut from it so I cut it down to 5".  (The oval size is the 2nd largest from the Pierced Oval dies) I cut a piece of red bandana paper just a li'l bit larger than my oval opening and attached it to the back of my chicken paper.  

3)  I used a strip of the chicken paper that was cut off  when I trimmed that paper to 5" and used the backside -- which has a chicken wire pattern -- and attached that to the lower part of my card. I then wrapped some natural colored twine around that strip of chicken wire paper, and tied in a somewhat of a bow.  Then added a cute red/white gingham brad and attached on top of the grey layer. 

4)  Next, I die cut a white oval frame by layering the 2 largest of the Pierced Oval dies together, taped them in place with a low-tac tape and ran it thru my machine.  Then I glued on top of the oval opening on card.


5)  I die cut my Hen from light grey, white, and red cardstock (to match the cute chickens on my paper!) and assembled.


6)  I noticed the red comb & wattle of my chicken were lost again the red bandana paper, so I die cut a Stitched Sun and placed behind her head ☺  I also added some white gel pen detail on all the red pieces.


7)  And lastly... I added some Scattered Straw (Distress Oxide Ink) onto a piece of white cardstock since that was the closest I thought would match my paper, and then ran it through my computer printer to get the sentiment on it.  Then I backed it with a Scalloped Oval and popped it onto card with foam dots.

****TIP:  I did try printing my sentiment first, then ink blended over it, but the opacity of this pigment ink just covered up my sentiment!  Lesson learned!  LoL.


Thanks so much for taking a look today!  I hope you are inspired to get crafty with your favorite CottageCutz dies!  These Folk Art ones are so cute and different - We'd LOVE to see what you are creating too!  Please use hashtag #cottagecutz when posting so we can find your projects!

~Kristine


Monday, May 22, 2023

Butterfly Thoughts

Hello crafty friends!

Kris here to share some Monday inspiration with you!  Today's card is a simple thinking of you card featuring the Spring Butterflies and some flowers and leaves from the Spring Frog w/ Mushroom and the Spring Potted Flowers w/ Bird dies.


I really like this color combo - it has an elegance to it which was fitting for this card.

Design Steps:

• I cut a pc of black cardstock to 6" x 9" and scored the 9" side at 4-1/2" for a side folding card.

• I cut a pc of Soft Suede cardstock at 5" x 3-1/2" and layered onto black.

• I die cut the 3rd largest Pierced Oval die 

---TIP:  after die cutting the shape, and before you take it out of the die, I ran my scoring tool (small ball end) around the inside of the die.  This gives a much deeper embossing than running it thru machine with embossing mat.  


here are the results 👍
(although, most of my oval ends up covered up, but it's still pretty!


• I stamped a sentiment onto the white oval.  I didn't use my MISTI and I think the sticker was a bit crooked so I got it a bit crooked too.  Clear stamps are so much easier to position!   To rectify that, I could have stamped first, then die cut 2nd (hindsight!) ☺

• I die cut my flowers and leaves from colored cardstock.  I ended up cutting more than what's pictured here because I never know how much I want to use until I start gluing things down.


• For my butterfly, I die cut it from a burgundy c.s. then I laid that over some pink c.s. and trimmed with my scissors a slight angle inward so the pink ends up a tiny bit smaller than the top one.  Then I glued it under my die cut butterfly. 


PRODUCTS I USED:


Just a couple of reminders:

• All the products in our Spring/Easter Release are 30% OFF!

• We're having a DESIGN TEAM CALL here!


~Kristine


Thursday, February 23, 2023

Happy St. Patrick's Day Pup

Hello Scrapping Cottage Friends,

We have a huge Presidents Sale going on in the store right now!  The sale ends tomorrow at midnight EST time.  You can save as much as 70% on some of the items.  It is a great time to stock up and cross off some of those dies on your wish list!! Check it out HERE.  

Today,  I am using 3 of the dies that are currently on SALE!  The Shamrock and Valentine ScottiePierced Oval Set,  and Spring Meadow.


Designer Steps:

1.  Use the Shamrock & Valentine Scottie die and cut the following colors of card stock: light gray, gray, green, light green, yellow, brown and black. Not pictured is the grass cut with the Spring Meadow die on green card stock

2. Ink the edges of the pieces with matching inks.  Assemble the pieces with a quick drying glue

3.  For the card base use an A2 cream card stock
  • Cut light green card stock 4 x 5 1/4
  • Cut cream card stock 5 x 3 3/4 and use the second from the largest Pierced Oval to cut the oval out of the center
  • For the oval backing cut a piece of cream card stock 4 7/8 x 3 5/8 
4.  On the 4 7/8 x 3 5/8 piece ink the bottom half with green
5.  Glue the cream inked card stock to the light green card stock.  Glue the pieces of grass as shown.  Use dimension tape on the back of the cream card stock with the cut out oval. Then pop it over the grass
6.  Glue the pup to the center of the grass
7.  I added 3 four leaf clovers to the edge of the card.  To give the clovers dimension I used a stylus, white ink pen for the little veins and to soften the white I went over it with my YG03 Copic maker.  I inked the edges of the leaves with a darker green ink.  I also decided to change up the sentiment to make it pop a little more.  Your card is complete

CottageCutz Products


Stop by the store today and save!!! 


We have more inspiration on our YouTube Channel check it out HERE

Thanks so much for stopping by!  And I will see you next Thursday.

Blessings and Take Care


Thursday, December 22, 2022

Frosty Friends

Hello Crafty Friends!

It is Pam sharing with you today! Merry Christmas to all!

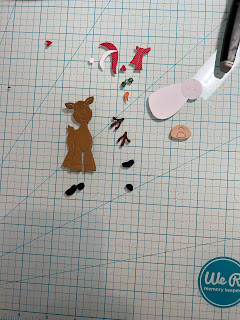
Well only 4 days left until the big day of celebration!! And of course I am getting a last minute gift ready.  And what is a gift without a handmade card!  So this is the last card of the season.  I used the Happy Reindeer and Snowman.


Design Steps:


1.  Using the Happy Reindeer and Snowman die cut out the following pieces of card stock:  brown, red dotted DP, green, black, orange, dark brown, and white.  Shade the edges with coordinating inks and a small applicator.  Assemble the pieces with a fine tip glue

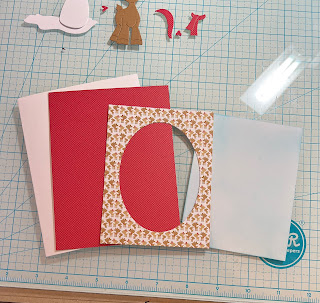
2.  Use a white A2 card base, cut red dotted DP 4 18, 5 3/8, cut a piece of reindeer DP 4 3/4 x 3 1/2 (using the 3rd from the largest Pierced Oval die cut the oval in the center of this reindeer DP) and finally cut a piece of white 4 1/2 x 3 1/4 and sponge or brush with blue ink
3.  Glue the red dotted DP to the white card base, next glue down the blue inked card stock to the center of the red dotted paper.  On the back of the reindeer paper add dimension tape and then pop it over the blue inked paper
4.  Add the snow to the bottom of the oval and then glue down the reindeer and snowman.  Add the bow and your sentiment and your card is complete

CottageCutz Products


We have more inspiration on our YouTube Channel check it out HERE

Thanks so much for stopping by!  And I will see you next Thursday.

Blessings and Take Care


Thursday, July 14, 2022

Daisy Birthday Wishes

Hello Scrapping Cottage Friends, 

We have a new release and it is just plain adorable.  It is called Strawberries and Bees perfect for those fun summertime cards. There are 16 designs in this new collection and you can get the individual dies for 30% off right now! This sale will not last so shop today to get the incredible savings.

Here is my card for today using the new release die Flowers and a fancy fold.  The idea for the fancy fold design is from Sharon Hashimoto Burkert.  I just loved her card so I had to give it a try.


Design Steps:

1.  For the fancy fold part of the card use a piece of black card stock 4 1/4" x 11" scored at 3", 5 1/2", 8", 9 1/2"
2.  The base of the card is a piece of black card stock 4 1/4" x 5 1/2" and white card stock embossed with a honey comb 4" x 5 1/4".  The decorative pieces for the fancy fold are as follows: two pieces cut at 1 1/4" x 4" (black checked and butterfly paper) one at 2 1/4" x 4" (teal flower paper) one at 1/2" x 4" (yellow checked) and white cut at 2 1/4" x 4" and 2 3/4" x 4".  The belly band is black 1 1/2" x 9 1/2"
3.  Glue the white honey comb card stock to the black base, glue the butterfly paper to the first flap, next is the black checked DP, 3rd panel is the teal flower DP, next two panels are the white and finally next to the white on the last panel add the strip of yellow checked DP

4.  Fold your fancy fold piece and glue it to the card base and then place the belly band around the card and glue the band together

5.  Using the Flowers die cut out 3 of the Daisies in white, 3 centers in yellow, and 4 leaves in green.  Assemble the flowers using a fine tip glue.  Using the 2nd from the smallest Scalloped Oval cut it out in yellow.  Using the 2nd from the smallest Pierced Oval cut it out in white.  Stamp the right side of the white oval with Happy Birthday and then glue to the yellow oval

6.  Place your belly band around the card and glue down the sentiment oval to the right on the band.  Glue one of the flowers just below the belly band and the other two flowers on the belly band as shown in the pictures above and below.  Stamp the inside of your card and it is complete

CottageCutz Products


Here is the new release so please check it out in our store today!!

We have more inspiration on our YouTube Channel check it out HERE
Thanks so much for stopping by!  And I will see you next Thursday.

Blessings and Take Care