Showing posts with label Melinda Beltran. Show all posts

Tuesday, December 19, 2023

Dog Treat Jar and Card Set

Hey crafty friends,
So glad you stopped in today! It is coming down to the wire before Christmas! Today I am sharing a super cute and quick gift for my little grand dog. Here is what I made.
I made this super cute card and little treat jar with tag for Kylo, my little grand doggy. He is the sweetest little guy! 

Here is a closer look at the cute little treat jar. I picked uup a jar from the dollar store and filled it wit little milk bone treats that are in red, white and green. I added this super cute little tag. It features the sweet little Christmas Reindeer Puppy die from the new Cottage Cutz Christmas Die release.


Here is a closer look at my card. It is a top folding card and I used the Doghouse w/Pup & Hydrant die as well as the Love My Dog, Love My Cat dies for the card. I also used the Wacky Stitched Rectangle set. I wrote his little nae on the cute little sign and I did the same with the word Grand.

Here is a closer look at the cute little tag. I put the little doggy onto the smaller rectangle wacky stitched dies. I cut the smaller of the two mats in patterned paper and the larger one in black cardstock.

Here is one last look at my cute little set.


Dies Used For This Project


Well, that about covers it for today. Be sure to keep up on all the fun and creative things the designers here are coming up with. Until the next time, have a wonderfully crafty day!
Melinda

Tuesday, December 12, 2023

Window and Plants Card

Hey crafty friends,
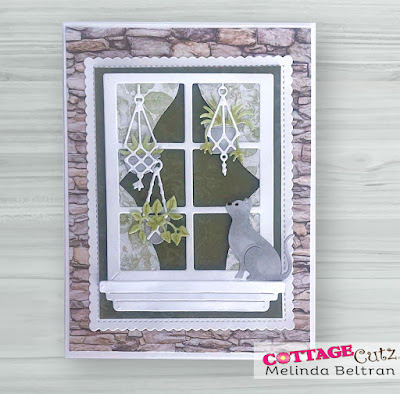
So glad you stopped in today! I am sharing another card with the fun Black Friday release from Cottage Cutz. Here is my card.

I created a top folding card. It is an A4 size. It is of white cardstock.  

I started by using the new window die cut. I wanted to make a curtain so I turned the die cut around and just made a quick outline.

I mirrored it and then cut them out.

I put the window on top of the curtain cut out. I then added that to a dark green paper mat and then placed those on the scallop stitched rectangle mat. I then added three of the cute hanging plants from that die cut. I added the cute little kitty die cut to the right of the window sill. 

I then added a stone paper mat to the base of the cardstock. I think that paper choice pulled it all together. I purposely left the card with no sentiment. I am either going to use this as a congratulations on your new home or a thinking of you for someone who loves plants.


Dies Used For This Project

Garden Window


Hanging Plants

Nested Scallop Rectangle Set
The one I have is currently out of stock. 
This is a great alternative.

Well, that about covers it for today. Be sure to come back real soon. You will want to keep up with my crafty adventures! Until the next time, have a wonderfully crafty day!
Melinda


Wednesday, December 06, 2023

Thank You Garden Flower and Urn Card

Hello crafty friends. Thanks for taking the time to stop and visit with us for the Wednesday edition of the Blog. 

It's new release time!!! We have our annual Black Friday release available now in the online store. There are 19 different designs, and they can be used for all seasons.

We also have our Christmas 2023 release in the online store that has 40 designs. It's an old-fashioned Christmas theme. You can pick up the individual dies at 30% off for a limited time.
 

Today I am sharing a very quick, easy and pretty Thank You card created with some fantastic dies from the new Black Friday Cottage Cutz release. Here is what I created.
I made a top folding 5.5 x 5.5  square card. I love the larger size card as the sentiment is very big and bold!
I started by cutting out all my various dies in white cardstock. I went ahead and chalked the edges of my urn to give it some dimension and really make it look more like the concrete/cement urns you typically see.


I then colored the stems of the flowers I used with my green marker. I left the flower tips of them white. I then added some Stardust Stickles to them to give them a little touch of pizzazz. nI mounted the finished die cut onto some blue cardstock and then all that was mounted onto one of the stitched square scalloped eyelet dies.

I then cut out more of my blue cardstock and then added a piece of floral print paper as an additional mat layer.

I then cut the sentiment, Thank You out of the same dark blue cardstock and decided to add that to the top of my card. I then adhered everything to my card base and done! I think it turned out so pretty and love the big bold statement the sentiment makes.


Garden Flowers


Garden Tub & Urn


Sentiment, Thank You

The Stitched Nested Scallop Square I used is out of stock. Here is a very good, close alternative.


Well, that about covers it for today.  Until the next time, have a wonderfully crafty day!
Melinda

Tuesday, December 05, 2023

Garden Tub And Flowers Thank You Card

Hello crafty friends,
Today I am back again sharing another easy, quick and pretty card using the new Cottage Cutz Black Friday release dies. Here is what I created.
I created a top folding A4 sized card. I started with black cardstock for my base. I used the new pretty Trellis background die and cut it out of white cardstock.


I then cut out flowers from the Garden Flowers die. I cut them in white cardstock and then colored them in.

I also used the Greenhouse Plants die and did the same, cutting them out in white and then coloring them with my markers.

Here is a closer look at the flowers once I put them in the garden tub die that is also a part of the new release. I cut the tub out in black and the handles in white. I colored the handles with a tan marker that made them look more wooden. I added some chalk and some white accents with my gel pen. I added the cute little Thank you sentiment from the Sentiment, Thank You Berry Much die. I colored it in the same color as some of the flowers.  I mounted all of that onto a double stitched rectangle mat with a piece of patterned paper for a little touch of color.

Here's a closer look at me adding in some diamond dots where the trellis lines meet. I thought this gave the background a little extra subtle touch.

Here is one last look at my completed card. I think it turned out really cute and love the almost farmhouse kind of feel I think it has :-)


Garden Flowers

Garden Tub & Urn

Sentiment, Thank You Berry Much

Trellis Background


Well that about covers it for today. 
Until the next time, have a wonderfully crafty day!
Melinda

Tuesday, November 28, 2023

Black Friday Vintage Mailbox New Release

Hello crafty friends!
Today I am sharing a card I created with the new dies released for Black Friday by Cottage Cutz. Here is what I created.

I created a top folding A4 card. I used some black cardstock for the base. I then used some pretty shabby papers for the mats.

I used some black ink to ink the edges of the mats to give them a consistent edge.

I used some black, white and patterned papers to cut out the pretty new vintage mailbox die. It is part of one of two special bundles for Black Friday. I used my gold pen to add some gold to the various cuts in the die. I wanted the word Post along with that pretty dove and the leaves to stand out. I did also dot around the black base with my gold stickles. I did also add some stickles to the centers of the flowers.


Here is one last look at my finished card. I did add the sentiment Hello from the new Hello Sunshine sentiment die from one of the new dies. I love how this turned out. I love the look of vintage, shabby chic but don't do it very often.


Vintage Mailbox

Sentiment, Hellow Sunshine


Nested Wacky Stitched Rectangle Set

Here are the Black Friday Bundles

Bundle #1

Bundle #2

Be sure to hit the sale while it is available.

Well that about covers it for today. 
Until the next time, have a wonderfully crafty day!
Melinda